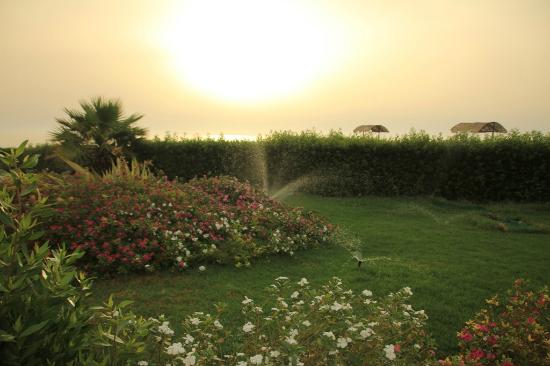
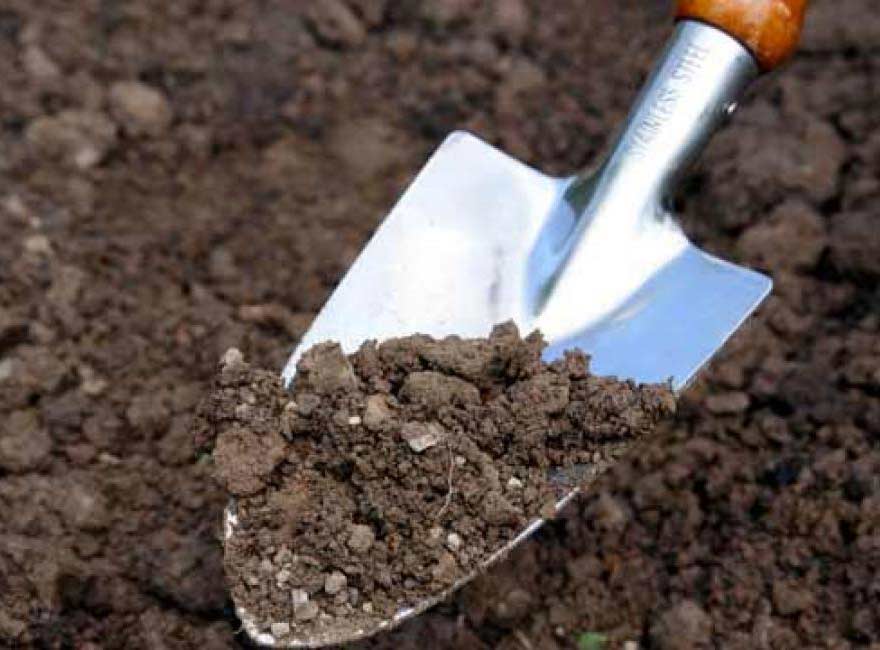
The often dry and overly hot summer weather is a real test for anyone, whether experienced or novice gardener. Many vegetable crops are characterized by the fact that they are not able to survive a long period of lack of rain. Accordingly, in order to replenish moisture, the owners of urban household plots are forced to water them daily with the help of such an element as a hose or from buckets. A much more difficult situation occurs during the period of lack of rain in summer cottages, where the majority have no way to regularly water the plants, because few of us can afford to come to the country house or greenhouses every day. Moreover, this applies not only to crops that grow in the garden, but also indoor plants.
In such situations, a good solution is irrigation using an autonomous system. Nevertheless, their use is absolutely meaningless when only 2–3 r. for a week, because the burning rays of the sun and overdried soil can literally destroy the future crop in 2 days.
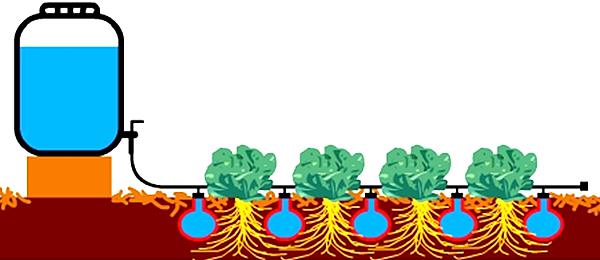
At present, there is a maximum effective method watering plants, which will enable them to consume water even when the owner of the dacha or garden (greenhouse) is absent. It means drip irrigation with your own hands - this is a method of watering, in which water is supplied in a small volume (literally one drop at a time), but regularly. In specialized traditional stores, as well as on numerous Internet sites, today it is possible to buy ready-made automatic systems with which drip irrigation is carried out.

At home or in the country, it remains just to assemble such a system and connect it to a water source. Nevertheless, it should be borne in mind that the cost of such devices is quite high, and their device is quite simple. In this regard, many modern gardeners and summer residents, who have discovered and understood all the advantages of this method of irrigation, create irrigation in the country or in the greenhouse, including from polypropylene pipes. Of course, before proceeding directly to the process of creating such a device, you need to carefully study the recommendations of people who are docks in this matter, and they know exactly how to do it yourself, as well as the fact that this process will definitely require a scheme.
The main advantages of such systems
A device of this kind provides an opportunity for every gardener or gardener / summer resident or owner of a greenhouse to feel a huge number of advantages, freeing him from a sufficiently large amount of all sorts of troubles (unless, of course, there is a high-quality filter in this system). But still, there are several main advantages of this system, namely:
Benefit #1: Save Water
When watering plants with a hose or auto sprinkler, excessive water consumption is observed. After all, a large amount of it spreads over the territory of the site and does not get where it is required, that is, at the root of the crop. At the same time, part of the water feeds the weeds, which are just what they expect, as a result of which they spread throughout the site as quickly as possible. In addition, a certain volume of water also evaporates, and also accumulates in the form of puddles in each depression on the paths.
![]()
In the process of using this system, the entire amount of spent water is coming to destinations, i.e. to the root system of the plant. This also applies to watering indoor crops, and watering in a greenhouse using pipes. According to the average statistics, in the process of drip irrigation, the water consumption is significantly less compared to other methods of moistening by at least 3 times, especially when a filter is installed! In other words, such irrigation is characterized by economical use of water and point orientation (and this also makes it possible for plants not to burn).
Benefit #2: This watering method requires minimal effort from the owner of the dacha/garden
Having installed an irrigation device of such a plan in his garden or summer cottage / personal plot, each of its owners will no longer have to carry hoses around the backyard, carry heavy containers that are filled with water. To start watering plants, a summer resident or a gardener using an irrigation system from medical droppers, for example, simply open the tap valve.
Benefit No. 3: The owner of the garden / cottage does not have to be present during watering
Systems of this kind, created in summer cottages or in a greenhouse, provide an opportunity for their owners (who, as a rule, are in the city all week) to get rid of worries about the timely wetting of their future crop - especially if you initially install a filter in the pipe system in order to so that she doesn't get stuck.
Benefit #4: This Watering Method Leaves Leaves and Plant Stems Dry
This fact is extremely important when there is a need to water crops during the burning midday period. If at this time the crops are watered using any other method, some of the water will necessarily fall on the foliage, which, as a result, is fraught with burns. If the owner of a summer cottage or personal plot wants to water the crops in the evening, then the water on the foliage can contribute to the occurrence of various kinds of fungal diseases or cause rotting of the roots of crops, including indoor ones. When using a system that implements drip irrigation, you can ignore such restrictions and water your plants whenever you want throughout the day - there is no irrigation scheme here.
Advantage number 5. With this irrigation, soil compaction is excluded
When a large volume of water is poured under crops using hoses, holes appear on the ground, which become covered with cracks after drying. The pipe system for drip irrigation of plants in the greenhouse eliminates this, eliminates the compaction of the earth, respectively, it is required to loosen the soil much less frequently. That is, there is a uniform moistening of the soil, without the formation of puddles, which is also good for any type of indoor crops.
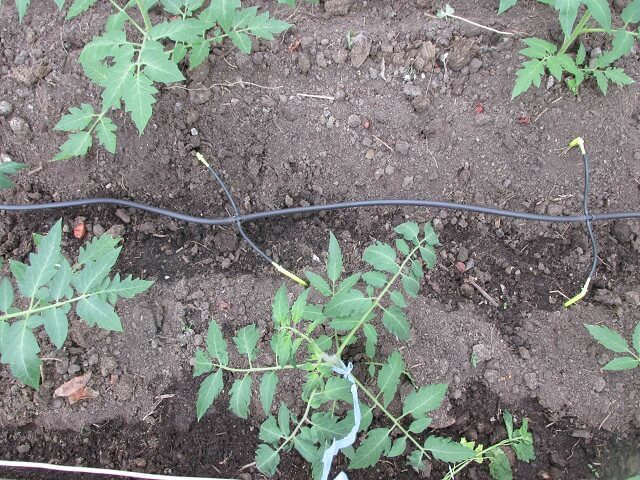
All the main advantages of this kind of irrigation have been identified and studied. Accordingly, it is possible to begin the process of constructing a system consisting of medical droppers, as well as elements such as supply hoses. Drip irrigation systems from improvised materials can be created with your own hands.
The device of a drip irrigation system from medical droppers
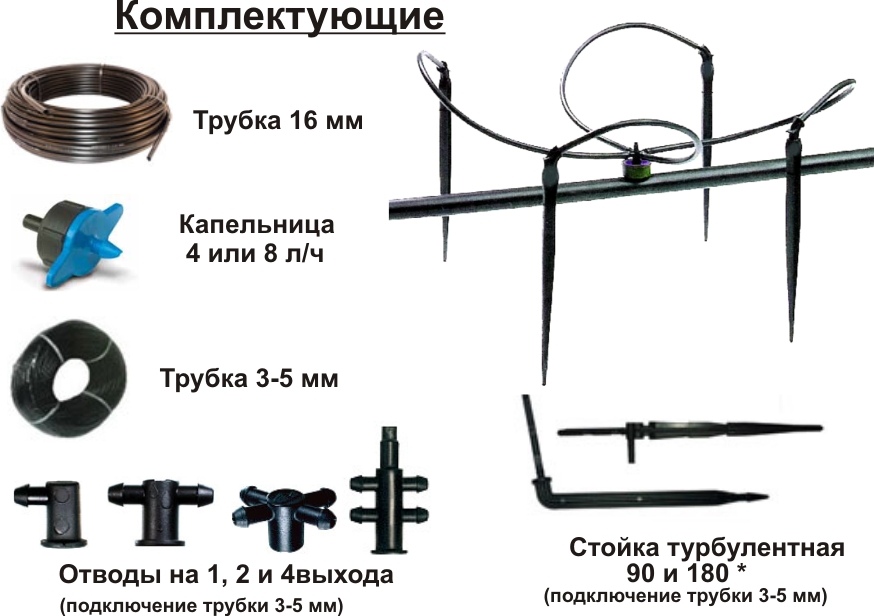
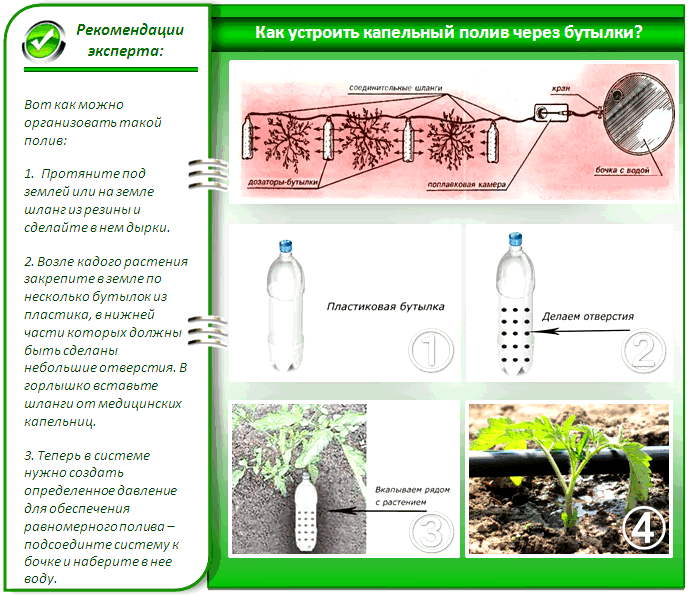
The creation of such irrigation systems is impossible without such materials:
- droppers;
- tees, plugs and connections;
- you need a quality filter;
- hose required.
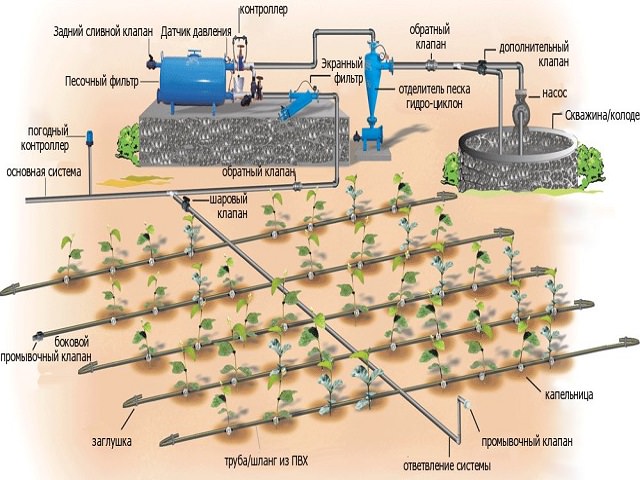
System Diagram
Initially, you should consider where the system will take water from - a preliminary at least the simplest scheme printed on paper will not hurt here. It’s great, of course, when a summer cottage or personal plot is equipped with its own water supply - in this case, the hose that will supply water for irrigation should simply be connected to it. If the water supply is on the territory of a summer house, a garden, a personal plot, then a container that has a large volume should be adapted for this purpose. For example, a barrel is well suited for this, which must be placed on a hill (2–2.5 meters from the ground level) - and thus create conditions under which water will be directed to the drip irrigation system from pipes by gravity. As a supply hose, you can use a plastic water pipe or a rubber hose (even a hose that has already been in use).
System design: main stages
First stage
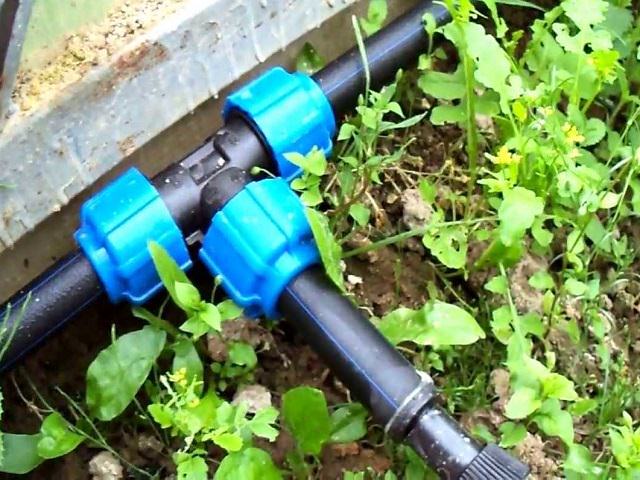
A supply pipe or hose should be laid along the bed. When the bed is not one, but several, it will be necessary to create a wiring - for this it is necessary to use tees, which allow you to connect individual parts of the pipes into the system as a whole.
It is important to know! When piping in the process of creating a drip irrigation system, it is always necessary to pre-plan it, so in some cases it must have many branches.
Second phase
Plugs should be installed where hoses end or pipes end. Then you need to make holes throughout the hose in the appropriate places opposite each culture. In the process of this, it is possible to use an awl or screw it into plastic pipe self-tapping screws (which, of course, then must be removed from the pipe holes).
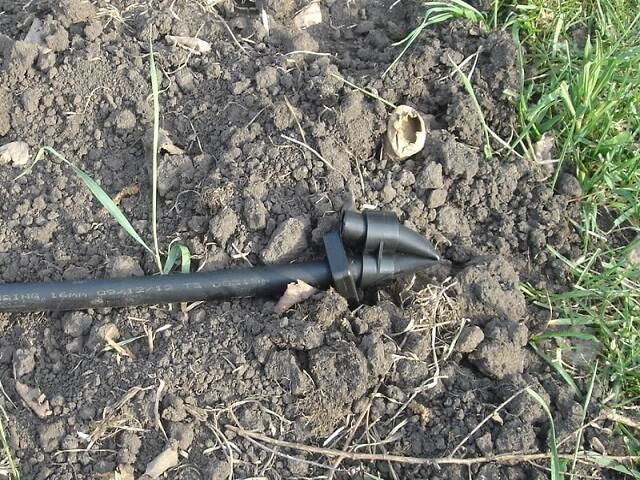
Third stage
It is necessary to insert the plastic ends of medical droppers into each of the holes that were made earlier. The wheels of medical droppers are movable and enable the owner of a summer house, garden or garden plot to adjust the amount of water that enters the plants through them and through the hose. Everything - a system that will carry out constant watering, completely self-made, is created!
Should know! For maximum efficiency, drip irrigation of cucumbers must be carried out constantly. – at the same time, the system must be adjusted in such a way that water is supplied in a minimum amount to each bush. And with high-quality cultivation of tomatoes, it is optimal to use more intensive watering, which will be longer in terms of the amount of time.
Systems of this kind for growing cucumbers, tomatoes or other plants become most effective when the land around the crop is mulched with a layer of straw, as well as peat mulch. As a result, this approach will provide an opportunity to significantly reduce the evaporation of water from the soil and deliver all the moisture received to the root system of plants. That is, mulching is a great way to increase the efficiency of this kind of watering. This applies to both indoor plants and greenhouse plants.
Rules for the care of systems made from droppers
When such a plan of systems is operated for a long time, sooner or later they become contaminated. As a result, the degree of efficiency of such irrigation systems is significantly reduced. If there is a decrease in the volume of water that comes from the dropper, you should carefully disassemble the entire system and thoroughly rinse absolutely all of its constituent elements. In order to prevent this kind of trouble, you should put a high-quality filter where the system starts to read.
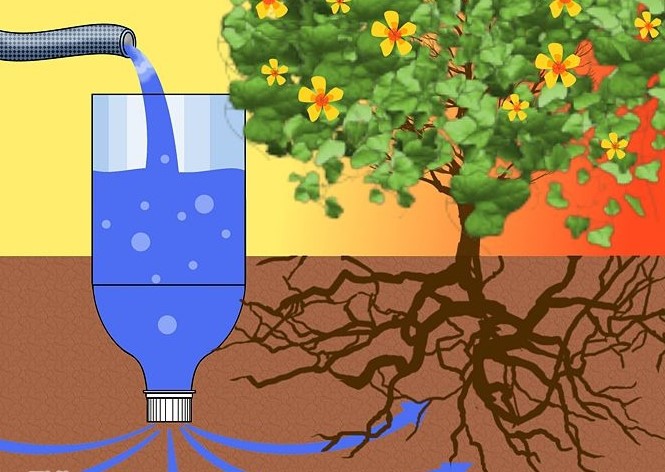
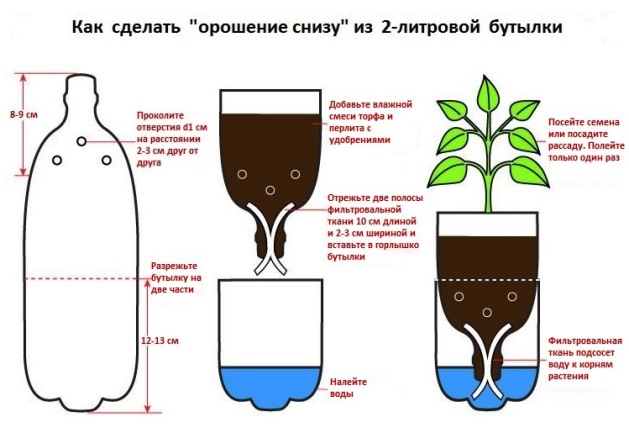
Creating a system from plastic bottles
It’s even easier to make your life easier and solve all the problems that are associated with watering plants in a country house, garden or garden plot - it’s to make a drip irrigation system with your own hands using ordinary plastic bottles. It should be noted that this system compared to the one described above from pipes and droppers, it is characterized by another advantage - in order to make it, absolutely no financial resources are required!
It should be noted, of course, that this kind of method, such as drip irrigation from a system made from plastic bottles, is not an alternative to full-fledged irrigation. Nevertheless this method perfect when you just need to maintain the normal development of almost any moisture-loving crop (cabbage, cucumber or pepper) in the hottest conditions summer period or when the owner of the garden, cottage, garden plot is absent for a long time.
The principle of operation of systems from ordinary bottles
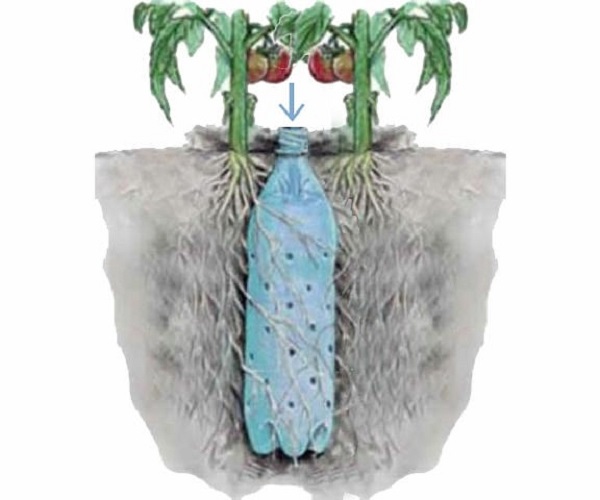
As it becomes clear from the very name of this system for watering the most different cultures(which grow in a country house, garden or garden plot), ordinary plastic bottles (from mineral or sweet water, as well as kvass or beer) will act as the main material. At the same time, it should be remembered that the larger the volume of plastic bottles, the more water the plants will be able to receive, respectively. The basic principle is that, as needed, the water that was previously bottled will independently gradually enter the soil and thus supply the plant with moisture constantly.
Making drip irrigation systems from plastic bottles
- In the wall of each of the bottles, using a regular awl, make as many holes as possible;
- After that, it is necessary to bury the bottles near each of the plants, leaving only their necks above the ground level;
- Water should be poured into the necks - due to the gradual seepage of water from the holes of the bottles, the necessary moistening of the space of the earth near the root system of each plant will occur, and it is from this earth that the culture will constantly be fed with moisture.
If you have suburban area there are several greenhouses in which cucumbers, tomatoes and other vegetable crops are grown, then you know exactly how much time and effort it takes to care for them. But what if work and other things do not allow you to be in the country every 2-3 days? How to ensure the watering of vegetables in the greenhouse, prevent them from drying out and get a rich harvest? The solution to this problem is a drip irrigation system.
Such a system not only saves time and eliminates the need to visit the infield every two days, but also provides other advantages. And for those who want to learn more about the benefits of drip irrigation and how to do it yourself, this article has been created.
Drip irrigation - what is it
Drip irrigation means special system irrigation of agricultural crops, in which moisture enters the ground drop by drop to the roots of plants grown in a greenhouse. Drip irrigation can be organized in the following ways.
In our case, the latter option will be considered as the simplest and most inexpensive to manufacture. The creation of such a system will be discussed in more detail below, now we will consider the general advantages of all drip irrigation systems.
- Water saving. Compared to a conventional hose or watering can, drip irrigation systems use significantly less liquid for equal or even higher irrigation efficiency.
- Reasonable moisture distribution. Having overdone with watering plants from a hose, a summer resident can turn the land in a greenhouse into a marshy swamp. With drip irrigation, this is not possible.
- Time saving. Any drip irrigation system, both connected to the water supply and stand-alone, requires less maintenance time compared to traditional methods glaze.
- By delivering water directly to the roots of plants, they growth is accelerating, and with such a system, the crop in the greenhouse can be obtained faster. In addition, the roots of vegetable and other crops are not washed away.
- The ground is mostly dry, the humidity in the greenhouse remains normal. As a result, the likelihood of weeds and the development of diseases in plants is reduced.
- Decreased Attrition Rate and soil erosion.
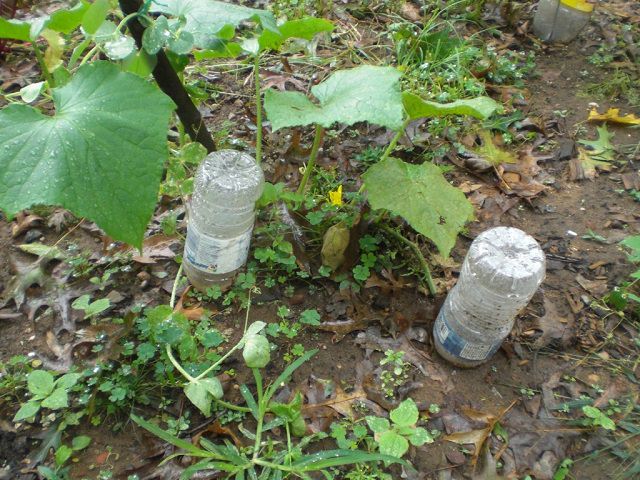
Advantages and disadvantages of bottled drip irrigation
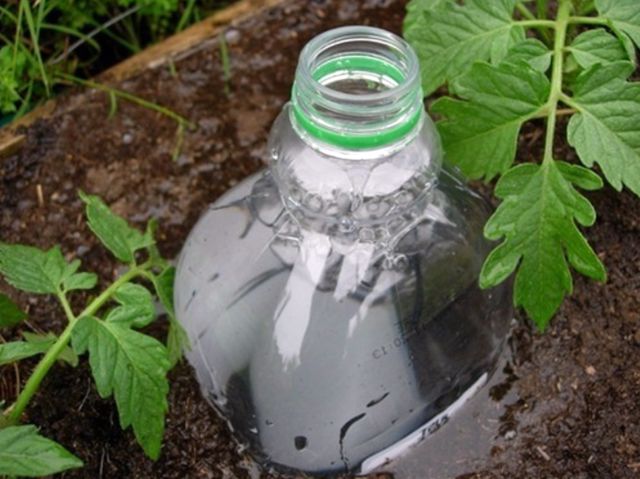
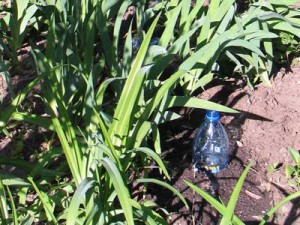
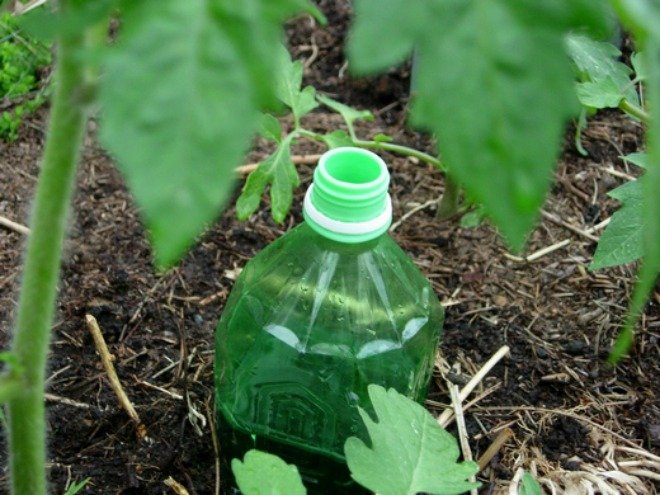
The device of such a system is as follows: a plastic bottle is dug in near each individual plant in the greenhouse, in which holes of small diameter are made. The bottle is filled with water, which, seeping through small holes, nourishes the roots of plants.
![]()
Important! Sometimes the bottles are not dug into the ground, but are hung under the roof of the greenhouse for each individual plant. In such cases, it is important to ensure that most of the moisture does not fall on the leaves, but on the ground, and directly at the roots.
Some of the benefits of drip irrigation have been discussed above, but what are the advantages of a bottled scheme? They are next.
- Cheapness. In fact, a system using plastic bottles is free - the main material for arranging drip irrigation can be found at home or purchased at a symbolic price.
- Ease of creation. Arranging drip irrigation from plastic bottles does not require any technical knowledge or special skills from you, absolutely anyone can handle it.
- Simplified care of seedlings and plants in greenhouses- with a similar irrigation scheme, there is no need for frequent visits to the plot. Now you can go on trips for work and other needs without worrying about the state of the future harvest.
- With bottles dug into the ground water will not get on the leaves or flowers, which means that the problem with sunburn of plants is being solved.
- autonomy- Unlike other drip irrigation systems that require a water pipe and a more or less constant pressure in it, drip irrigation from bottles needs only the water itself.
- Coming to vegetables, fruits and flowers water has the same temperature as air in a greenhouse, which has a positive effect on the condition and yield of some crops.
- Easy to repair or dismantle. If for some reason one of the elements of the system is out of order, then it is very easy to replace it - the bottle is dug out, and a new one is dug in instead.
But the system also has its drawbacks. The disadvantages of drip irrigation using bottles are presented below.
- The complexity of creating such a system on a large area. Therefore, if you have a lot of greenhouses, then it makes sense to think about another, more advanced method of drip irrigation.
- There is a possibility of clogging bottle holes, especially when used on soils containing large amounts of clay.
- Due to its primitive nature, such a system is not able to completely replace irrigation, therefore, sometimes it will be necessary not only to add water to bottles, but also to supplement drip irrigation with the same watering can. For a full-fledged and requiring a minimum of watering effort from you, it is preferable to use specialized drip tapes and dropper dispensers connected to the water supply.
Necessary materials and tools
To arrange drip irrigation using ordinary plastic bottles, you will need the following materials and tools:
- plastic bottles;
- a piece of cotton fabric or old nylon stockings;
- shovel for digging holes for bottles;
- ruler for measurements;
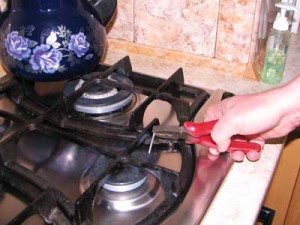
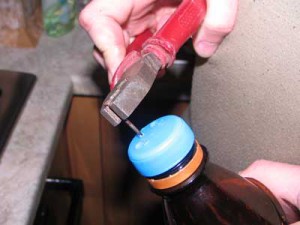
- sharp nail, thick needle or awl;
- a lighter, a fire or other source of open fire, on which a nail or needle can be heated.
Before you start arranging irrigation, you need to figure out how much bottles are suitable for plants in your greenhouse. The choice depends on the crop being grown - some require more moisture for themselves, while others, on the contrary, less. Also, consider the weather in your area - the higher the temperature, the more water you will need. And, of course, the volume of containers depends on how often you are ready to visit the cottage.
Important! Keep in mind that the temperature inside the greenhouse is higher than outside. And the plants will need more water. In this case, the increased moisture consumption is compensated by faster maturation and, subject to the cultivation technology, a plentiful harvest.
Table. How long does one plant last a bottle of a certain volume.
As you can see, it is not advisable to use small containers - bottles from 0.5 to 1 liter will require frequent "refueling", which will force you to visit the garden as often as before.
The best option is a container with a volume of 1.5-2 liters, using which you can come to the dacha once a week to “refuel” the containers, additional watering and perform other work that plants in the greenhouse require. If the crop being grown requires a lot of water, then large bottles of 5 liters should be preferred. But keep in mind that a five-liter plastic container takes up a lot of space and a hole for it must be prepared of the appropriate size.
Some of the summer residents may have a question: “Why do you need fabric for drip irrigation? Perforated bottles not enough? The problem is that these holes can become clogged and clogged with earth over time. To prevent this, outside (and sometimes inside) that part of the bottle where the holes are located should be wrapped in an old nylon stocking or a piece of cotton fabric. Water will seep through it, but the earth will not get inside.
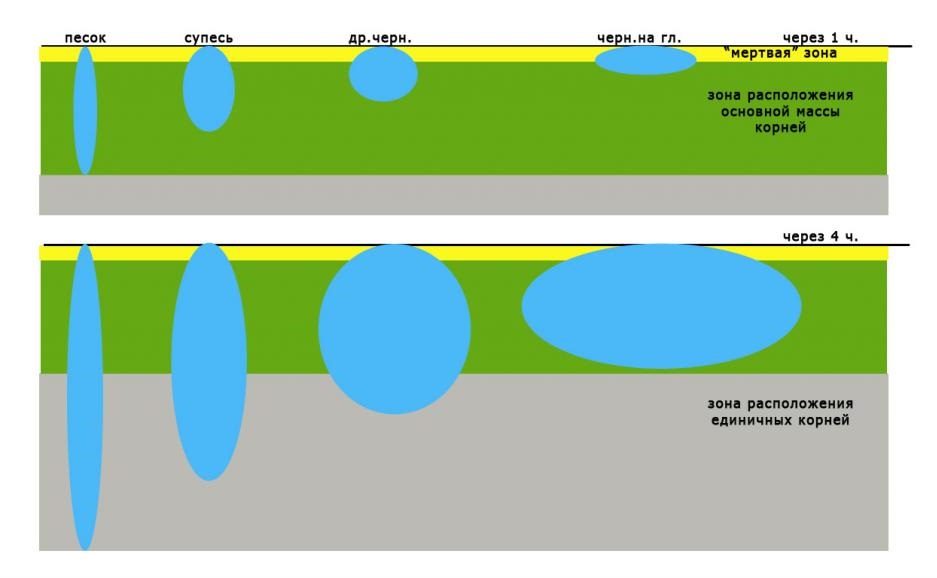
Another issue that needs to be considered is how many holes and what diameter should be made. Their number should depend on the properties of the soil - the worse it absorbs moisture, the more holes will be required. So, if you bury a bottle in a hole with the neck down, then 2-3 holes are enough for sandy soils, and 4-5 for clay soils.
Advice! If clay soil does not absorb water well, then the holes in the bottle cap can be replaced with a piece of foam rubber that closes the neck.
Holes in a bottle or cap are punched using a hot nail or needle on a stove / lighter. The optimal diameter is from 0.5 to 1 mm. Figures of 1.5-2 mm are the maximum allowable, with b O Higher values will drain the water too quickly.
As for the ratio of bottles and plants in the greenhouse, the ideal option would be 1: 1 - one plant per container. If there is not enough space or the culture does not require a lot of moisture, then you can use one bottle (preferably 2 or 5 liters) for 2, 3 or even 4 plants. But, accordingly, more holes will need to be made in the container.
Important! It is best to install a drip irrigation system from bottles at the time of planting seeds or seedlings in the soil, so that when digging the hole, the root system of the crop is not damaged.
Method number 1 - Dig into the ground
In total, there are four ways to arrange drip irrigation using plastic bottles. The most common of them is digging into the hole upside down. Step by step it looks like this.
Step 1. Near each plant, individually or between two adjacent plants, a hole is dug 10-15 cm deep and with a diameter equal to the diameter of the bottle.
Step 2 Using a ruler from the bottom of the bottle, measure 3-4 cm up.
Step 3 With a red-hot nail or needle from this place in the bottle, holes are made in 2-4 rows in a checkerboard pattern. The number of holes depends on the density of the soil, but on average it is about 10-15 pieces.
Step 4 The container is wrapped with cloth or nylon so that all openings are closed. This is necessary to protect the holes from clogging with earth.
Step 5 The bottle is inserted into the hole upside down.
Step 6 To prevent debris or earth from falling into the water from above, close the neck with a piece of gauze or nylon.
How to arrange drip irrigation through bottles
Important! If you do not want the water to evaporate from the container into the air, put a lid on the neck, but make at least one hole on it (the lid), otherwise the bottle will shrink when empty.
Method number 2 - Stick the neck down into the ground
The second method differs in that the bottle is inserted into the hole on the contrary, bottom up. Accordingly, holes are made either in the neck or in the lid. It looks like this.
Step 1. A hole is prepared with a shovel near the plant in the greenhouse. The diameter remains the same as in the first method, but the depth of the hole is much smaller - along the height of the neck of the container.
Step 2 In the neck or lid itself, several small holes are made with a hot nail. Their number depends on how dense the soil is and how well it absorbs moisture - the better, the fewer holes should be, and vice versa.
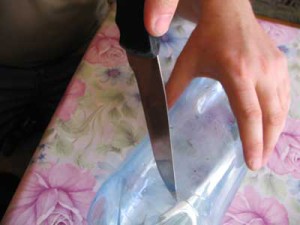
Step 3 4-6 cm are measured from the bottom and the bottom of the bottle is cut off with a clerical knife or ordinary scissors. If you do not want garbage to get into the container from above or moisture to evaporate from it too quickly, the bottom must not be cut off completely, and then bent to the side, like a can lid.
Step 4 The part of the container where the holes are located is wrapped with a cloth. If desired, the fabric can be put inside, in the bottle itself.

Step 5 The neck of the bottle is buried in the hole. If desired, the container can be buried at an angle of 45 degrees towards the root system.
Compared with the first method, digging a hole for a similar design of an irrigation system is a little easier, but water is not delivered to the entire root system of the plant, but only to the lower part. The choice of the preferred option is up to you.
Method number 3 - Hang over plants
If you do not want to expose the root system of greenhouse crops, then the drip irrigation system can be placed not next to the plants, but above them. In addition, with this method, the soil around the roots is not eroded.
Step 1. A series of holes is made at the bottom of the bottle, as for the second method. And in the same way, a part of the bottom is cut off from the container with scissors.
Step 2 With a needle or nail at the bottom of the bottle, a couple more holes are made for wire or twine, on which the container will be hung in the greenhouse.
Step 3 The bottle is fixed in such a way that the distance from the neck to the ground is from 35 cm to 50 cm.
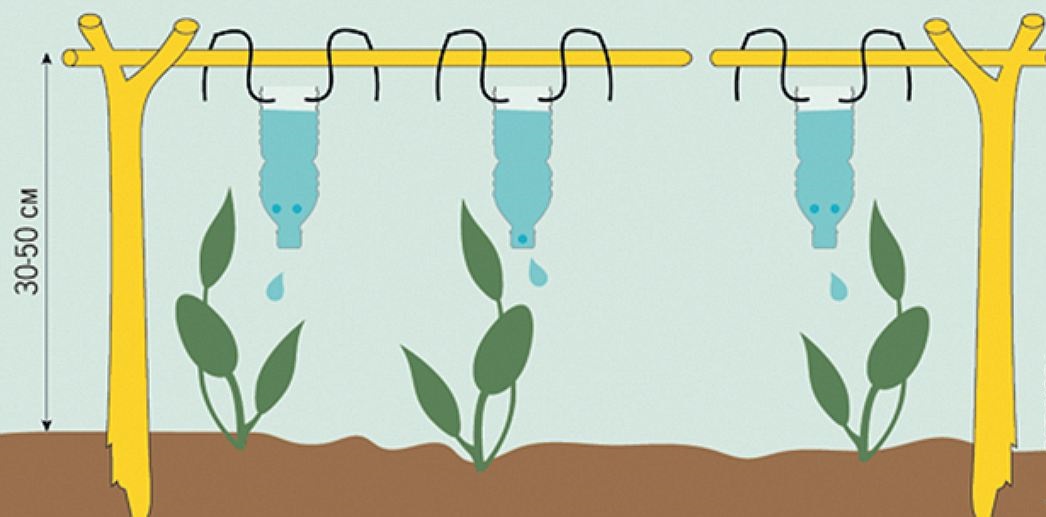
Try to position the bottle so that most of the drops fall on the ground next to the stem, and not on the leaves. Thus, more water will reach the roots, and the probability sunburn leaves will be much smaller.
Method number 4 - Using special nozzles
The last way to create a drip irrigation system will cost you a little more money, but it will save you from digging holes and working with a nail and bottles. At your local garden supply store, you can purchase special dispenser nozzles that can be screwed onto bottles (except five-liter ones) instead of regular caps.
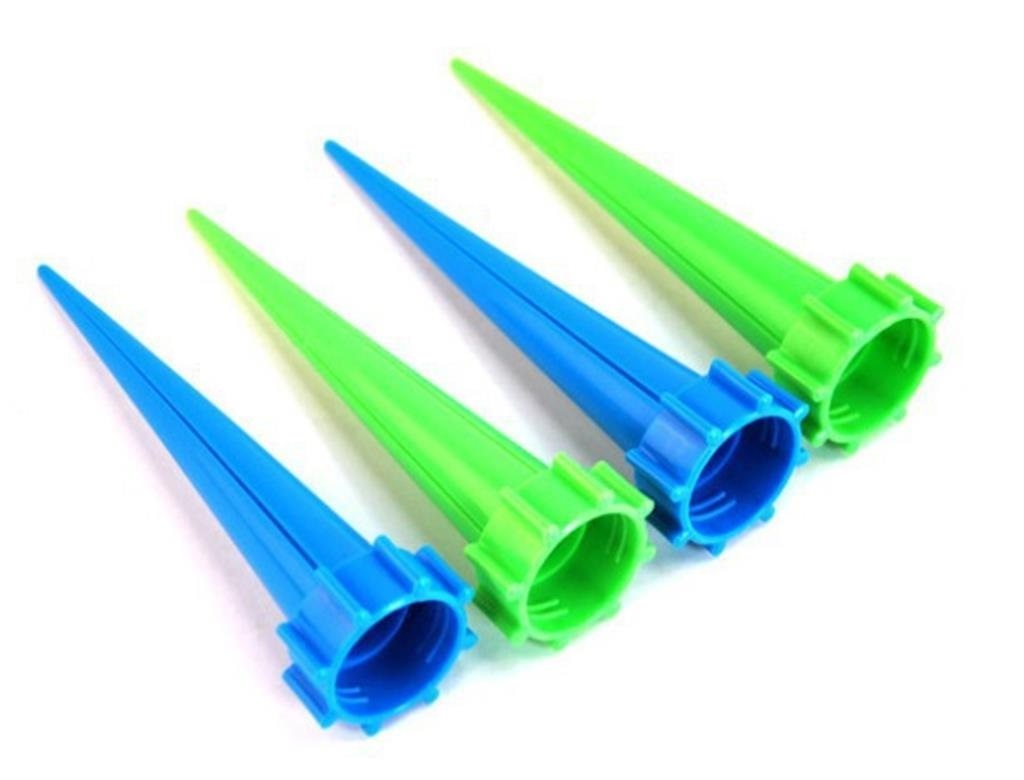
A container with such a nozzle is turned upside down and inserted into the ground at some distance from the stem of the plant.
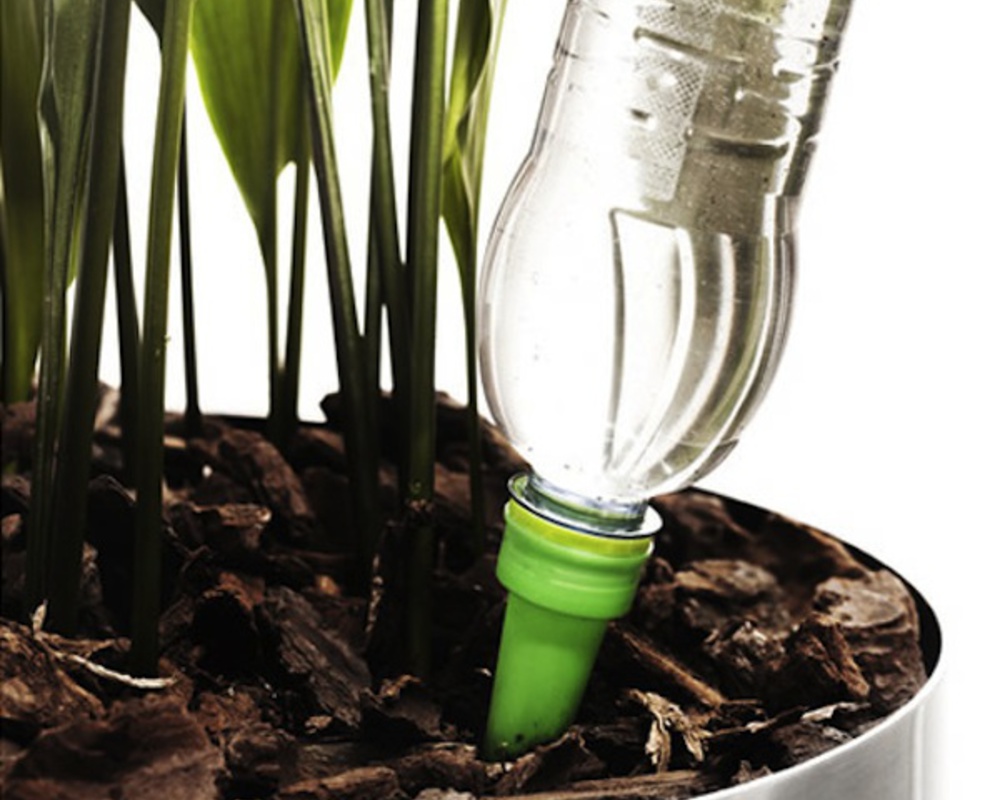
This method is especially convenient when working with small crops or flowers.
Another variation of drip irrigation: only one hole is punched in the bottle, a ballpoint pen is inserted into it. The writing tip is pre-removed, the remaining ink is washed out with alcohol. The rod is directed to the area for irrigation and fixed with garden pitch or just plasticine.
The original version - drip irrigation using droppers
As you can see, arranging a drip irrigation system from bottles in a greenhouse does not require much time and effort, and the results of the work will save you a lot of trouble in caring for greenhouse plants.
Video - Do-it-yourself drip irrigation from plastic bottles
Have we answered your question?
Many amateur gardeners often think about how to improve the system for cultivating their piece of land. One of the most pressing problems, in the event of a long absence of rain, is the provision of plants with water. Otherwise, the entire future crop may be in jeopardy.
Not every site is located next to a natural source of water - a river, a pond, especially - such a technical convenience as a water pipe. It is possible to store liquid in large containers, but this is a rather laborious process. In the case of even passing a street water supply near the dacha, watering the garden with a hose takes some time and effort.
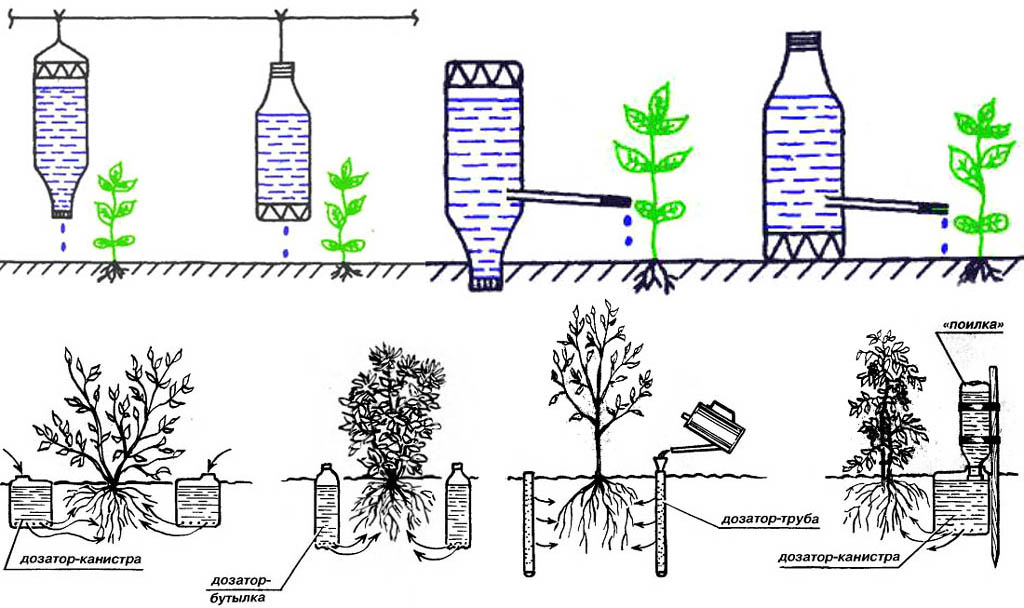
The exit exists. Simple and convenient designs of metered water distribution will provide plants with a constant supply of moisture for some time. Consider a number of examples of the implementation of water supply under the root system of vegetables without human assistance. The formation of the procedure for continuous supply to the personal plot will be discussed in this article. Dosed distribution of liquid by drip from plastic vessels is the most effective and reliable method.
This provision will help those who wish to work personally, without involving outside specialists, since there are some subtle circumstances and requirements. One of the main tasks in drip and metered irrigation is not the use of labor and ensuring a constant supply of moisture for a certain amount of time. Thus, the gardener can not worry about the harvest and get the desired result.
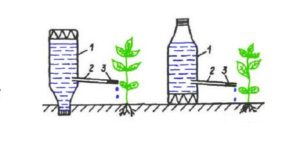
In such products, auxiliary means are not used to provide moisture to the root system of plants, but only containers made of polyethylene and an unnecessary ballpoint from a fountain pen. The technology for preparing a miniature system for is as follows: - take used ballpoint refills from fountain pens and remove the drawing element itself - a ball; - clean the cavity of the rod from the remnants of the writing composition with a solvent; - plug one of the ends of the rod. The role of cork will be played by any thin wooden stick. - at a distance of 4 millimeters from the cork in the rod, make a hole up to 0.5 millimeters.
This diameter is not a fixed size once and for all and, if necessary, it can be increased. However, the owner himself, by empirical method, will establish the desired size of the hole. For vessels with a capacity of 1.5 to 2 liters, this diameter is usually less than the diameter of the ball rod. Sealing paste can be used to satisfactorily seal the hole.
Methods for equipping polyethylene vessels for metered irrigation
 Method number 1
In this case, in a plastic container, remove the bottom and cut through the leak a little above the middle part of the bottle. We insert a ball rod into the leak and seal it so that water does not flow out. Then the container with a well-twisted cork is installed in the ground upside down and securely fixed.
Method number 2
In this version, the leak with the rod installed in it is cut out at a distance of 2-2.5 centimeters from the bottom of the bottle. The container is placed on the ground and fixed, and water can be poured through the neck, as usual. Having installed containers near, monitor the operation of the system. It is even possible to determine the amount of water spent per unit of time. The desired value depends on the volume of the container, on the diameter of the ball rod and, of course, on weather conditions.
The most primitive options for artisanal irrigation
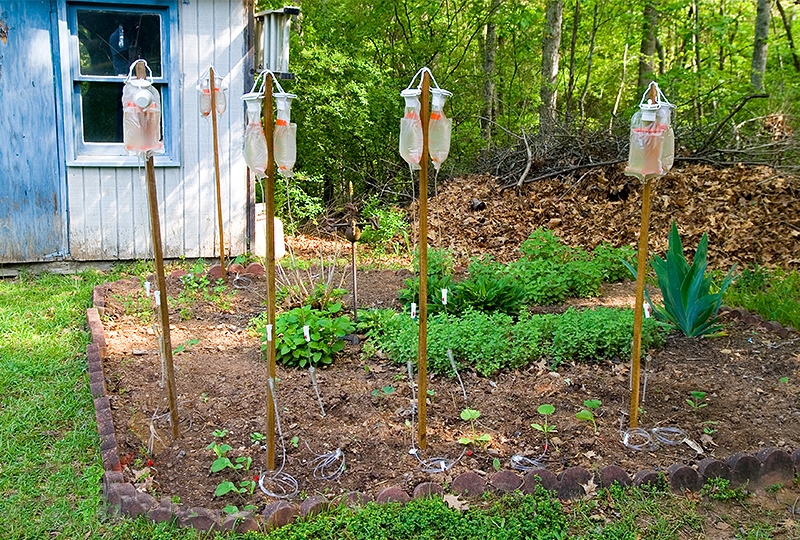
Instead of the two proposed methods, it is possible to use an absolutely simple and reliable way- pierce a hole in the container itself. In this case, it must be taken into account that the smallest diameter of the hole is desirable, and it should be made at the bottom of the vial. The installation of the bottle also involves two solutions: the first - near the root system of the plant in the ground, the second - suspended on a wire or twine above the plant. For effortless irrigation, use plastic flasks with absolutely no action.
Fill the containers with water, unscrew the cork and place the bottle near the stem of the plant. A certain period will pass and the water will run out, then refill the bottle. This process is quite simple and effective. Such methods of watering garden vegetables are also used using various polyethylene containers. Make a hole up to 0.4-0.5 mm in size at the bottom of the bottle in order for air to pass through, and pour liquid into the container. Then turn the flask upside down, fix it securely in the ground near the stem.
Try not to touch the roots of the vegetables. Capacities are used in a completely unexpected and original version. For example, it is taken plastic bag and a small hole is pierced in it. Next, pour the liquid, tie the bag and place it on the ground, near the roots of the plant. The principle of operation is similar to bottle irrigation - the liquid evenly and gradually leaves the bag and saturates the soil around the root structure. If there is no need to perform metered irrigation, and the only task is to maintain sufficient air humidity, then everything is much simpler.
But this remark applies only to closed greenhouses and greenhouses. Place open containers filled with water on the aisles and along the perimeter of the room. This method is used in the long absence of a gardener in the country. High humidity guarantees plants nutrition for a certain period of time and prevents accelerated drying.
Advantages of the dosed irrigation method
 The proposed method does not require financial and material costs. The owner does everything. with my own hands, special skills are not required, and the things used, usually, no longer represent any value. During normal watering from above the plants, water gets on the leaf, and not on the soil, which is not desirable for some vegetables, and the water consumption increases. With our humidification system, water is directed directly to the root. Excessive air humidity in a greenhouse adversely affects the development of plants due to an increased risk of their diseases. And with a drip system, the amount of moisture in the air practically does not change. With drip irrigation, the liquid approaches the root structure of plants gradually and dosed, without over-moistening the soil, and preventing it from drying out in the absence of watering for a long time.
Moisturizing the soil with plastic bottles
 Gardeners and gardeners use the following options for irrigating crops: using hoses directly between rows of vegetables and other plants, simulating sprinkling with special spray nozzles. With all the advantages of these methods, they have a huge drawback - a large flow rate of liquid, which, with a water meter installed, results in additional financial costs.
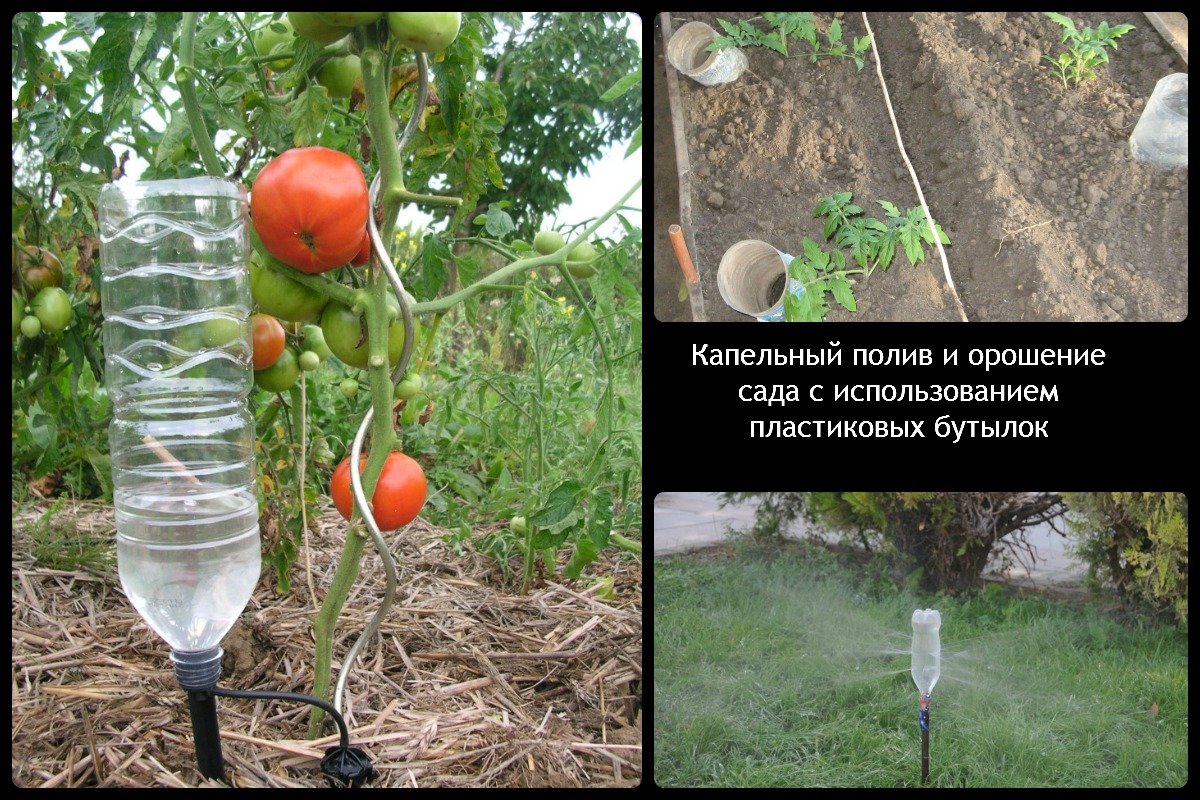
To prevent such a sad development of events, gardeners and gardeners use plastic bottles, flasks and other plastic vessels. Economical watering with the help of assistants can significantly reduce water consumption and material costs. The most effective bottle volume is between 2 and 5 liters. At drip method irrigation of the garden and vegetable garden there is no need to visit the summer cottage often.
Sprayers from polyethylene containers
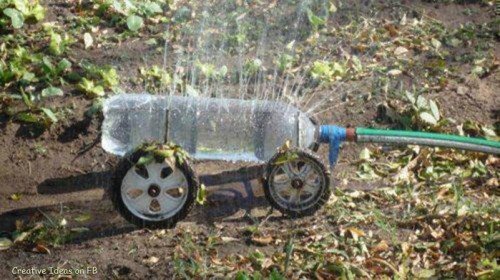 In order to make a homemade sprinkler, you need to find a plastic bottle with a cap on the farm. Then measure the diameter of the thinnest element of the handle, make a slightly smaller hole in the vessel and, shortening the polyethylene handles to 7 centimeters in length, insert into each individual hole. Take a garden hose adapter and insert it into the hole in the container lid. It must be fixed with silicone glue. Apply glue to the neck threads as well and screw on the cap.
After connecting the system through a hose to the water supply, turn on the water supply. Existing methods of drip irrigation organize the supply of liquid at a minimum flow rate and directly to the root structure, supplying horticultural crops with constant moisture. This method of dosed watering, when used in greenhouses, does not allow the active growth of weeds, does not allow the soil to dry out, reduces air humidity, preventing the formation of mold and other putrefactive processes.
How to use plastic utensils to irrigate the root system of crops (video)
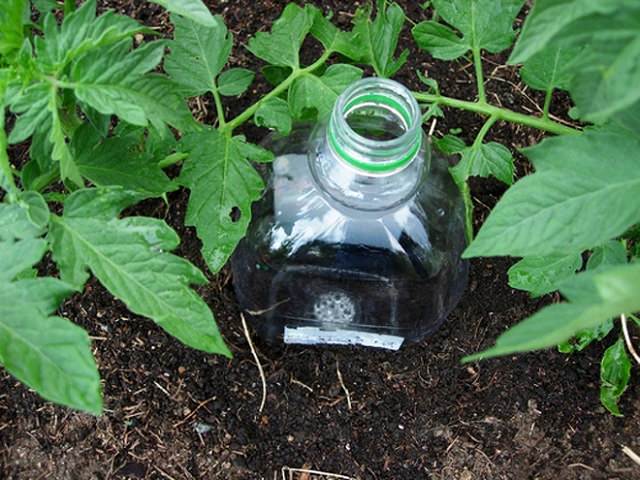
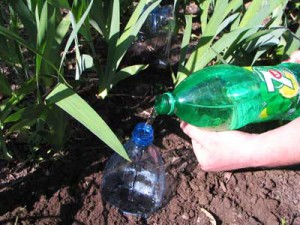
Tomatoes clearly prefer watering under the root structure. At the same time, plastic dishes with a volume of 2.5 liters are taken, the bottom is cut off from it, which is later used as a lid to reduce evaporation. The bottle is securely closed with a cork and two holes are made in it with a diameter of 2 millimeters using a hot nail (100-120 mm). Practitioners are advised to select the number of holes empirically. The next step is the location of the container.
It is desirable to install it next to the stem vegetable crop. The most convenient moment for equipping the system is right during the period of planting in the ground. But this is not a dogma and installation is possible at any desired time, because if there is enough rainfall, then there is no need for additional irrigation. To install the container at a distance of 20 centimeters from the stem, we excavate the soil to a depth of 15 centimeters. We watch so as not to damage the root structure of the plant. Then we bury the bottle at an angle of 35-45 degrees. This problem often happens to beginners - earth gets into the holes and water stops flowing into the soil.
To prevent this, put non-flowing material on the bottom of the recess - rags or dry grass. You can also tie this impromptu protection to the neck, then the earth is guaranteed not to clog the holes. The system of this irrigation is very simple: passing through the rows between the beds, we fill the bottles with water, which will gradually be supplied directly under the root of the crop. In this way, it is possible to make various top dressings in the form of fertilizers, while significantly saving them. This type of watering is used to care for many plants: pumpkin, tomatoes, cucumbers, peppers and others.
If the owner is not satisfied with the look of the garden, when a lot of bottles spoil the aesthetics, then drop the containers upside down. But you will have to add water through a funnel. Many gardeners complain that with metered watering, the top layer of soil under the crop looks dry and it is difficult to determine whether the root is getting enough moisture. The answer is simple - appearance plants, fruiting and development is the best indicator of proper care. When a person lives far from a personal plot, and there is no way to water vegetables daily, then the drip irrigation method is suitable as the most profitable option.
How to equip watering with plastic bottles, see our video
Watering the soil- the most important link in the care of a greenhouse plant. In case of temporary impossibility of regular manual irrigation of the land, they come to the rescue laws of physics and tools.
Moisturizing the soil using a dug-in plastic bottle - ideal alternative to conventional watering.
Want to know more? Subscribe to our VK public, there is all the most delicious from the editors and interestingness from readers:
In contact with
If the air in the greenhouse is dry and hot, then in order to organize watering with the help of dug plastic bottles, for each plant from the greenhouse you will need 1 liter and a half.
At moderate humidity and temperature soil is appropriate to use 1 bottle for 2-3 plants.
for irrigation moisture-loving or large greenhouse inhabitants use 3-5 liter containers.
1 way "down the neck"
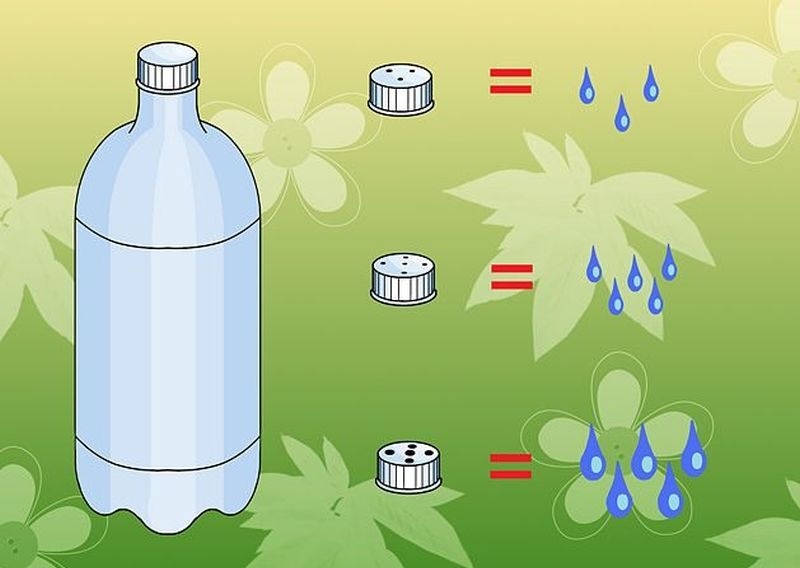
- Make a series of small holes with a needle in the narrow part of the bottle, located at the neck. The number of vertical rows of holes should correspond to the number of plants being irrigated.
- Cut off the bottom.
- Wrap the bottle in cotton cloth to keep soil particles from clogging the holes.
- Dig a hole 10-15 cm deep between the roots of the plants.
- Place a homemade sprinkler with a closed lid, neck down, turn the holes towards the root system.
- Cover the bottle with earth, fill to the top with water for irrigation and cover the bottom with a plastic cap to reduce evaporation of the liquid.
Don't make big holes whose diameter exceeds the thickness of the needle. Through them, the water will leave the tank early, because of which the plant may suffer from dehydration.
Important. Do not use containers from under aggressive liquids(solvents, glass cleaners) and oils. The remains of these substances on the walls of the bottle pollute the soil and have a detrimental effect on plants.
 It differs from the above method in the absence of the need to cut off the bottom of the container. Holes are being made indented from the bottom by 2-3 cm.
In case the water runs out in the bottle ahead of time, the liquid remaining at the bottom for some time will be able to compensate for the lack of moisture.
Bury the bottle in the soil up to the neck. Cover your neck, but do not screw the plug so that the container does not shrink as it empties.
Interesting. The use of this method provides longer irrigation period due to the existing "reserve" of liquid at the bottom and a smaller area of moisture evaporation through the neck.
How does the method work?
Irrigation with bottles dug into the ground is based on moving fluid from a wetter environment to a drier one, i.e. along the moisture gradient. Speeding up the process contributes to the gravity of the water.
When the earth is saturated with moisture, the flow of water from the bottle slows down due to the leveling of the gradient.
With this method minimizes the likelihood of overdrying or excessive moisture in the soil.
Benefits of Irrigation with Bottles
- Undoubted cheapness thanks to the use of improvised material in the manufacture of the sprinkler.
- Simple and fast design application.
- Time saving. The need for frequent visits to the greenhouse to check soil moisture disappears.
- Through the bottle, it can enter the ground not only water, but also fertilizers dissolved in it. They are dosed and directly to the root system bypassing the overlying soil layers.
- Reliability: Now you don't have to worry about the condition of the plants during a short trip.
- Prevention of fungal diseases root system due to excessive soil moisture.
- The need disappears loosening and softening the earth.
- Water, located in a container dug into the ground, reaches a temperature environment And heated to the roots.

The drip irrigation method is suitable for plants with aboveground shoots and fibrous root system:
- cucumbers;
- tomatoes;
- cabbage;
- pepper;
- eggplant.
Warning. The method is not suitable for root crops (carrots, beets, turnips). If you are using plastic watering bottles in your greenhouse, manual watering cannot be completely ruled out due to the fact that foliar irrigation procedures play an important role for many plants.
Useful and inexpensive
Many experienced summer residents use self-made irrigation systems and prefer them to factory ones. Do not rush to throw away old plastic bottles from under the water, because often modern methods have cheaper counterparts.
Useful video
You can learn more about how to organize watering in a greenhouse with plastic bottles in the video.
In contact with
See inaccuracies, incomplete or incorrect information? Do you know how to make an article better?
Would you like to suggest photos for publication on a topic?
Please help us make the site better! Leave a message and your contacts in the comments - we will contact you and together we will make the publication better!
Landing care is a rather complicated and time-consuming task. Just watering the garden or gardens is worth something. Proper organization of irrigation is the key to a high-quality and plentiful harvest. The main thing to remember is how much water is needed for each individual variety. cultivated plants. This article will tell you about some aspects of irrigating gardens and orchards.
Remember that watering is always carried out drinking water but not always cold. Some use watering from a septic tank, as here the water will be more purified. Here, water from a well, well, river, etc. is passed through a septic tank. Watering the garden with water can be done in several ways.
There are the following options for irrigating gardens and gardens:
- sprinkling;
- overlap on the formed stripes and checks;
- overlap on the formed furrows;
- surface drip irrigation;
- drip subsurface irrigation.
These options have both advantages and disadvantages. Overflow options are the simplest and easiest, but they degrade the soil structure when the ground is flooded. Also easy method watering - sprinkling. But it leads to the development of fungi. At the same time, soil irrigation saves time and water, but it is more costly.
As equipment here, you can use wells, wells, sprinkler, systems from a septic tank and other tools.
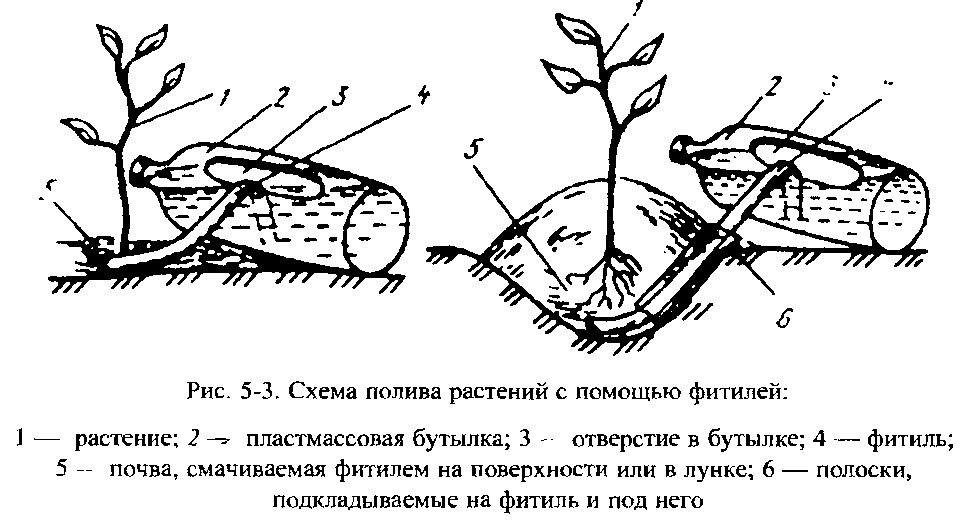
Video "Wick method of watering the garden"
Through the wick, moisture spontaneously, slowly enters the root system, which does not require any inspection and care throughout the week. The root system is easily fed.
Ways to organize
It is hard to even imagine how many ways to irrigate vegetable gardens and orchards today. Therefore, in our article we will indicate only those methods that are currently used most often. It should be remembered that the choice of irrigation method with cold and drinking water depends on several factors:
- type of plant (only then it is unequivocally clear whether they can be watered with cold or only warm drinking water);
- soil composition;
- climatic conditions;
- water availability. The presence near a river, well or well, from where you can organize a system from a septic tank or special equipment and fixtures;
- financial capabilities of a person;
- how much to water.
There are the following methods of irrigation with water:
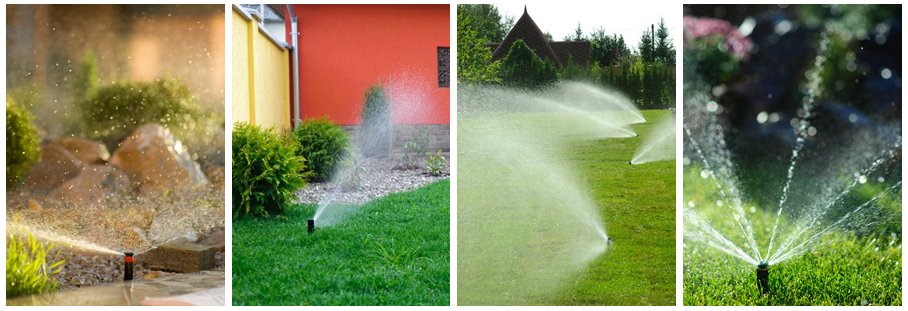
- irrigation. Ideal for watering shrubs and trees that need a lot of water. This method is not for the lazy, as holes should be dug around the plants. Water is poured into them manually (for example, it is taken from a well), although it is not bad to use wells (you can connect a sprinkler with a hose). The use of a sprinkler here is not always effective. Only drinking water is used. Apply after the end of the growing season;
- furrow method. It is used if the plot has a horizontal slope. Again, the method is not for the lazy, as it requires complex calculations. Here you need to take into account the composition of the soil and the amount of water that will be used for irrigation. With heavy soils, the width of the furrows will be about 80-90 cm, and with light soils - 0.5 m. The disadvantage of the method is the high consumption of drinking water, as well as the difficulty of doing everything yourself.
- drip method. Counts best solution. It can be used on all types of sites. A special device allows you to use water very economically. Wells, wells, etc. can be used as a source of drinking water;
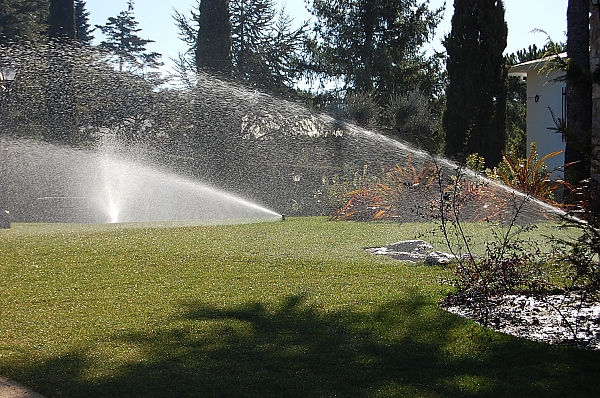
- sprinkling. In this case, a hose with numerous holes is used. Fluid through this equipment is supplied under pressure. The pressure that the sprinkler gives can be adjusted depending on your needs. The result is a long sprinkler. In this case, the sprinkler is laid in the ground. In addition, the sprinkler can be placed on special tripods. A septic tank is not used here, and drinking water can be raised from a well. Nowadays, this is a fairly common method of watering.
In addition, another unusual way of watering plants with drinking water is the wick method. Anyone can make this setup. Such an installation has the only drawback - the inability to control the degree of soil moisture.
For lazy people, a method using a pump is suitable. This is a very convenient method in terms of implementation. Thanks to the pump, you can significantly save time when irrigating large areas with potable water. The only hitch here can be considered the choice of the type of pump.
By design, pumps are of the following types:
- drainage;
- superficial;
- submersible. This group is divided into borehole (suitable for a well) and well (respectively for a well).
Separately, it is worth noting that the septic tank is used when watering young plants and is suitable for many of the methods described above.
Another fairly popular method is watering with drinking water from an automatic system. The advantage of such a system is the complete automaticity of the process of watering plants in a vegetable garden or garden with drinking water. For lazy gardeners, this is it. Wells, wells, etc. can be a source of water. It is worth noting that such a system is quite difficult to implement with your own hands.
How to do it yourself
Nowadays, many people prefer to make a drinking water irrigation system for their site with their own hands. Consider the general points, the basic steps in order to make it yourself:
- preparation for work. At this stage, it is necessary to determine the type of irrigation system, the source of water (well, wells, use of a septic tank, etc.), estimate the irrigation area;
- then draw up a plan for placing the system on the land;
- buy all the necessary materials and tools that are needed in order to make the selected type of irrigation system;
- during the construction of the system, all joints of its elements must be sealed with sealant to exclude possible leaks;
- pipes / hoses of the system can be placed on special supports, dug into the ground, and also left on the soil surface;
- to prevent quick clogging of hoses or pipes, special filters should be used in the system.
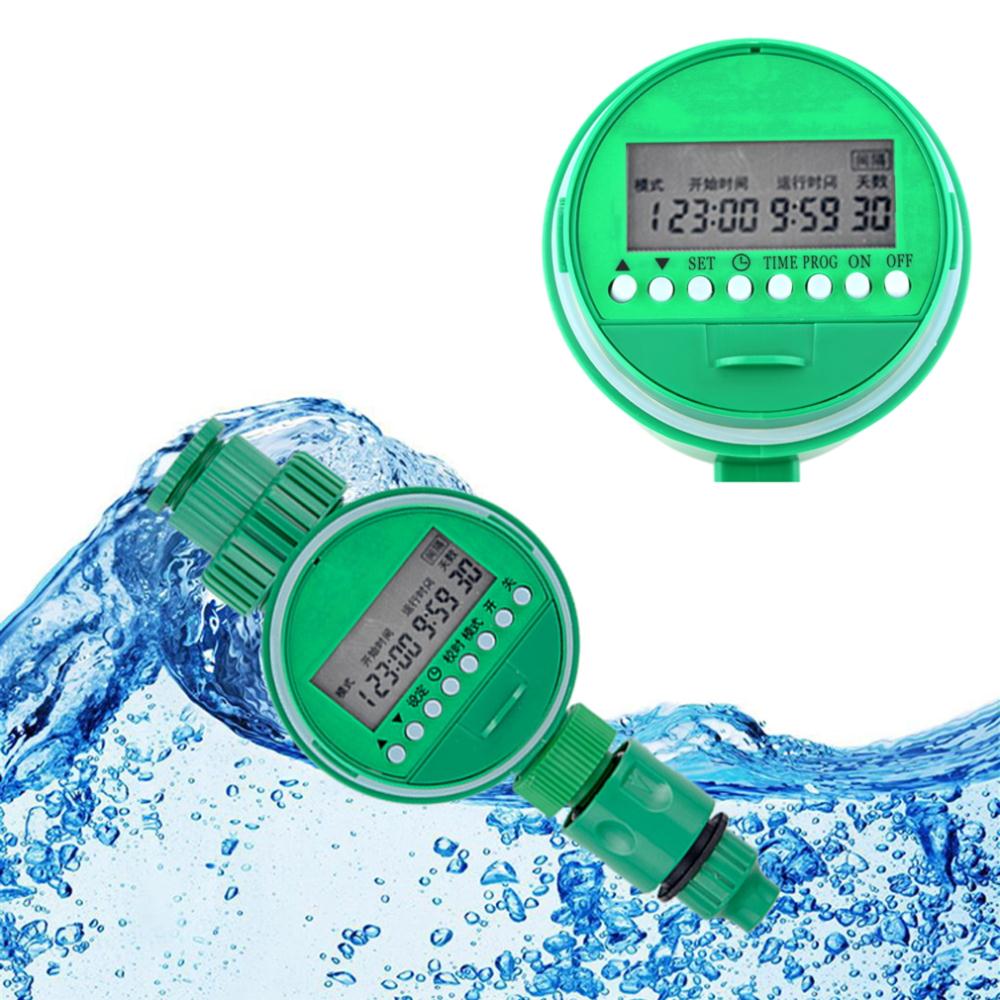
At the same time, if you want to do automatic system watering, you will need to purchase special electronic controllers that run on autonomous batteries. How much they cost depends on the region of the country and the type of controller.
Each type of irrigation system has its own characteristics and disadvantages. Study in detail all their advantages and choose the most suitable method for your site.
Basic principles of garden irrigation
The principles of garden irrigation include the following points:
- watering is necessary depending on the type of plant;
- it is better to irrigate less often, but more abundantly. Remember that frequent watering will bring more problems than benefits;
- under fruit trees and bushes need to pour more water;
- watering is carried out only with settled drinking liquid;
- The best time to water is early morning or evening.