Consider how to properly position the sockets when repairing an apartment. For information on how to properly wire them, read on page Replacing electrical wiring. First, let's decide on the height of sockets and switches. As a rule, sockets are placed at a height (along the axis) of 25 ± 5 cm, switches - 95 ± 5 cm from the finished floor. Someone wants a little higher, someone a little lower - it does not matter. Some sockets are located at a different height, but this is discussed separately.
How to place sockets in a room

First you need to decide where the furniture will stand. It is clear that it is difficult to do this at once, but, at least in in general terms necessary. Next, we follow a few simple rules:
✎ Place a single or double outlet in every empty corner of the room - just in case.
✎ Behind the cabinet, if the cabinet is illuminated, and next to the cabinet it is better to place at least a single socket.
✎ The switch is placed 15 cm from the door, you can also place a socket under it - this place will always be available, no matter how you move the furniture.
✎ In the bedroom, you should accurately calculate the place where the bed and bedside tables will stand. Two sockets should be placed next to each bedside table - one for the lamp, the other for all sorts of gadgets. This is if the lamp is planned to be placed on a bedside table or on the floor. If you are planning a sconce, it is better to immediately draw a conclusion above the bed at a height of 140-150cm (this is above the bed, usually sconces are hung at a height of 180cm). For a sconce, you can put your switch above the nightstand. But here it is necessary to accurately calculate all the dimensions. A good option is to use one switch key to turn off the sconce, and the other to control the chandelier (that is, the chandelier is controlled from three points - from the door and from each bedside table).
✎ Opposite the bed, along its axis, a TV usually hangs. For it, several sockets are usually displayed - there is always something to plug in there. These sockets can be placed both at the height of all other sockets, and under the TV (at the height of the switches), and behind the TV (at a height of about 140 cm, but this must be specified by the height of the TV itself).
✎ For the air conditioner, either a socket is placed (somewhere higher, in the area of \u200b\u200bthe indoor unit) or a wire is simply brought out to the place where the air conditioner tubes exit the wall.
How to arrange sockets and switches in the corridor
As a rule, there are almost no outlets in the corridor. One or two is enough, under some switches. There are a little more switches in the corridor: at the entrance, for the kitchen and bathroom. It is good to use a pass switch in the corridor - it is very inconvenient to turn on the light at the entrance to the apartment, then return from the kitchen to turn it off. A walk-through switch allows you to control the light from different switches located at different ends of the corridor, which is very convenient. Even the name of this switch speaks - "through", i.e. for use in "passages".
How to place sockets in the kitchen

If the rest of the wiring in the apartment can often be left old, then for kitchen sockets designed for such appliances as: oven, hob, dishwasher, washing machine, it is recommended to put a separate wire into the shield. The rules for placing outlets in the kitchen are as follows:
✎ Sockets on the apron are located at a height of 100 - 110 cm from the finished floor. Above each desktop is to place at least a couple of outlets.
✎ Appliance outlets are placed no higher than 10 cm from the floor - at the bottom of every modern kitchen furniture there is a flip-out panel that allows you to access these outlets. It is acceptable to place the sockets higher, so that later you can cut out the back wall in the lower cabinet, but you can get, for example, behind the dishwasher or in the drawer. So it's easier to put all the sockets down.
✎ Sockets for washing machines, dishwashers and refrigerators are best located not behind them, but nearby (also water outlets).
✎ The outlet for the hood is located on top of the box next to it - under the ceiling. As an alternative, just a wire is output along the axis of the hood.
✎ The lighting of the kitchen furniture is included in the outlet for the hood (one option). The downside is that the backlight will have to be turned on with built-in switches that are inconvenient to use. Another option is to put the backlight switch on the apron (along with sockets) and pull out the wire for the backlight from it.
How to arrange sockets in the bathroom
The location of the outlets in the bathroom is usually guessed by the tiles - so as not to get into the curb and get into the edge of the tile. Usually, just a wire is output, and the markup for the outlet is already done when it is clear how the tile will lie (the same for the apron). The bathroom has the following sockets and switches:
✎ Outlet for washing machine (if it is not in the kitchen). It is usually placed above the washer, in the same vertical axis with water outlets.
✎ Socket for hair dryer and shaver. It is placed next to the mirror, above the sink, away from the bathroom.
✎ Switch for the lamp above the mirror, if this lamp is used as an additional lamp and there is no built-in switch in the mirror. It is placed next to the outlet for the hair dryer.
✎ Switch for the fan (the fan can be turned on together with the light, but it is recommended to turn it on separately - many cannot bear the constant buzz). It can be located in the hallway next to the bathroom light switch or in the bathroom next to the hair dryer socket.
Following these simple rules, in less than half an hour you can place sockets throughout the apartment, and this is already almost half of the design project)))
Having decided on the location of the sockets, you can proceed to the installation of socket boxes.
If you have any difficulties with self-placement of outlets (or other questions), use our service
Installation of an outlet in the apartment. Instruction for beginnersIN modern world the basics of working with electricity is a must for every man. It is far from always convenient to call an electrician to fix a melted outlet or replace a switch. And if you plan to repair the apartment in your own performance, you should arm yourself with basic knowledge that will allow you to independently perform at least the most common electrical work.
Most often, during the repair process, issues are resolved about bringing one or more outlets to the right place in the room, installing or moving the switch. That is why you should first consider the location of such points of connection to the power grid, their number, the load that the network must withstand on this line.
Rules for the location of sockets and switches in the apartment: the basics of electrical safety
only through RCD (to protect a person from electric shock),
at least 60 cm from the water source (showers, sinks) horizontally and at the same vertical distance from the edge of the bath,
the socket itself must be made in a waterproof design with a protective cover,
in such premises only three-wire networks with appropriate equipment can be used (the socket must have a grounding contact).
The distance from the floor level to the socket is 30-35 cm, to the switch - 90-95 cm (this placement of sockets is important from the point of view of possible flooding of the room in order to prevent water from accessing structural elements that are energized).
From the edge of the window opening, the wiring should be located at a distance of at least 10 cm.
From the ceiling, a horizontal cable is carried out at a level of at least 15 cm.
If you decide to install a socket in the bathroom, you need to pay special attention to the fact that equipment can be installed in wet rooms.
Cable selection
As a standard, electricians recommend using a VVGng 3 * 2.5 cable for socket groups. At the same time, a very common mistake for beginners is to use a smaller VVGng 3 * 1.5 cable for these purposes, which is ideal for lighting networks, but in most cases will experience maximum permissible loads in a network with sockets. As a result, constant overheating will occur, which sooner or later will lead either to a short circuit or, at best, simply to the failure of the line.
You can’t save on the cable in any case (if such a thought nevertheless arises, try to estimate how much it will cost to replace the line, re-chase the wall, restore the finish in the room, the desire will be removed by hand). If it is assumed that some lines will be under greater load (for example, an electric stove or a powerful boiler will be connected to the outlet), this direction should be done with a separate line (preferably connected to your circuit breaker on the shield) with a VVGng 3*6 cable. In order for cable laying to be quick and clean, you can use a wall chaser (you can use Bosch GNF 65 A or inexpensive but reliable Energomash UShM-915SHT) together with a construction vacuum cleaner.
Preparatory work
If there is a need to install a new outlet, then the entire preparatory process is associated with the need to correctly and accurately install the mounting box. Required tools:
perforator (Makita HR 5211 C is perfect) with a drill 8-10 mm,
crowns for cutting a hole of the desired diameter (in size it is selected 5 mm larger than the installed box itself),
victorious chisel,
hammer,
spatula and plaster mortar.
Box installation algorithm
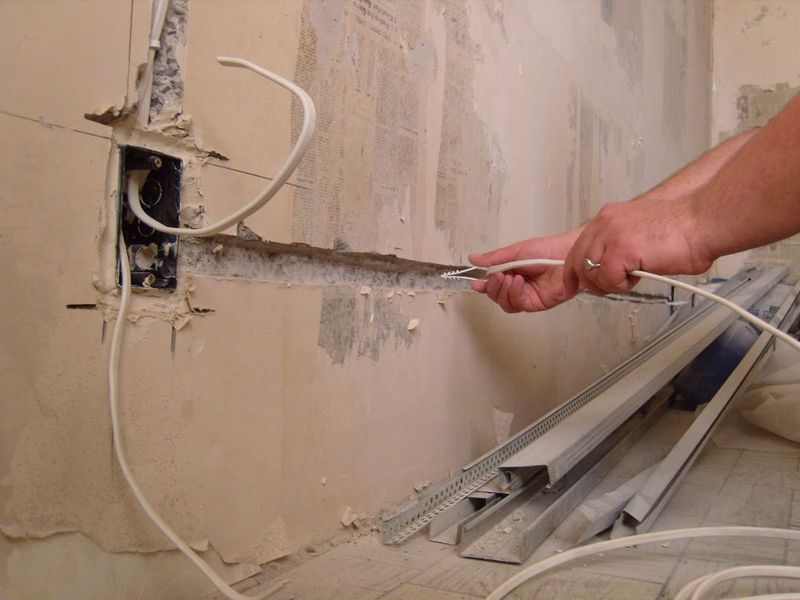
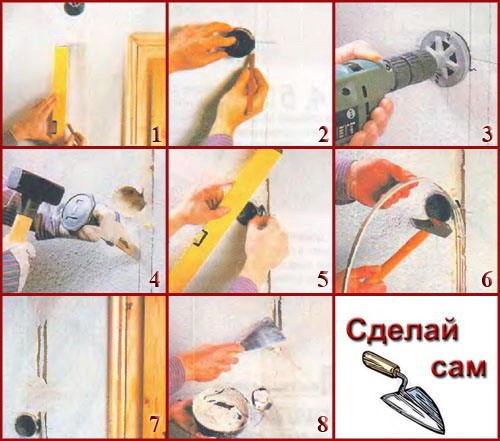
To a depth of about 6-7 cm, exactly in the center of the pre-marked installation site of the switch or socket, the first pass is made with a drill (to prevent jamming of the crown).
The nest is cut out with a perforator with a crown. Depending on the material of the walls, you will have to deal with either concrete or brick. It is better to choose a crown (so that for all occasions) with a diamond coating for working with concrete (indicated on the package), if necessary, it is easy to deal with bricks. The size of the crown is selected depending on the diameter of a particular socket (the common sizes are: euro sockets 68 mm; domestic 80 mm).
The cavity is cleaned with a chisel and a hammer.
A small recess is made in the direction of cable entry for easier cable entry.
For better adhesion with gypsum, the surface is wetted with water.
Gypsum mortar is applied over the entire surface where cables are not supposed to be laid.
A box with a pre-cut hole for the cable “sits” into the cavity.
The cable is carefully laid, the voids are sealed with mortar.
Socket installation
The performance of all preparatory operations also largely depends on the type of socket being installed (it can be single or double, multi-channel or equipped with additional elements). It does not affect the editing algorithm in any way. The main structural elements of any socket are the terminals, the inner case (clamp for the terminals) and the decorative overlay.
Connecting the power to the socket consists in attaching one of the wires to the terminal with a clamping bolt, and the second to the other (in three-wire systems, the yellow-green or brown PE wire is connected to the grounding element in the center with a hole in the middle). If a composite socket is installed, then there is no need to connect wires to each individual connector: they have long terminals that connect all the inlets into a single circuit. Installing a decorative overlay is the final stage of work.
When additional outlets are needed after repair
The renovation is finally over, but a few outlets are missing? This is indeed a problem that can be solved with minimal losses without a global disruption of the finish. In this case, it is proposed to power a new cable from the shield, which is lowered in the gate to the level of the plinth. Further, the cable line is laid under the plinth to the place where the sockets are installed and rises to the place where the socket group is located.
If the wall is finished tiles, then it is possible to remove one of the tiles (or several for convenience of work) at the place of placement and drill a channel necessary for laying the cable to the floor level with a puncher. In this way, the cable can be pulled up to the socket. Ideally, a hole of the required diameter is drilled in the removed tile for the box.
Greetings to all readers of our blog.
Today, dear readers, I want to highlight the topic of how to install sockets. This procedure is very often in demand when replacing an old outlet with a new one in the event of a breakdown, when carrying out repairs in rooms and completely replacing electrical wiring.
The work itself is not very difficult, but, like everything else, there are some peculiarities and "highlights". So let's get started...
As you know, sockets are the end points of the electrical network, to which consumers (irons, refrigerators, TVs, etc.) are directly connected. They are both external and internal. The principle of connecting to the electrical network is the same for both of them, the difference is that the internal ones are installed in special boxes (socket boxes) recessed into the wall and practically do not protrude, while the external ones are mounted directly on the wall surface and are completely visible.
Let's consider everything in order:
ATTENTION: When carrying out any work with electrical wiring, do not forget to turn off the electricity, and additionally check its absence from the network after turning it off.
1. Fastening of external sockets.
The principle of installing an outdoor outlet is very simple and requires minimal effort. This type of consumer connection is mainly used in rooms with external wiring, in rooms whose structures are made of flammable materials (for example, wooden buildings).
Of course, when using external wiring and external means of connecting consumers, the aesthetic appearance of the room deteriorates - all the wires are in plain sight. But, on the other hand, when there is a choice between aesthetic appearance and safety of life, safety is definitely chosen. Due to the fact that all the elements of the electrical wiring are visible, the problem area is easily determined. For example, in case of poor contact, you will immediately see the places of melting of the case, a change in the color of the case and the appearance of smoke.
Installation of an external outlet is carried out as follows.
- disassemble the case;
We unscrew the fixing bolts and remove the top cover.

- using screws, we fasten the base to our surface (for example, to the wall);

If the structure is attached to a flammable material (for example, wood), it is advisable to lay a non-combustible material (paronite, plaster) under the base. This extra layer will create a barrier between the flammable material and the socket and prevent fire.
- we connect the wires of the mains (more on this in paragraph 3 "Connecting sockets to the mains").
- screw the cover to the body and completely assemble the socket.
2. Ptypes and installation of boxes for internal sockets.
A completely different installation principle is used for internal sockets. When attaching them, a box is required. This is a special cylindrical box in which the body of the outlet itself is placed.
Previously, metal boxes were used. A recess was made in the wall at the place where the electrical wiring came out, if the wall was tiled - or of the required diameter. A box was mounted into it with the help of alabaster and contact wires were brought out. Already then, a means of connecting end consumers or a switch for connecting voltage to was attached to the box.

At present, with the advent of plastic in wide use, boxes began to be made from it. In such a box, the socket is well kept both with the help of spacer legs and screwed with screws. Another advantage of such a box is its budget price.
If there is a need to put several sockets - the boxes are easily interconnected into a block.

Depending on the material of the walls in which it is planned to mount the installation box, boxes of various modifications are also produced.
Conventional boxes are used for mounting, for example, in brick walls. To do this, a hole is drilled using a crown at the place where the electrical wiring and the future outlet or switch are to be output. Already in this hole, with the help of alabaster, the box is fixed flush with the surface of the wall into which the wiring is output.
If you plan to mount the box in a drywall wall, then you must use a special box "with ears" as in the photo below.

We drill a hole with a diameter of 68 mm in drywall. and insert the box into it. Tightening screws, ears with reverse side drywall presses the box and firmly fixes it in place. The free space between the drywall and the wall must be at least 45 mm so that the box is completely recessed and flush with the outer surface of the drywall.
Note: modern outlets sold in the store, almost all are designed for plastic installation boxes with an internal diameter of 65 mm. and are not always suitable for metal (old) boxes. The inner diameter of the metal box is 68 mm. The extension of the legs of modern sockets is not enough to fix the case in the old box. Therefore, when buying an outlet in a store, check whether it is suitable for old boxes.
3. Connecting the socket to the electrical network.
All preparatory operations are completed and you can install and connect our new socket.
- Remove the top cover by unscrewing the bolts from the front side;

- We relax the contacts into which the power wires will be inserted so that the distance between the clamping sponge and the stop is greater than the diameter of the contact wire and it is freely inserted to a depth of 5-10 mm.

- We clean the ends of the power wires brought out into the box. We orient the ends of the wires so that they fall into the contacts of the case and bend them in the form of a springy snake (as in the photo below). This type of bend makes it possible to move the case away from the wall to tighten the wire fastening bolts on the case and eliminate sharp bends in the wire when it is inserted into the box;

- We tighten the bolts of the wires in the sockets of the housing.

It is necessary to tighten it very strongly, since when a powerful consumer is connected (for example, a 2 kW heater) and poor contact, the junction will start to heat up. This will lead to the melting of the wires, the plastic case, and, ultimately, the failure of the entire structure and wiring.
What to do if the ends of the wires brought out into the box are short and do not allow you to connect the outlet?
In this case, there are several ways out of this situation:
The best, but also the most difficult way is to extend the wires by soldering the required length of wire on them and insulating the soldering point. This method is suitable if you have all the necessary accessories (soldering iron, solder, etc.) for soldering, if the wiring is copper and the length of the lead wire makes it possible to do this.
If the wire breaks off under the very body of the box, you can carefully open the place where the wiring is terminated in the wall and do the extension soldering procedure where it is convenient. Of course, the aesthetic appearance of the wall will be disturbed and this place will have to be a little, but all the same, the loss of appearance will be minimal compared to replacing the entire wire from the junction box to the outlet.
If the electrical wiring is aluminum, and it breaks most often, the soldering method will not be acceptable.
In this case, if the length of the broken end allows, you can use the terminal. On the one hand, we insert the stripped broken end of the wire into it, on the other, the stripped piece of the extension wire and strongly tighten the contact points.

Of course, this method creates an additional contact point where heating is possible, which creates a certain risk. Otherwise, you will have to replace the entire lead wire from the junction box to the outlet of the wiring from the wall.
This was a small digression, but let's move on to further installation. We connected the wires and now we need to install the socket in its place in the box.
4. Mounting of internal sockets.
Depending on the type of box, internal sockets are attached to it in two ways:
- by means of fasteners;

The principle of their action is simple. The fastening tabs have a curved configuration and resemble the “Archimedes lever”. When screwing in the bolts passing through the tabs, one side of the tab is pressed against the body, and the other side, passing through the stop, moves to the side. Tightening the bolts in turn on one and the other side of the body, the paws rest against the box and jam the body in the required position.
This method of fastening is now practically not used. It is used only in cases where the socket is installed in a metal box, mainly in buildings of the "Soviet" times.
More convenient, easy and practical is the following mounting method.
- body fastening with two screws;

Depending on the need, we orient the body in a vertical or horizontal direction. We direct the screws into the special holes in the box and twist.

The socket is connected to the mains, fixed in the box, and the last step is to put the top cover back in place, apply voltage and try to work by connecting the consumer.
Now you know how to install the outlet. I look forward to your comments and will be sure to respond to everyone.
See you soon, and all easy repairs.
In conclusion, a small video of installing an outlet in a wall lined with drywall.
Sincerely, Ponomarev Vladislav.
Before performing work, installing a socket and a switch, it is necessary to determine the quantity and location. It is better to install a double socket in most cases and in sufficient quantities so that you do not need to use extension cords and adapters later.
Plug socket - an electrical installation product that serves to connect various household and industrial devices through a plug. The socket has its own load limit - 1.5 kW, but this value only allows you to extend its life so that the socket does not need to be repaired, but modern designs can withstand up to 3 kW.
If there are places with a large number of electricity consumers, then it would be more expedient from the point of view of safety to install an outlet block connected by the loop method in parallel. This is justified, compared with the use of tees and extensions. For the installation of all sockets, there are basic rules, the implementation of which will give a high-quality and safe result.
When connecting sockets, you must follow general rules regardless of the mounting method chosen. Basic recommendations:
- Regardless of the type of electrical wiring in the house, only standard sockets should be installed - in our country, these are 6-ampere sockets with round sockets;
- Usually, the installation of a new outlet is carried out at a distance of 20-90 cm from the floor, but it can be performed at any height for certain furniture and project requirements;
- Before connecting the outlet, you need to remove the fuse from the desired circuit or turn off the power supply, you need to make sure that there is no voltage in the network, using a guaranteed serviceable device such as a voltage indicator or a voltmeter;
- Above the stove and sink, the installation of the outlet is not performed;
- The gas stove to the outlet should be no closer than 50 cm;
- Under the power line up to 8 points, a copper cable with a cross section of 2.5 mm2 is required;
- The purpose of the wires should be determined by color: phase - brown or black, earth has a yellow-green color and zero - blue.
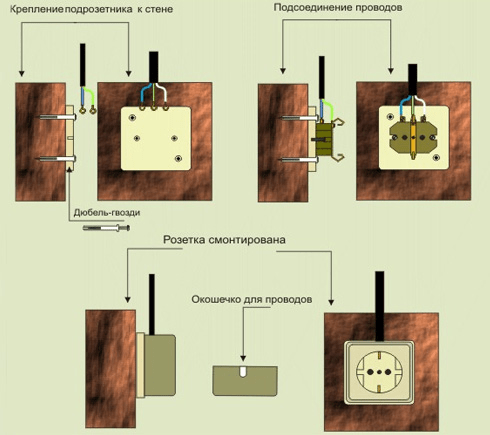
Before installing the socket, you should cut a strobe between the junction and mounting box. Drill a hole for the junction box and mount it there.
Most in a simple way to drill a hole in the wall is to use a drill or puncher with a round nozzle with victorious tips, it is also called a crown. Install the mounting box in the hole and fix it with alabaster.

Then for the wires you need to do the following:
- Run the wires from the distribution box to the junction box;
- Fix the wires with alabaster on the wall in the strobe;
- Cut off excess wires to leave about 10 cm for easy connection;
- 10 mm of insulation is removed from the end of each of the wires;
- Unscrew the screws and remove the decorative cover from the socket;
- Carry out an audit of the outlet;
- Connect the terminals with the wires from the junction box;
- A socket is mounted in the box and fixed with self-tapping screws or spacer plates.
In the case of installation of open wiring and switches for open wiring, wires should be fastened to porcelain insulators. To enter the wire into an open-type socket, there is a special hole for open installation. In plastic socket covers, this function is performed by thin membranes (pre-pressing). It is necessary to break out such a pre-press from the side from which the wire will be drawn. After all, you can put the outlet cover. Also, do not forget to put a socket box on such an outlet. Previously, they were made of wood. Now this function is performed by plastic sockets.
Installation of sockets and switches is carried out different types and it is important to understand which design will be the most optimal for a particular case.
Common types of sockets
For domestic conditions, the most common sockets are 220V and 380V. Each of them is made for a specific installation of electrical wiring. They, in turn, also have subspecies:
- Up to 16 A (external) - may or may not have a grounding contact, mounted on a wall or other surfaces;
- Up to 40A (external) - designs with 3 flat or round contacts, are used only for connecting stationary electric stoves that require the installation of a power outlet;
- Internal (embedded type) - installation is most often carried out in installation mounting boxes;
- With a cover against water and dust ingress - most often used for bathrooms;
- Paired (2 in 1 housing) - come with and without grounding contacts;
- TV - to connect the antenna coaxial cable to the device;
- Computer - are used to connect to the Internet or a computer network;
- Telephone - hidden and external types for connection to the telephone network.
380V sockets are not used in old apartments. They are of two types: stationary and portable. Both options refer to external views and can be used in private houses for connecting heating boilers, welding machines and etc.
Ways to install sockets
The method of mounting sockets will depend on the type of construction. There are outdoor sockets, which involve laying the wire in a metal or plastic box by fixing it to the wall with dowels, nails or self-tapping screws.
Another type is indoor installation. Installation of a flush-wiring socket is carried out inside the walls, followed by fastening the socket support with screws.
Holes are made for drywall walls, where mounting boxes are inserted and fixed.

If the wall is brick or concrete - first drill a hole with a crown. Installation of the socket block implies a parallel connection method, that is, a loop. The group of outlets itself can be placed both vertically and horizontally, and then it is closed with a common frame.

Rules for installing a socket with a grounding contact
To ensure high electrical safety performance under conditions of increased load from a large number of household appliances, these household appliances must be grounded. For this, sockets with a grounding contact should be installed in the apartments. Outwardly, sockets with grounding differ in that they have holes with slots on the sides, with protruding brackets, or a cylindrical hole for entering a grounding contact.

To connect such an outlet, you need to install ground wiring, which is performed in one of the following ways:
- If there is no ground wire in the house, it should be laid with an additional bus or wire passing from the switchboard to the room;
- When the wiring in the house is made according to the European standard and the ground wire is present, then a standard connection is implemented - phase to the right terminal, zero to the left, and ground to the bottom or center;
- For private houses, when installing a grounded outlet, a contour of three metal corners with a triangle should be driven into the ground to a depth of 1.5 m, then the contour is scalded and a metal tire is pulled from it, covered with earth, a nut is welded to the tire, and a nut is fixed to it ground wire.
Do-it-yourself installation of such an outlet is carried out according to standard technology - first a place is selected, a hole is made in the wall for mounting a socket box and a strobe - for wires. During the installation of the socket, the structural elements must be controlled in terms of level, the socket body must be fixed with self-tapping screws. The ground wire is fixed to the U-shaped plate in the socket with a screw.

How to work with overhead sockets
Installation of a surface-mounted socket type will be appropriate when work is carried out on open areas of the wall or open wiring is installed in special cable channels, the finish has already been completed or increased requirements for fire safety. The cost of installation for sockets of such a plan is the same, but it is the process of connecting the socket itself, including the required number of sockets and the power of the connected devices, that can affect.
The order of installation of the socket is as follows:
- Turn off the electricity supply;
- Open the outlet cover to gain access to the front panel latches;
- We press the latches with a screwdriver and disconnect the front part from the case;
- We disassemble the socket into its component parts;
- It should be noted the location of the mounting holes, attaching the case to the installation site strictly horizontally;
- We fix the base to the wall using dowels and self-tapping screws or other fastening systems, depending on the type of base;
- We cut an inlet hole in the plug;
- We bring a corrugation or a cable channel and a power cable to the outlet;
- We remove the insulation from it and connect the wires to the contacts;
- We insert the inside of the outlet into the case and install the front part - now you can test the operation of the outlet.
This instruction is suitable for mounting an open-wiring socket, otherwise the differences will not be significant: instead of point 7, you need to make a hole for the power cable in the back of the case before fixing it to the wall.
Connecting a double socket to one socket
To install a double socket in one socket, you need to follow a certain scheme. Step by step it looks like this:
- We select a suitable place - optimally close to the place where the electrical junction box or the wire running in the wall is located;
- The base of the recessed outlet is outlined with a pencil, a hole is made in this place with a puncher, as described above, so that the inner case fits there;
- A hole for the wires is made in a glass (socket), then it is fixed with cement or alabaster, the solution hardens and installation can be carried out;
- The socket is disassembled into its component parts;
- The wires are shortened with pliers and with a knife, the insulation is removed up to 1 cm long;
- Phase and neutral are fixed in different side terminals, grounding is in the center (if provided);
- The inner part of the socket is attached to the socket with fixing screws;
- The front panel is installed and fixed with screws;
- The outlet is being tested.
After installing or repairing an outlet of any type, it is better to test it on some inexpensive item like a table lamp, rather than a computer or TV. When installing an outlet, you cannot attach the neutral and phase to the same plate - it will cause a short circuit and the need to re-install the wiring after it is damaged.
If a socket needs to be replaced, then it is necessary to turn off the electricity, check the absence of voltage and correctly dismantle the old one beforehand. To do this, unscrew the protective cover, remove the mechanism from the glass and disconnect the wires, unscrew the screws for the spacer legs and unscrew the contact screws. After dismantling the old outlet, the new one is mounted according to standard instructions.
The high level of comfort of a modern person involves the use of a large number of electrical appliances. Therefore, installing sockets in the bathroom is not a whim, but an important necessity.
The selection and installation of power points takes place in accordance with the requirements of regulatory documents and the rules of the intra-apartment or intra-house electrical network device. These provisions have been studied by us and are detailed in the article.
We will designate the zones acceptable for the installation of sockets, list the rules for laying the electrical cable and give advice on choosing electrical appliances. Suggested step-by-step instruction on installation will help to perform all electrical installation work on their own, without seeking help from specialists.
In old buildings, sockets in bathrooms are extremely rare. The reason for this is the compact footage of the room, the elementary lack of free space on the walls and the weak general electrical network of the apartment.
In addition, until recently it was believed that electric points in bathrooms and toilets could not be installed, so they were taken out and mounted near the doors to the bathroom.
In modern housing, the situation is different: bathrooms combined with a toilet and separate bathrooms have a large area, which allows you to freely place a washing machine, water heater, dryer, additional electric heater-towel dryer, and a “warm floor” system in the interior space.
The daily use of a hair dryer, electric shaver, hair curler, etc. remains relevant.
Given the number of devices that require electricity to operate, a block of sockets or 2-3 separate points are mounted in the bathroom
To find out exactly how many outlets are needed for a bathroom, you need to make a list of all devices and among them select those that are constantly connected to the network.
Suppose a washing machine is often installed in a large bathroom. Under it, they usually allocate a separate electric point or mount the cable connection directly, using a terminal block.
According to the rules, the electric point must be located on the left, right or above the device; it is prohibited to install it behind the volumetric unit. Easy access must be provided so that in the event of a product failure, it can be quickly and easily replaced or repaired.

Requirements for installing power points
New modifications of electrical devices are designed to be operated in rooms with high humidity. But both them and the sockets are subject to increased requirements. For legal information, see normative documents, for example, in GOST R 50571.11 (1996) and PUE (7.1).
What areas are suitable for installation
As you know, the combination of water and electricity in everyday life is very dangerous for humans. Therefore, the bathroom, where such contact is possible, is usually divided into zones. There are four of them, from 0 to 3.
You will definitely need junction boxes - for distributing wires along the lines. If 2 blocks of sockets are installed in the bathroom, respectively, 2 will also be required.
With its help, it is much easier to determine the purpose of each tap:
- phase– white color of isolation;
- zero- blue, blue;
- grounding- yellow-green or green.
We fasten the wires in the terminal blocks and carefully lay them inside the box, trying not to pinch or bend. Then we insert the case and tighten the fixing screws. Lastly, we put on a decorative bar.
After installation, we must perform testing - we apply current to the line and use an indicator screwdriver or a multimeter to check the voltage in the network. If everything is in order, we finish the wall cladding or put in order the area near the electrical point.
The process of installing a surface outlet is much easier. It is usually installed with external wiring, that is, there is no need to ditch the walls and mount an internal socket. Before installation, the case is disassembled in the same way and the wires are connected.
Before installing large and powerful equipment, you need to think about whether you need an outlet to connect. Suppose, for the operation of a boiler with a power of 3.5-5.5 kW, operating in constant mode, it is better to use not an ordinary power outlet, but a direct connection with a separate machine.

To protect electric points from water ingress when bathing, they can be placed in niches, behind partitions and even in cabinets.
If the bathroom has a sink with a countertop, then you can consider an interesting and convenient solution with a hidden module. The socket block is hidden in the table, and only an element comes out, for which it can be easily reached outside.
The main advantage of the retractable module is 100% protection against water, but subject to timely masking.
The line going to the bathroom room must be equipped with an RCD, and each powerful device with a separate circuit breaker. So, if one device breaks down, the rest of the lines will work as usual.

Remote and retractable "columns" and "books" are actively used in offices and kitchens, but they are also suitable for equipping a bathroom
Conclusions and useful video on the topic
What difficulties you may encounter when installing electrical outlets in the bathroom and how to deal with them, you will learn from the videos presented.
Video with comments on the installation of outlets:
About the nuances of working with tiles:
Professional installation of the socket block on the tile:
Installation of a surface socket:
Electrical work requires a certain skill and safety precautions. However, home craftsmen can easily cope with activities such as replacing and installing sockets and switches.
If you still have difficulties or require work of increased complexity, it is better to contact professional electricians.