Directory "How to make a stuffed animal" V. Yu. Sugrobov.
PREFACE
Let's start with a little history. Such a story can happen in any hunter’s family at a time when guests come to him.
I noticed that not a single hunter can sit at the tabledo it silently. He will definitely insert something like this, so that everyone around them understands what they see in front of them a courageous man who is not afraid of dangerous animals, nor the schadenfreude of the weather, and in general on it alone the whole family lives because he dresses everyone in fur coats, feeds them exclusively with meat, and by all accounts is the breadwinner for his wife.
In response to these statements, there will definitely be some incredulous subject who will say a short phrase in relation to the questioner: “Prove it!” And here our hunter, hastily getting up from the table, makes his way into the next room and, with a proud expression on his face, drags a whole stack of old photographs to the guests.
But the guests drank a lot! And among the tipsy guestsAn “expert” will definitely appear who, for fun, will throw out another phrase: “Fake!” or “Near strangers trophies and we can take pictures!” The hunter provided Kurazhen. And he already decides to run for a gun and inflict the final blow on the offender - to shoot him in the fifth point, so that he no longer sits at his table and on his chair.
Now let’s try to move the same company to another room. There is an old gun hanging on the wall, which is not
will shoot, as it should be in theatrical plays, Well, the owner of this apartment is balanced and wise Human.
On the closet, on the shelves and on the same wall, next to the photo graphy of his beloved mother-in-law, hanging hunting trophies in the form of strange people of a duck, a hawk, and here hang the heads of an elk, a wild boar, a Suli. And let the apartment somewhat resemble a zoological museum, its owner is not a poacher. Each trophy has its own history. The guests look around enviously and no longer ask stupid questions, but only admire and do not praise the modestly silent owner of such an amazing collection. For a city dweller, even an ordinary goat causes consternation. And here! Fantastic!
All the hunter's pride is in its place. Theyfit perfectly into the interior of the apartment. These items They have one more amazing quality - they transport guests to another world they have forgotten, and these also transport the hunter himselftrophies excite him so much that he wants to give up everything and leave get out of town quickly.
The phrase sounds absurd: “He loved nature so much that he decorated the walls of his apartment with skins and stuffed animals.”
In Grandfather Durov’s museum there is a stuffed animal of his beloved dog. The effigy was made after her death - in memory of a friend. This is probably normal, although very sad. When I I started doing taxidermy, I also set the same goal for myself - to leave for posterity the memory of the animals that surrounded me all my life. Mostly these are birds and rodents. I did not stuff other animals. Afterwards, hunters approached me with a request to make stuffed animals for them. It was from their trophies that I learned this, I must say, difficult creative profession. Some trophies remained with me, some I begged from people who did not need them, but in any case, my collection of trophies did not have a collective, but an informational meaning. This is important for the researcher. First steps in I started preparing stuffed animals as a child. I stuffed my pants and jacket with hay and attached a football instead of a head.a new ball, and on the ball he put an old, rusty German helmet, broken in several places. The result was stunning. I was whipped because my neighborbecause of my joke, she had a heart attack when she met my stuffed animal in her garden at night. My family went through a lot of grief, considering that I hid my “work of art” in the toilet at night from the rain.
So talent is a terrible force!
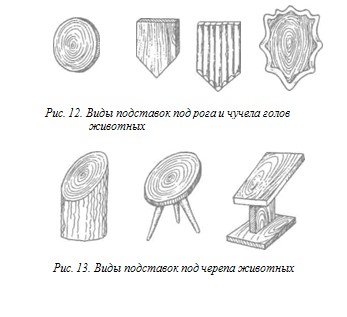
You can make stuffed animals, birds, fish and even reptiles. The only problem is where to put stuffed large animals, and is it necessary? This kind of work is difficult, and I have never seen anyone have a stuffed elk, wild boar or bear in full growth. I assume that such a meeting will also occur. is expected. But the apartment is not a museum. Usually its inhabitants are ogre- are dressed up with a small stuffed animal, skin, head, hornsor an animal skull. With a creative approach to this In this case, the skull can also be beautifully and significantly placed on a stand. If the volume of the book allows, I will tell you about the methods of making stuffed animals in full size.
TOOLTAXIDERMIST
If you decide to make a stuffed animal and it doesn’t matter in principle,which animal, you should know that the less time time will pass from the moment the animal or bird is shot until the time you start your work, the better. You should have everything at your fingertips. You won't have to run around and look for something.
I have all the necessary tools stored in one place - those. I like to work on a clean table, not cluttered third-party, unnecessary items.
The table must be illuminated, and the light must change itsdirection depending on the need and desire of the worker.
The chair should have a backrest, since sitting for a long time doing such painstaking and attentive work affects the fatigue of the entire body, especially the back.
Next to the table you should have a bucket where you can choosegarbage pouring out. Have a broom and dustpan at hand,a towel or rag to dry your hands.
So, for work you will need:
1. pliers;
2. round nose pliers;
3. tweezers;
4. wire cutters;
5. screwdrivers, screws;
6. hammer;
7. drill;
8. saw;
9. scissors;
10. scalpels - wide and narrow;
11. sharpener for scalpel;
12. shallow cuvette;
13. white and black threads;
14. a needle, preferably the kind that doctors use for stitching wounds;
15. syringe with a thin needle;
16. cotton wool;
17. thick and thin wire;
18. plasticine black, white, red;
19. set of paints;
20. ruler, notepad, pencil;
21. wooden planks of various thicknesses, boards;
22. a set of artificial eyes of various shades and sizes (buttons, etc.);
23. supply of sawdust, hay, cotton wool for stuffing;
24. chemicals: copper sulfate, gasoline, ether, denatured alcohol, arsenic, table salt, epoxy glue, ammonia and others, depending on need;
25. plaster, tow, newspapers;
26. awl.
HUNTING HUNTING - DIFFERENCE!
The work of a taxidermist begins with shooting. Not suitable for making stuffed game or animals, highly damaged by a shot.
To do this, the taxidermist hunter must adhere to the following rules.
.If possible, shoot in places that are easier
They are camouflaged with feathers and fur. This is usually a tulo-
body, belly, wings. It is not advisable to aim at the head
or in the neck.
. When shooting game, only use shot that corresponds to the size of the prey. Do not shoot a sparrow from a cannon - only feathers will remain from the carcass.
. It is advisable to carry winged prey by hanging it by the legs so as not to damage the plumage.
. The hunter must have cotton wool with him to sprinkle it on all wounds, from which he makes tampons and inserts. throws them with a stick into the throat and anus of the bird. This is pre- will protect feathers from contamination with blood, feces and esophageal contents.
. Very delicate birds should be shot after shootinglay them down so that they take their natural position:folded wings, aligned legs, basic neck and tail position.
. If the prey cannot be immediately delivered to the placemaking a stuffed animal, using a hook stick through the back pro-the course is necessary to pull out the insides, cut them off and tie them with thread so that the contents of the stomach do not get into the abdominalcavity. (This applies primarily to waterfowlbirds: they are prone to rapid decomposition.) Afterthis in abdominal cavity inject denaturedalcohol, and if it is not at hand, stuff the carcass with nettles and juniper. Essential oils juniper suspendedencourage the proliferation of microbes.
. Bloody feathers are wiped with cotton wool, and cotton wool soaked in denatured alcohol (if available) is applied to bleeding wounds.
. Birds are transported very carefully so as not to bend, ruffle or break the feathers.
. Birds are wrapped only after final cooling so that they do not begin to deteriorate. To prevent game from spoiling, it must be ventilated in advance and, during a smoke break, placed on its back, and not on any other body part; Game intended for making stuffed animals should not be carried together with other game or placed in one piece. lofan bags, nets.
For the same purpose, denatured alcohol is injected into the lumbago areas under the feathers and into the oral cavity, and cotton wool, soft dry hay or salt are placed between the packaging and the body. mu. It is most convenient to transport the carcass in a box, pre- Carefully make holes in it for ventilation.
Preparation begins only after
as the carcass finally cools down.
When you arrive home, you should not put game in the freezer -only on the bottom shelf of the refrigerator. It is very difficult to remove the skin from a frozen carcass, and a thawed carcass takes on an unmarketable, wet appearance, which makes further work very difficult.
The skin of a large animal must be removed immediately
after the shooting.
The “wet” skin should be transported by rolling it into a roll and pre-laying it with a 6-7 cm layer of dry hay. You should avoid folding the skin into an envelope: bald spots will form at the fold.
.I do not recommend skinning or attempting to make
make a stuffed animal from the fallen and have lain for some time
animals. This is dangerous for your health.
I have personal sad experience to warn you against such rash and dangerous actions.
The skin is removed by hand and knife. The knife must be sharp, preferably with one-sided sharpening, and the tip of the blade must be sharpened not only sharply, but also with a slight flaw, so that it scratches more than it cuts. In practice, you will understand that such a knife is the most suitable for removing skin. When hunting, you need to carry a sharpener with you.
MANUFACTURINGSTUFFBIRDS
I will try to describe in great detail the entire process of making stuffed birds. So, pay attention!
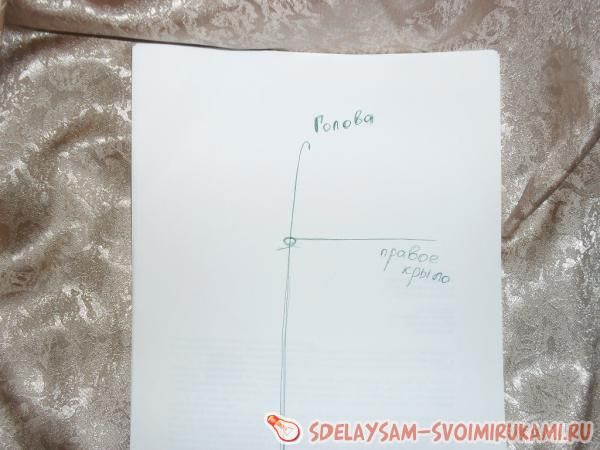
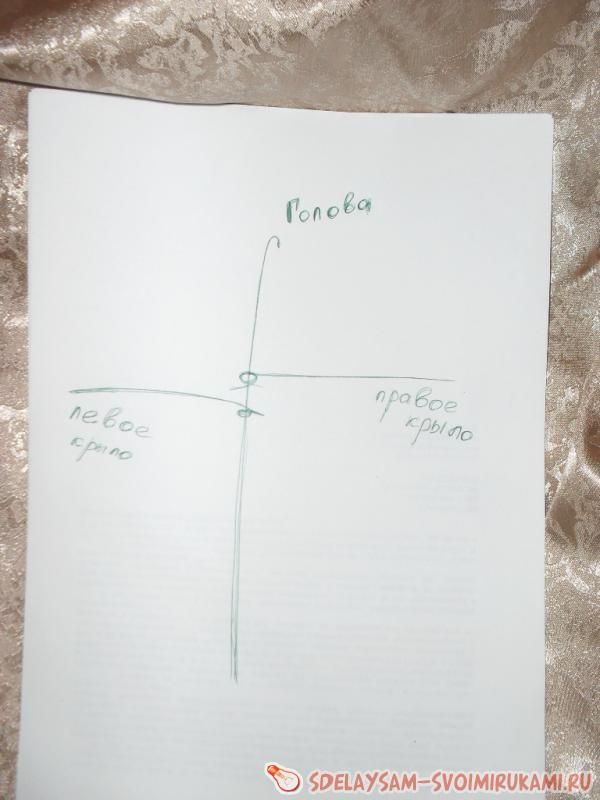
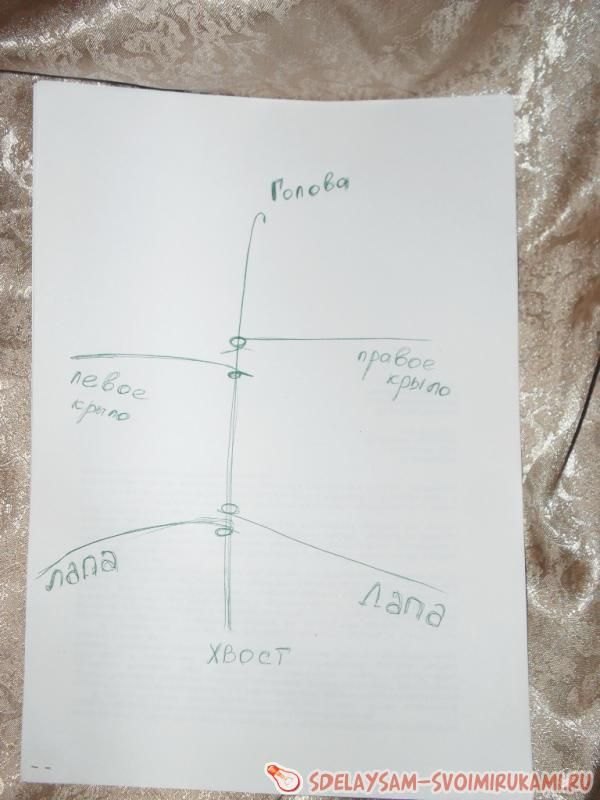
Having measured the bird's measurements with a ruler, you should write down:
body length and thickness; length of wings, neck and legs.
This is very important point. If you do not take measurements of the game first, it will be difficult to do this after dissecting the bird. If the artificial carcass turns out to be is large, the stuffed animal will have increased dimensions, which means depends on the appearance of the stuffed animal and the quality of processing of the carcass - ki. The color of the chemical will appear through stretched skin. drug. So, when treated with copper sulfate, the skin color will turn greenish. It is better to make an artificial carcass a little smaller than larger.
. Place the bird on its back in the cuvette. You should have a rag and cotton wool at hand to wipe off the blood.
. On the bird's chest you spread the feathers and the wide scalpMake an incision from the base of the neck to the anus. You don't have to be afraid to make a deep cut. We are interestedonly the skin, not the carcass itself. However, it shouldn't beso deep that the bird's entrails spill out.
. Using a thin scalpel, separate the skin of the bird along with the feathers. From the meat, cutting off the connective fibers, separate the muscles and subcutaneous film.
The skin is easily removed from almost the entire bird carcass, forexcept for the wings, legs and head.
. Using your fingers, remove the skin from your legs to the ankle joint.
. The ankle joint is cut with nippers and the leg is released through the abdominal incision.
. You also free the other leg.
When you stretch your leg through an incision in the abdominal cavity, the skin of your leg folds into an accordion, which in itself is not scary.
The skin on the tarsus of most birds is not wrapped. The exceptions are the golden eagle, eagle owl, ruffed buzzard and some other birds with “shaggy” legs.
. When both legs are freed, cut off the tail and cutmake the attachment of the tail feathers to the carcass higher. Tailcut off so that the tail feathers stay in the place where they grow, that is, on the coccygeal gland.
. Once the legs and tail are freed, the skin from the back and sides will come off easily.

Despite the ease of the entire “operation,” it must be carried out carefully, using your fingers, sometimes with scissors, sometimes with a scalpel. The carcass should be blotted, sprinkled with starchuse flour to wipe away drops of blood so that they do not stain
plumage. When trimming areas where feathers grow, you must be especially careful, otherwise the feathers will fall out.
Having reached the wings, you free all access from the skin.
ny places of the forearm. Basically you have to work
thumb and forefinger.
You expose the forearm and cut the elbow joint.
In birds the size of a partridge or larger, the skin of the forearm is cut along the inside of the wing, between the radius and ulna bones. In this case, the feathers remain attached to the bones and do not fall out.
In small birds, the skin from the forearm is wrapped in stockings and the muscles and tendons are cut out.
It is imperative to remember that you should, if possible,Remove bones and skin from meat. The less meat remains on the stuffed animal’s “clothing,” the better.
.Remove the skin from the neck and head with a stocking, moving it
fingers forward. You don't stretch the skin, you trim it
in those places where it is attached to the neck.
Trim the skin at the junction with the muscles - in the ear canals and around the eyes. Remove the skin from the head to the base of the beak.
Geese, ducks, swans, herons and woodpeckers have a headache walks through a narrow area of the neck, so it is necessary to close the neck from the top to the back of the head. The exposed skull is cut off from the carcass, the eyes, tongue, muscles are removed, and the brain is removed through the occipital bone.
.The “clothes” for the future stuffed animal are ready. Now we need
process it.
Clean the skin removed from the bird to remove any excess meat and fat. Oily skin blot repeatedly with a paper napkin, wipe with cotton wool and sprinkle with starch. Wash dirty feathers warm water with soap and dry, sprinkling and wiping them with starch. Pre-wash greased feathers with gasoline, ether or acetone, keeping in mind safety precautions.
After this treatment, etch the skin with a solution sodium arsenic or solution copper sulfate. Try to lubricate only the skin with copper sulfate, otherwise the plumage, especially the down, will change its color to green ny. The skull must also be etched. I dipped it in a solution of copper sulfate for fifteen minutes, and when
I saw that I had not completely freed him from the remnants of meat,boiled it for two minutes in boiling water, and then dipped it in a solution of copper sulfate.
There is no need to cook the skull for more than two minutes. The boiled ligaments fall apart and it loses its shape.
Copper sulfate must be handled very carefully and with rubber gloves. If there are scratches on your hands, do not work.
A solution of copper sulfate is injected into the skin of the scalp with a syringe. ki of the bird, and if necessary, then into the muscles of the metatarsus of the ankle real birds such as heron, crane.
Lumps of plasticine are inserted into the eye sockets. Artificial eyes are selected according to the color that suits the given game. If you want to firmly attach the head to the base of the stuffed animal in the future, then instead of plasticine, insert plaster, prepare it a few minutes before putting it on“clothes” of the bird on an artificial carcass.
Instead of store-bought artificial eyes, you can useCreate buttons that match the color, or make eyes from colored plexiglass in advance.
The topic of making eyes is a very sensitive one. Let the stuffedthe birds will turn out plucked or somehow ugly, it can then be “added” to a more successful the forehead of a predator and present it as a “victim of natural selection", but the stuffed animals must really have eyes"real".
There are several ways to make eyes. Here is one of them.
From lead, cast a round pig with a diameter of 8-10 cm, a thickness of 2-3 cm.
Press hemispherical holes into it. To do this, drive bearings of different sizes into lead.
Holes with a diameter of 4 mm are for the eyes of snipe and quail; 8-10 mm - for the eyes of ducks, harriers, goshawks ka; 20-22 mm - for the eyes of roe deer and wild boars; 33-35 mm - for eyes of elk, deer.
For each hole, select punches - metal balls with a diameter less than two thicknesses of plexiglass, welded to metal rods.
Select plexiglass of different thicknesses. To make eyes with a diameter of up to 10 mm - 1 mm thick plexiglass;
20 —25 mm - plexiglass 2 mm; 30 mm and more - plexiglass 2.5-3 mm thick.
Plexiglas should be colorless.
Heat the plexiglass over a candle or gas burner and cut it into strips. The width of the strip should be 1-2 mm larger than the diameter of the hole, and for large eyes - 3-4 mm. You cut a square on the strip; it is held in place only by a thin “hair”. While the plexiglass is warm, round the corners of the square and, applying it to the hole, press it into it. punch, hold for two to three minutes until the plexiglass cools. Draw the pupil in black; Paint the iris with paints or smear plasticine of a suitable color over it.
We left our carcass without “clothing” for now.
.Each person makes the basis for the future stuffed animal according to
at your own discretion.-
But the original dimensions must be respected so that the hazel grouse does not turn into a capercaillie.
Some people make the base from plaster, others according to sizethe body, cuts out a wooden block, and then ties it with bandages or other suitable material. Some people make the frame out of wire. For snipe owls, magpies and similar birds, soft wire with a diameter of 1.2-1.5 mm is suitable; for pheasants and black grouse - 2.0—2.5 mm; for wood grouse and geese - 3.0-3.5 mm.
Make a main rod equal to the length of the body,
neck with head - with a margin of 10-15 mm. Cross wires
locks for wings and legs should be with a reserve for each
house end 10 mm.
At the level of the hip and shoulder joints,You fasten the loka with rings, and wrap tow on it to a thickness equal to the volume of the carcass.
To prevent the tow from unwinding, wrap it with strong threads.
Push the front end of the central rod into
the bird's skull by piercing it. Insert the wire along with
tow in the neck. A rod wrapped in tow in the skull
must hold tight.
Stretch the skin over the neck and chest of the base, pre-
carefully inserting the wire into the wings.
. Bend the wire a little and insert it into your legs,Make holes in them with an awl.
. Give your legs a natural position; if necessaryYou need to secure the wire connections more tightly and insert the tow into the places from which the muscles were removed.

Sew up the skin, give the bird the desired pose, and tidy up the feathers. Place the finished stuffed animal on a branch.
Once you do this operation several times, you will get the hang of making stuffed animals quickly.
To prevent the wings from sagging or twisting during drying, they are fixed. Some masters have inserted close your eyes at the end of all work, making sure that they located under the eyelids, in the center of the eye socket, looking forward, and not in different directions.
That's it. Yes, I forgot!
Place the bird carcass in a saucepan and cook until it is ready to eat. Bon appetit! That's it now.
MAKING STUFFED ANIMALS
Before you start making a stuffed animal, decide for yourself what you want. Make a stuffed animal from the whole animal or just from the head. Maybe you will be satisfied with crafts made from animal fangs, horns, or hooves. What I mean is that by giving preference to one of these items, you may lose the others forever. Well, the head and the rug somehow fit together. But the head is separate? By cutting off the head, you will never get a full size stuffed animal. Having taken the tusks from a boar as a very memorable trophy, you will never again be able to make anything worthwhile out of your head, of course, except cold meat.
I know from myself that the choice is difficult. And I want this, and I want that. And if there is no master nearby, then you can lose your dream. Go from larger to smaller. If the head fails, the fangs will always remain, and not vice versa.
Having practiced on a bird, you already know what and how we will do.
It's better to start with small animals - squirrels, hares, ferrets, and eventually rats, if you like them. Then you can move on to foxes, wolves, moose and bears. Most importantly, it should be at hand required material, this especially applies to stuffed large animals. The frame must support the weight of the stuffed animal. Let’s not guess now what kind of stuffed animal we will make in the future, let’s start with small animals.
Stuffed squirrel
We took measurements of the squirrel. We take out a scalpel and make a longitudinal incision - from the chest to the root of the tail.
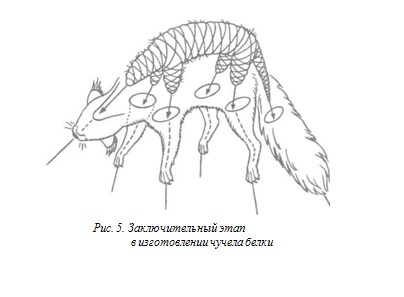
In fact, when any animal comes to you, you yourself must carefully look and evaluate how best to remove the skin from it, so that you can then successfully put it on an artificial carcass. Each animal needs its own approach, but the basis is always the same - a cut from the chest to the tail, freeing the legs and head. There are no other difficulties. The most important thing in such work is to make as few unnecessary cuts as possible, properly process the skin and skull, and properly prepare the artificial carcass. So we made the cut. Without cutting, turn the hind and front legs out to the base of the toes, remove muscles and tendons, cut the knee joint on the hind legs, and the elbow joint on the front legs.
You know where, from whom, how and what is cut, remember There’s no need to say anything special. The carcass itself will not let you free the carcass.some joint just like that. You will find a way out yourself, If you try to use one or the other method. It is better to start “liberation” first with your hand. If it doesn’t work out, you need to resort to using a scalpel, and not vice versa.
Further. You pull out the tail vertebrae of the squirrel without cutting the tail or wrapping the skin over the vertebrae. You shoot with an accordion. Remove the skin from the entire carcass. From the neck, wrap the skin over the head and trim the bases of the ears and the ligaments around the eyes, as close to the bones and eyeball as possible.
We must try not to cut the eyelids and the skin around the eyes. Trim your lips along the border with the gums. Nasal cartilage and don't cut the chin. In this case, the skin will stick firmly to the skull; you cut it off from the carcass.
Remove the brain from the skull through the resulting hole, and remove the septum from the nasal cavity.
A note for the future. If through the resulting holeIf you find it difficult to remove the brain from other animals, then you can cut or saw off the occipital bone at the skull and remove the brain through a wider hole. Scull we process it, fill it with any suitable material (you don’t have to fill it), and return the occipital bone to its place: either glue it or replace it with something.
Now it’s convenient for me to enter the numbering of actions. So, boo-Let's assume that everything we described is number 1.
2. The skull and the entire skin, including the inner surface ness of the paws and tail, soak it well in a saturated solution of sodium arsenic or pickle it with acid- but a salt mixture or fine table salt. Well, salt is available to everyone!
3. We make a wire frame. It consists of a main rod and two cross rods for the legs.Let's sharpen them. I do not indicate the dimensions of the rods, they should be slightly longer limbs of the animal. We make two rings on the main rod: one at the site of the shoulder joint, the other at the site of the hip joint. We insert transverse rods into the rings, ring- we clamp the free ends of the transverse rods handle 1.5 turns around the main rod.
4. We wind the tow on the resulting frame in different measures appropriate to the carcass. To prevent the tow from unwinding - fell and did not fall apart, we wrap it with threads. The extra 2 cm of tow should fit tightly into the skull.
5. A skin etched with arsenic can be worn for an artificial carcass. The salted skin is pre- it is necessary to rinse thoroughly clean water, squeeze out and, turning the fur side out, dry for an hour. After the skin has dried, we treat it with a solution of copper sulfate. It should be rather weak so as not to color the squirrel’s fur.
6. Dip the skull into a solution of copper sulfate for a few minutes.
7. We put lumps of tow in the eye sockets, tightly rolled to the size of the eyeball, put the tow on the palate, and put plasticine, gypsum, clay (of your choice) in the places of the removed muscles.
8. We insert artificial eyes, stretch the skin onto the skull and turn it fur side out. The muzzle is we adjust, smooth and straighten the skin on the head ears. We insert the main rod into the skull using artificial carcass.
We pierce the skull and use the end of the rod that appears to pull the beak into the skull.
At the same time we pull the skin over the neck and chestnative carcass.
9. With the ends of one transverse rod we pierce thethe soles of the front legs, and the ends of the other - the soles of the hind legstheir paws. We insert the end of the main rod into the tail.
It is convenient to do this if you bend the squirrel skin under thelarge angle in the direction of the back, and the ends are artificialof the carcass, since it is made of wire, also bent at the same angle, and directed in the desired direction.

10. We tie the leg bones to the rods.
11. Having given the paws a natural position, we sew up the squirrel skin, piercing the inside with a needle.
12. We place the stuffed squirrel on a twig, having previously drilled holes in it for the ends of the rods. Zak-reply. We cut off the excess ends of the rods with wire cutters. You can “gift” a pine cone to a squirrel by placing it on the shafts of its front legs.
13. In two weeks, when the stuffed animal has dried, the corners the eye can be lubricated with epoxy glue to prevent it from coming off cilia.
My first stuffed animal was a stuffed squirrel. She receiveddidn't feel very good, turned green from oversaturation solution of copper sulfate, sat in an unnatural position. Much later I got used to it and made more similar mistakes no longer committed
Stuffed roe deer head
It is interesting for us to make this stuffed animal for the main reason -the fact that roe deer have horns. How to preserve these horns, how to make a roe deer’s head so that it looks like a real one - these are the problems that we have to solve in order to apply this knowledge to make stuffed animals from other “horned” animals.
So, somewhere God sent you a roe deer... You separated the neckroe deer from the body and, after consulting with friends, decided to make a stuffed animal out of it all. Your actions are like this.
Remove the skin from the head of the roe deer by making a T-shaped cut between the horns, around the horns at the very top of the crown and along the upper side of the neck to the scruff.

. Having removed the skin up to the ears, cut the cartilage of the ear canals and the ligaments around the eyes, trying to do this closer to the bones of the skull and the eyeball. Try not to cut through the skin of the eyelids and the skin around the eyes.
. Trim your lips along the border with the gums. Cut the cartilage of the nostrils and nose. All muscles and connective tissue must be cut off from the lips - from fat deposits.
In the ears, separate the outer fur skin from the cartilage. The skin of the inner part of the ear does not come off easily; it can be left on the cartilage.
.Boil the skull without horns and separate the muscles and eyes.
You put the skull in cold water, and not hot. If
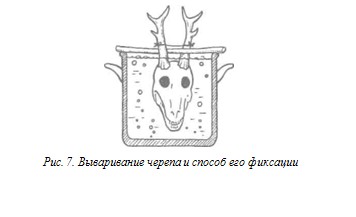
put the skull in hot water, protein substances (albumin) will coagulate and clog the pores through which theThe rest of the protein substances and salts are consumed. Cook until from the moment all residues begin to separate freely muscles. When boiled for a long time, bone connections and seams are weakened, and teeth fall out. For cooking, dishes are selected according to the height of the skull (without horns). If the dishes are larger, the skull should be hung by the horns on a stick.
It is not always possible to find dishes of the appropriate size, especially for large skulls - elk, wild boar. Having suffered for a long time, I found another way out, how to clean the skull if there is no pan of a suitable size. He poured water into an ordinary bucket or basin and put the animal’s skull there, forgetting about it for several days. The meat on the skull was spoiling and falling off. And when the decomposition of the meat approached In the end, the entire skull could be cleaned calmly and easily, even in hard-to-reach places with a strong jet of water.
.Saw off the occipital bone. Through the hole, about formed after sawing off the occipital bone, removing eat your brain. To do this, you can use tweezers, strong stream of water.
. Preserve the roe deer skin with an acid-salt mixture.After one or two days, strip it and etch it with arsenic. and wash it off. If the skin was processed only by a cook-salt, rinse it in clean water, squeeze and dry for an hour. Then skin from the mezdo sidelubricate the rye with a solution of copper sulfate, making sure thatso that the solution does not get on the wool. Copper sulfate pro-nourish the cartilage inside the ear and the inside of the skin ear. After half an hour, peel and knead the skin.
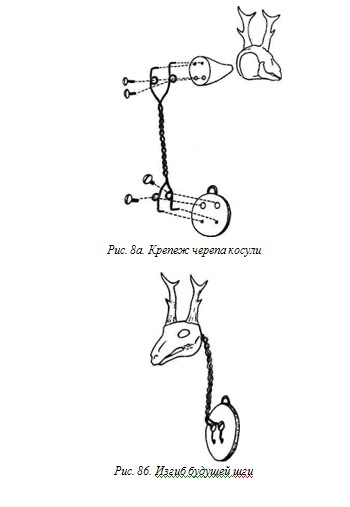
. To make a roe deer head, you need to twist a metal rod made of wire twice along the length of the neck with a diameter of 4 -4.5 mm. Curl the free ends of the rod into rings. Attach one pair of rings with screws to the board with loop, another pair of rings - to a wooden block, which which you wedge in the skull in place of the occipital bone.
. Give the metal rod a bend for the future neck, and turn the skull so that its position is father-in-law.
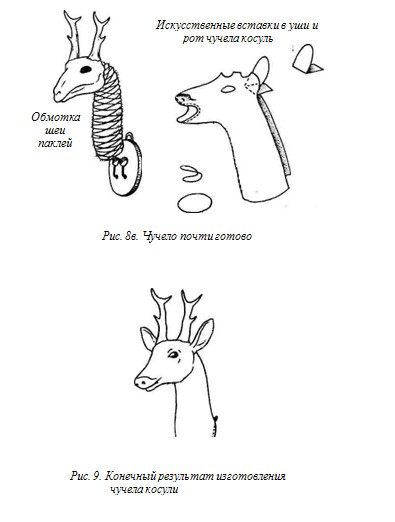
. You wrap tow or newspaper around the rod and tie it all tightly with thread.
. Insert lumps of tow into the eye sockets of the skull. Noso- fill the cavity with plasticine, clay or plaster, giving it correct form. Place tow on the palate and tie the lower jaw. You also apply tow or spread plasticine, clay or plaster on the cheekbones and cheeks, in places where the muscles were removed.
. Instead of lips, sew a large wire into the skin's mouth.local ring. For roe deer, a wire with a diameter of 3 mm (with insulation - 5 mm) is suitable; for deer, wild boar - wire with a diameter of 4 mm (with insulation - 7 mm).
Fasten the ring in the middle, in the corners of the mouth, and then sew along the entire perimeter along the border with the lips. When stitching, tuck the exposed part of the lips.
Cut cardboard according to the shape of your ears and insert it into your ears. The cardboard should have a “continuation” 5-7 cm long, which I would like to bend it and place it under the skin on the skull, giving the ears a standing position. Glue the cardboard to the ears so that the insides are not visible.
.Pull the skin prepared in this way onto
skull. The eyes should line up with the eye holes,
ears - accept your position: be slightly tiltedand spread apart.
. You sew the skin together, making ties on the flesh.
. The free part of the skin should coincide with the oval a board on which the entire head rests; skin a little pull and nail it to the end of the board. The stuffed animal is almost ready. All that remains is to comb it.
. When the stuffed animal dries out a little, after two or three daysGlue the corners of the eyes and lips with epoxy glue.
Some experts sew up the mouth of a roe deer with pinkmaterial, before gluing the lips, remove the sutures, fastening sticking lips with a wire ring, ears are fixed on wire. Each specialist is free to choose his own method of fixing the mouth, ears, eyes, and each, at his own discretion, selects the material that he considers necessary.
.You hang the stuffed animal on the wall, in the place where you want it
like.
MANUFACTURING STACY animals in full GROWTH
Making a life-size stuffed animal is not so easy. Requires patience, more material. To make a stuffed animal, large animals without horns are skinned in a layer (carpet); This is how it is done in bears, leopards, etc.
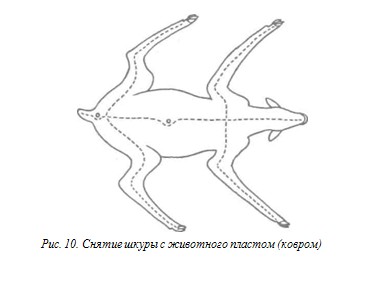
For large horned animals, we make an incision along the abdominal line from the base of the tail to the sternum. Next time- cut the upper part of the neck to a cross section between horns. This is how we skinned the head of a roe deer.
How to make a life-size stuffed animal, we andLet's take the example of the roe deer again.
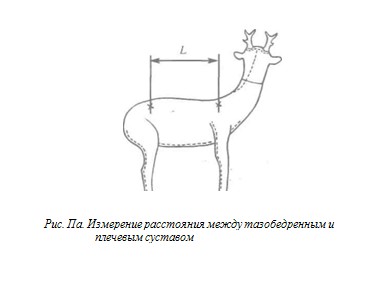
.Measure the roe deer carcass, the distance between the hip-
knee and shoulder joints.
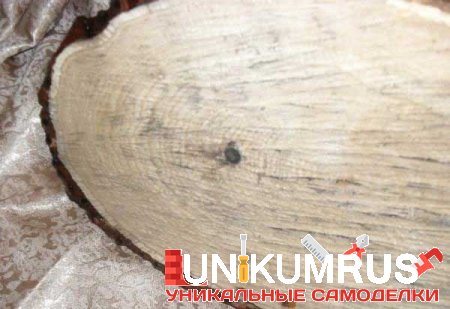
(The dotted line shows the cuts made to the roe deer carcass for skinning. The skin is removed from the head as shown in Fig. 6.)
.If you have the ability to sculpt, then because
prepare an exact copy of an animal from plaster or clay
th. Imagine how much plaster you will need! If
such a figure is too heavy for you, there are many sculptures
cover it in layers with paper, papier-mâché and when everything
When it dries, cut the paper layer and remove it. Then
all parts are connected on a frame made of steel rods and
glue it together.
I had an idea to stick paper and papier-mâché straight onto the roe deer carcass. What could come of this? I know. I haven't tried it.
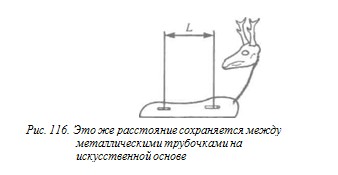
. You don't have to make a sculpture. Stock up on 20 meters of soft aluminum wire with a diameter of 3-4 mm and 20 meters of the same wire with a diameter of 2 mm. To you you will also need metal rods with a diameter of 8 mm - slightly longer than the legs of a roe deer. You will need a board 20-30 mm thick, shaped to match the lines of the back, back and front of the roe deer’s body.
. On the board on both sides in the places where the legs are attached -beat staples or attach tubes into which you tightly push the ends of the leg rods.
Attach twisted pieces to the front of the board
metal rods on which the skull of a living being is attached
here.
For the legs, metal rods with a diameter of
rum 8 mm.
Bend the end of one rod at a right angle toplacing it in a tube.
. Shape the rods into the front sides of the legs, leavingAt the bottom there is a pin for attaching the stuffed animal to the floor or stand.
. Edge the back side of each leg usingbiting a softer and thinner wire.
You can also make the back of your legs out of thick wire.loki, repeating the natural shape of the roe deer's leg. You can
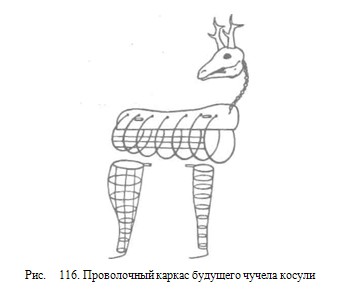
even from a whole rod, bent in half, to recreate the externalThis is a great view of the legs of a roe deer, but bending the wire, clearly repeating all the bends, is not so easy.
. Every 5 cm, braid the rods with semi-arcs, repeating the shape of the muscles of the roe deer’s leg. Using thin wire, also every 5 cm, weave the arcs from top to bottom, maintaining the contour of the roe deer’s leg. In a word, you make a lattice frame for the animal’s legs from wire.
. In the same way you make the body of the animal. Prepare from 4 mm wire 10-12 circles, equal in girth of the chest and abdomen. Their You fasten the free ends to the wooden “back” of the scarecrow and braid these circles with softer wire. The circles are narrowed at the places where the legs are attached.
. Finished wire frames are glued in multilayerseat with newsprint. The paste must be boiled on starch or flour with the addition of a saturated copper solutionvitriol, such a paste does not grow mold and li- fixing flour beetles. These “prohibitions” do not apply to mice. wandering around. You insert artificial legs into an artificial torso.
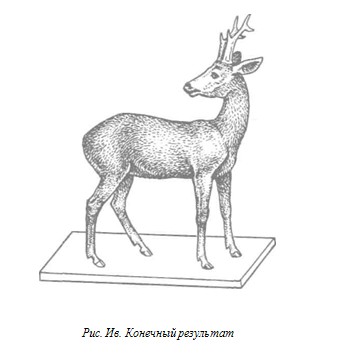
On the finished housing mounted on the stand, suli pull dressed, pickled and pressed skin Treat the hooves, separated from the legs, with a solution of copper sulfate, and drill holes in them for the rods. First, pull the skin over the head (we already know how this is done), then over the neck, chest, front and hind legs. You sew up the skin. The stuffed animal is ready.
MEMORABLE TROPHY-ANIMAL SKULL
I don’t know if a hunter gets tired of making stuffed animals in their full glory, but there are hunting enthusiasts who hang animal skulls on the wall as trophies. They shock others no worse than stuffed animals.
Previously very popular as decoration for hunting interiors, skulls of bears, wolves or exotic animals were used: rhinoceroses, crocodiles, elephants. Nowadays, such trophies are also of scientific and hunting value.
There are cases when the animal's head is so damaged, that the best way out is not to suffer, but dance on only one skull.
If you properly process the skull and place it beautifully on a decorative stand, a stone, or a cut of wood, then such an object will decorate the wall not only of a hunting lodge, but also a wall with a hint of European-quality renovation - in any city apartment. We will talk further about the requirements that the stand must meet.
The whole process of working with the skull consists of the following stages:
— skinning, removing muscles, brain and blood from the skull;
— digestion, removal of tendons and teeth;
— grease removal, bleaching and surface finishing;
—arranging a trophy in a hunting interior.
A trophy skull must be free of defects and blemishes.
The skin must be removed from the skull, and the muscles and tendons must be remove carefully so as not to damage it. Remove the skin from the head with your fingers; With a knife we only cut the neck, remove the eyes and muscles. The brain can be removed through a hole in the back of the head with a spiral of wire, and its remains and brain film - with a strong stream of water and tweezers. If conditions permit, we clean the skull of blood in running water temperature 10-18 °C. If the skull is cleaned in stagnant water, table salt is added to it to a 1% solution was available. The solution is stirred frequently and change.
Boil the skull as we already know, and put it only in cold, not hot water. We tie the lower part of the horns with a clean rag to avoid exposure exposure to boiling water and steam, otherwise the natural color will fade. When water boils, foam forms and dirt floats up - they need to be removed.
After boiling, immerse the skull in clean running water for about 8 hours, then remove it and place it in the shade. to a draft to dry. We clean the dried skull from fatty substances that appear in the form of dark spots. We remove them with a 10% ammonia solution alcohol Place the skull in this solution for 24 hours. Very effective degreasers are also chloroform (trichloromethane) and carbon tetrachloride carbon tetrachloride, gasoline and ether. It is enough to rub the skull with them several times, and it will sparkle “like new.”
We bleach the skull in this sequence.
. We fill all the cavities of the skull with cotton wool. We wrap it in cotton wool and tie it with twine.
. We place the wrapped skull in a closed place for access. light dishes. Otherwise, under its influence, hydrogen peroxide will turn into water.
. Pour hydrogen peroxide into the dishes to a height of 1-2 cm. The cotton wool absorbs it. Whitening time -15-20 hours. The dishes are closed all the time.
Skulls of small animals do not need to be wrapped in wax. that, and completely immerse in hydrogen peroxide. Time from- Whitening of such skulls is reduced to 4-5 hours.
The optimal concentration of hydrogen peroxide is 7-10%, while hydrogen is leached with ammonia.
a liter of hydrogen peroxide requires 5 ml of a 25 percent ammonia solution; it speeds up the whitening process.
So that after all these procedures the skull acquires colorivory, we place it in a 1% solution of phosphoric acid for 3-6 days, depending on the size of theturnip or in a 10% chloramine solution for 7 days.
Previously, skulls were bleached in anthills, but ants still severely damage the surface and integrity of the skull.
After bleaching, we begin finishing the skull.
It is not recommended to coat it with varnish. Rough
polish the surface of the skull with a mixture of one part “exhausted-
"nogo" (hydraulically enriched) chalk and
two parts lime. Apply the mixture to the surface through
pa and polish with a clean cloth. Also for polishing
you can use a mixture of “exhausted” chalk with denaturant
with alcohol, the thickness of which resembles sour cream.
We polish not to shine the skull, but to smooth out the
surface on which dust accumulates.
We rub the skull with paraffin and polish it with a clean rag.
coy.
We return lost teeth and bones and
glue it.
The whole process is described by me as required by the class.sical processing of skulls. At home, you can Perhaps you will find a simpler and more accessible way to skull work. In the end, the skull itself, even if not properly processed, already attracts the attention of others with its appearance.
Now let's move on to the methods and requirements for placing skulls on decorative stands. I have already said that stands can be wooden, stone and others, of any form and for every taste, if they are gar- mounted with the skull and the furnishings in the house.
Skulls just like horns and stuffed animal heads nogo, perfectly combined with natural materials lami, such as stone, skin, fur, bark, reeds, wood with or without bark, bast.
The stand should not be decorated in such a way that it attracts more attention than the trophy itself. It is necessary to ensure that the trophy stands out in its natural color:white - on a darker stand, dark - on a white stand.
Here are several types of stands for skulls, horns and monsters:cels of animal heads that can be made from wood.
I am sure that you, my dear reader, are a creative person.you have not only exquisite taste, but also the kind of artistic vision that is characteristic only of people like hunters - fans of the forest and nature. It will not be difficult for you to choose one or another stand for his trophy in order to achieve his plans.
A few lines about horns. If the hunter has a lot of timespends time in the forest hunting, then he develops horns. I now mean a hunting trophy. Everyone respect- a self-made hunter strives for one thing - to preserve this beauty for as long as possible and show off to your friends. Horns can not only be “taken away” from the beast, but also
 simply found. Consequently, the horns are not only trophy, but also discarded.
Trophy horns can be with part of the skull, without the skull, or even not all horns, but only their fragments. In any case, it is desirable that the horns are not damaged: rodents, as well as hares, like to feed on shed antlers. The bases of the horns must be strong enough to be screwed onto a stand or wall. If appearance The horns are not attractive enough; they are tinted and varnished. For a normal man who can hold a screwdriver or a hammer in his hands, attaching the antlers to a stand or to a wall is not difficult at all. The main thing is that it is beautiful and reliable.
MAKING STUFFED FISH AND SNAKES
Making stuffed fish
Since the topic of this book is making stuffed animals, it is impossible to ignore making stuffed animals of any kind, namely fish. This knowledge will seem very important, especially but an avid fisherman. It happens that good hunter one- temporary and a very good fisherman.
A stuffed fish is made as follows.
. The skin is cut with bottom side body from tailto the base of the head. The skin is not wrapped or folded,since the scales hold on very weakly. When preparing on-to constantly maintain humidity in the cuvette wherethis “operation”, otherwise the dried scales will stick.
. Cuts of meat and fat are scraped off the skin on a smooth surface, in the direction from the tail and back to the sides.
.
The skull is opened from inside the oral cavity and the brain is removed.
. The gills, eyes and fleshy base of the tongue are removed from the head. The muscles on the cheeks are also removed.
. The head and skin are treated with copper sulfate.
. The size of the fish is cut out of polystyrene foam or de- roaring an artificial carcass. It can be sculpted from clay,plasticine, plaster. The carcass is then covered in multiple layers paper. After drying, the paper is removed, the paper carcass is stitched and glued.
. A fish stand 25-30 cm long is the easiest to makemade of aluminum wire with a diameter of 3 mm and a length of 75 cm.To do this, bend a circle of wire with a diameter of 10 cm so that the remaining one end is twice as long as the other. At the intersection they are twisted in half over a segment of 5 cm andspread the ends in opposite directions at a slight anglecrowbar to the plane of the circle formed by the circle.
. The long end is pierced through (along) the plastic or paper carcass and bend the ends, repairing the base of the head and tail.
. The skin is pulled over the prepared carcass and sealed. sewing.
. The head is given a natural position, tightlythe gills are squeezed, and plaster, ale-bastre or other quick-hardening solution is poured into the slightly open mouth.
They insert the eyes, straighten the fins and tail,
pinning or gluing them to cardboard.
. They put the stuffed animal out to dry.
. A few days later the stuffed fish is covered with demons.colored varnish. And since the skin turns green from the copper sulfate, the stuffed fish is tinted a little.
Making stuffed snakes
I've been working with snakes for half my life. A stuffed snake attracts attention even more than a full-length stuffed animal. stuffed snake can be “rolled up” into a ball, it can be wrapped around an animal’s skull, just put it near front door or in the under- riding. Sometimes you need to educate your neighbors too!
A stuffed snake is made as follows.
.The snake is measured with a ruler. We are especially interested in
length from head to beginning of tail and tail length, thickness
snakes in different parts of the body. A snake's tail begins like thisstrangely enough, after the anus, which is closede-shaped scaly membranes. Note: ifIf the tail is long, it is a male; if it is short, it is a female.
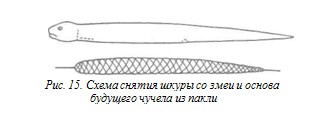
The head is separated from the spine, and when it is already
hanging on one skin, it is removed along with the skin. skin
turn it inside out and remove it with a stocking.
You can make a small incision from the head to the stomach. From large snakes you can remove the entire skin by trimming the lips and eye sockets. They start with the head and end with the tail.
. The brain and poisonous teeth are removed from the skull.This must be done carefully.
. The skull is treated with copper sulfate.
. The skin is treated with copper sulfate.
. On a wire equal to the length of the snake’s body with a tail,wrap the tow, leaving the tip of the wire to be placed in the skull.
. The tow is moistened with a solution of copper sulfate andwrapped with threads that fit tightly to one another.
. While the skin of the snake and the artificial carcass are not dry, the skin is pulled over the artificial carcass with the flesh inward.
. A quick-hardening plaster solution is poured into the skull and, bending the tip of the wire, secure it in the skull box. The incision is sutured.
. The snake's mouth is sealed with plaster, artificial eyes and an artificial tongue are inserted.
. After the stuffed animal dries a little, it ispaint. The stuffed animal is placed in the neighbors' mailbox or - at worst, they give it the proper appearance and findplace near other trophies. Please accept my dark humor as a release after hard taxidermy work.
CARE METHODSFOR TROPHIES
Just like hunting equipment and weapons, trophies require constant care.
The main enemies of trophies: dust, smoke, moisture, mold and rotting. Moths and beetles from the group are dangerouskozheedov. The best remedy for any pests is purity. We need to clean the stuffed animals more often, ventilate them, and beat out the skins. The skins are laid with disinfectantby common means. In insufficiently ventilated and dryBacteria appear on treated skins. Wool begins fall out, the skin loses its value. It is recommended to rub damaged areas with 2% formaldehyde, and ventilate the skin in a draft. Mold and stains caused by insufficient ventilation and high humidity are removed by thorough ventilation, op- scouring for disinfectants. Such products as gasoline, trichloroethane, denatured alcohol, ammonia diluted with water 1:1, acetone. (Ace- tone is used to treat damaged areas and in small quantities.) All these means must be used take turns: mold becomes immune to one to the same means. Insects also adapt - Xia. Previously, plastic bags and naphthalene saved from moths. Now the moth has adapted and eats everything. Carbon tetrachloride can be used for disinfection. it is poisonous, but not flammable. Sulfur dioxide is gooda product that destroys all types of moths, beetles, and their germs shea and larvae, as well as putrefactive and fermentative bacteria.
Moths and bark beetles cannot tolerate the fumes of resin from coniferous trees. Ants don't like the smell of coffee. They also do not like the smell of turpentine, tobacco smoke, tomato leaves and parsley, and do not like charcoal.The smell of tobacco repels moths and other “non-smokers” insects
To clean the skin, we can recommend the following method.
Take 4-5 kg of river sand (one serving - 2 kg). Polo- Place the sand in a linen bag and wash in running water until only clean sand remains. The washed sand is pour onto a baking sheet and heat in the oven until slightly crackling. The temperature of the sand should not exceed 100 °C. Place the contaminated skin on the table and sprinkle it with hot sand, which is then rubbed in with a fleecy brush. Clean hot sand melts the grease and dirt that stick to it. This operation continues until the sand grains are clean.
After cleaning, the sticky skin is straightened out and it acquires a natural shine.
You can also use sawdust from deciduous trees soaked in gasoline to clean the hide. Just don't put them in the oven. But, perhaps, I was “joking” here. Extreme caution is required when working with gasoline!
And so the whole process is the same. Instead of gasoline, you can also use trichloroethane. The skin then needs to be well ventilated.
Now household and ordinary chemicals have stepped far forward, many new products have appeared. And science does not stand still! Poison everyone to good health! That's probably all for today.
CONCLUSION
Theoretically savvy, and maybe practicallyHaving tried it, you are already ready for the fact that you know how and in what sequence you will make the stuffed animal. "Basics" you you know. Making stuffed animals is always a creative process.You need to become a little artist, a little sculptor.
I am also constantly learning. But if you suddenly ask me -how to make a stuffed giraffe, I'm afraid I won't do it right away I can answer you. The only way I can imagine it is I guess I'll have to look for a long pipe to make the giraffe's neck. I have no idea where to get it! We are talking about a pipe, with a giraffe's neck everything is very simple. You'll probably have to weave it out of wire too. I don’t know what to do with the kangaroo either, especially with her pouch.
And this can be the case with any animal that I have never met before.
You can make a stuffed animal from any animal. Differenceonly in the size of the head, legs, body, and in the method of removing the skin. The skin of large animals must be processed more carefully - almost as professional ambulancemen do.nyaki, and the rest can be figured out and, focusing onknowledge and experience gained in the manufacture of stuffed animals from previouslycaptured trophies, make a truly memorable copy, which will become the pride of a brave hunter in the future.
The memory of a successful hunt can be not only a stuffed animalanimal and its skull, but also hooves, wool, bristles, fangs,feathers, claws. All this is an excellent material for makingvarious talismans, if presented beautifully.
A little imagination, skill, creativity - and you will become the owner of objects that will cause admiration, and maybe even envy, among non-hunters - people far from the forest.
I have a talisman made from elk teeth, from the "tusk"the origin of which no one can explain, but thisjust a cockspur, donated by one very good great person. I have a lot more interesting things and unusual. At one time I was interested in making wood crafts. They complemented the hunting trophies, which in turn decorated the wall of my hunting lodge. In my “taiga corner” it’s now interesting and hunting-like humanly comfortable. So go ahead and learn!
Maybe I should read a few more tutorialsbooks on a given topic. I sincerely believe that the best and most faithful friend is a wise and necessary book. Glory to all the writers who share their knowledge with us, who think and care about our enlightenment!
We wish you beautiful trophies and memorable events!
LITERATURE
Gerasimov Yu. A.Gamekeeper's Handbook, 1988.
Formozov A. I.Pathfinder's Companion, 1990.
Grinchenko A. B.Hunter's field guide, 1998.
BloomM. M., Shishkin I. B.Hunting rifle, 1983.
Slepykh V.V.Modern Russian hunting, 2000.
Leontyev V.V. Hunting, 2001.
Fokin S. Yu., Shishigin A. G. Encyclopedia - hunting, fishing, 2003.
Roskopf I.Hunting trophies and products, 1984.
Kirsanov M. I.Hunting and health, 1990.
Dudzinsky V.Feathered game, 1979.
Rudenko F. A., Semashko V. Yu., Cherenkov S. E., Matyunin M. M. Hunter's Encyclopedia, 1995, vol. 1.
Rusanov Ya-S.Waterfowl, 1987.
Korytin S. A.Trapper's Lures, 1998.
Matveev A. S. Hunting, 2000.
Rasper A . G . Huntingonwaterfowlgame, 2003.
Charitable Foundation
rescue and rehabilitation
humans and animals
"Movement of the Good"
search for missing animals; animal rescue (cat in a tree, etc.); working with wild and dangerous animals (snakes, etc.);
transfer of animals to families; any other questions.
Popular science publication Sugrobov Valery Yurievich
MANUFACTURING STACY
Editor R. I. Kaganova
Proofreaders N. M. Broyko, V. S. Akimova
Artist N. A. Bachinskaya
Computer layout O. L. Chistyakov
ПознакомитьсяWithbookspublishing housesYouyou canonwebsite
For questions regarding the wholesale purchase of books
publishing house "Aquarium-Print" LLC contact
With the help of this article, you can gain some basic knowledge on how to make stuffed birds. The work is not difficult, but quite painstaking and definitely not for the squeamish. Using the example described below, you can make stuffed animals from almost any bird; this does not require any special knowledge or materials.
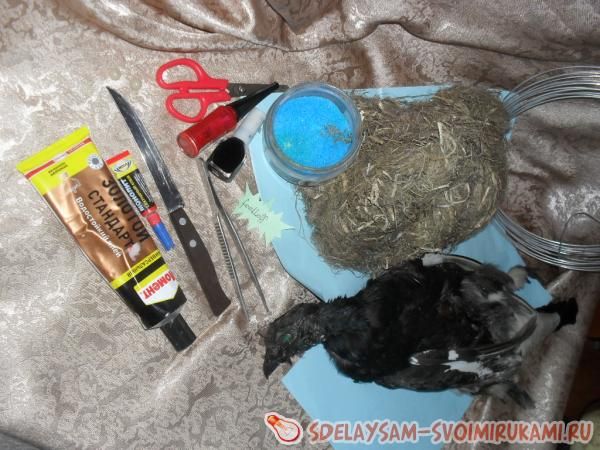
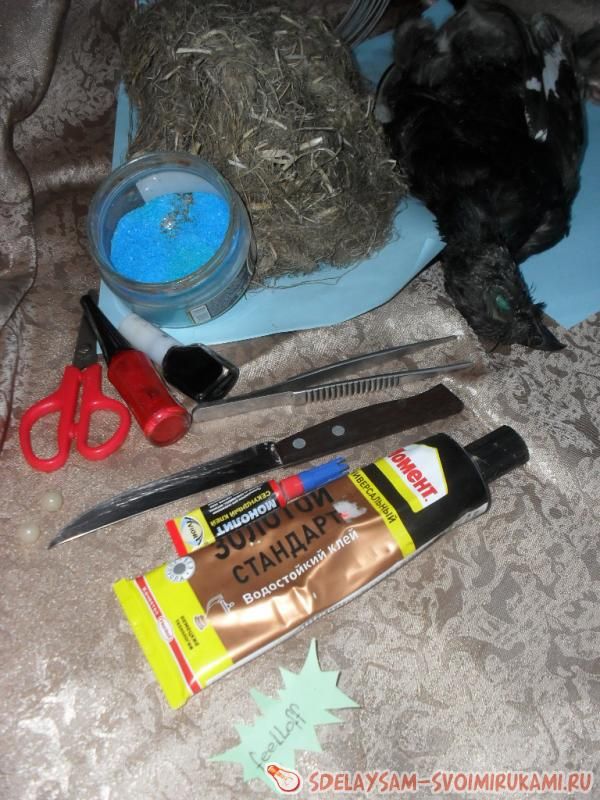
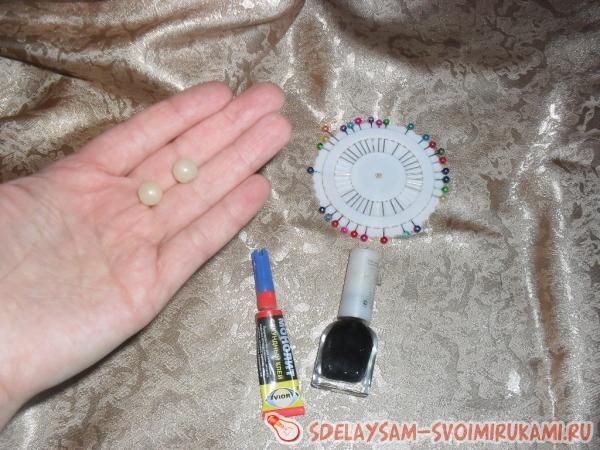
Materials and tools for creating a stuffed animal:
- copper sulfate;
- wire;
- brush (copper sulfate will be applied to it);
- tow (or other stuffing material, such as cotton wool or padding polyester);
- glue (moment);
- quick-drying varnish (you can use nail polish);
- balls or beads to create eyes;
- knife;
- decorative pins;
- threads with needles.
The process of making a stuffed animal:
Step one. Freeing the bird from the carcass
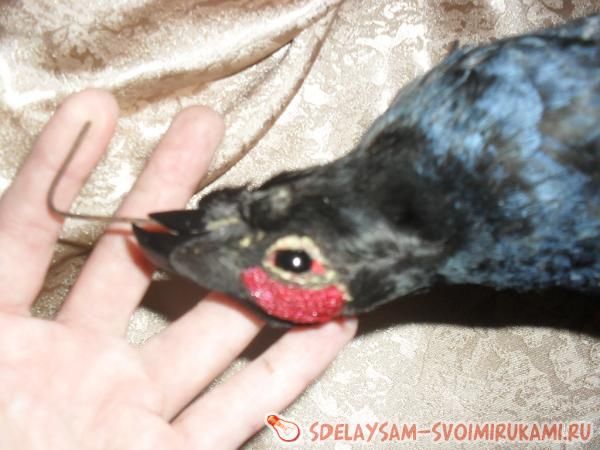
This is the most difficult, painstaking and unpleasant process. All the meat must be removed from the bird and this must be done as carefully as possible, as the skin can be damaged. Most the hard part there will be a head, and you also need to pay close attention to the coccygeal part, you need to try not to cut the coccygeal gland. The skin also needs to be removed from the legs of the bird; it can be rolled up into a stocking, this is not scary. The work must be carried out with a very sharp knife using small, careful movements; a scalpel is perfect for these purposes. When the code with feathers is removed from the head, the eye slits need to be covered with a piece of plasticine.
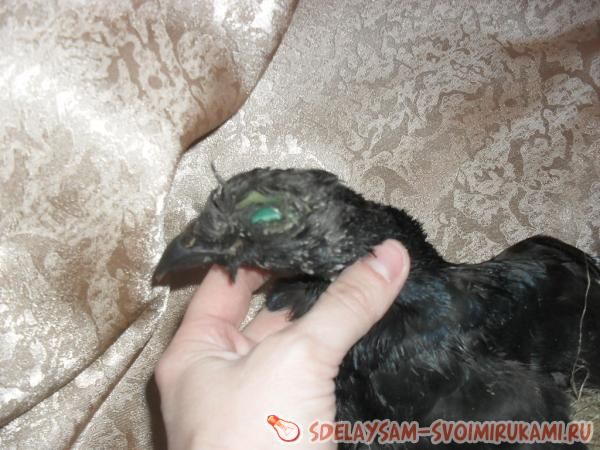
You will also need a skull for the stuffed animal; it will need to be thoroughly cleaned both outside and inside. The skull should be washed and cleaned under running water; the brain should be removed by scraping. Finally, the skull is thrown into water and boiled for no more than three minutes.
As a result, after all the work to make the stuffed animal, what should remain is the skull and the removed skin.
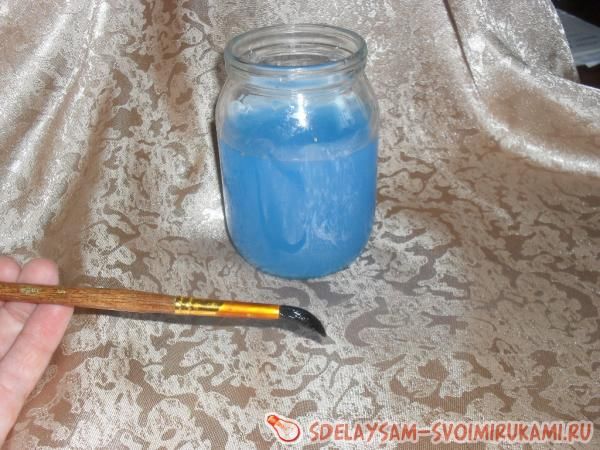
Step two. We poison the skin of the bird
If the stuffed animal is not treated with chemicals, it will quickly disappear; it will simply be eaten by bacteria. For these purposes, a solution of copper sulfate is used. To create it, you need to take one teaspoon of vitriol and dilute it with 200-250 grams of water. Next, the author takes a brush and paints the skin from the inside; unpainted fragments must not be skipped. Once the poison is absorbed, the bacteria will no longer be able to feed on the skin. When working, you should try not to paint the wings, otherwise the appearance of the stuffed animal may deteriorate.
As for the skull, it must be placed entirely in a solution of copper sulfate. Now you need to wait at least 6 hours until the vitriol is completely absorbed into the skin.
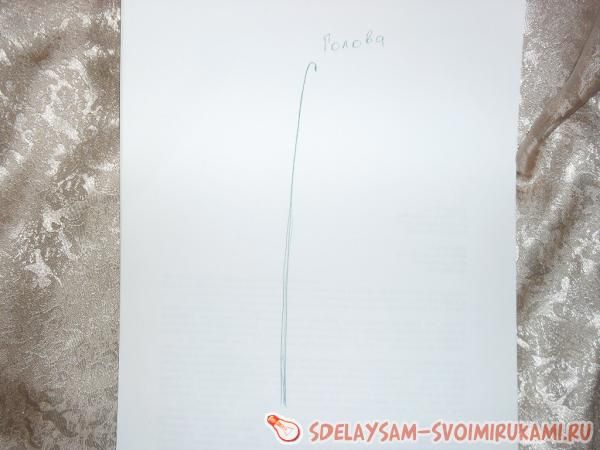
Step three. Making a frame for a stuffed animal
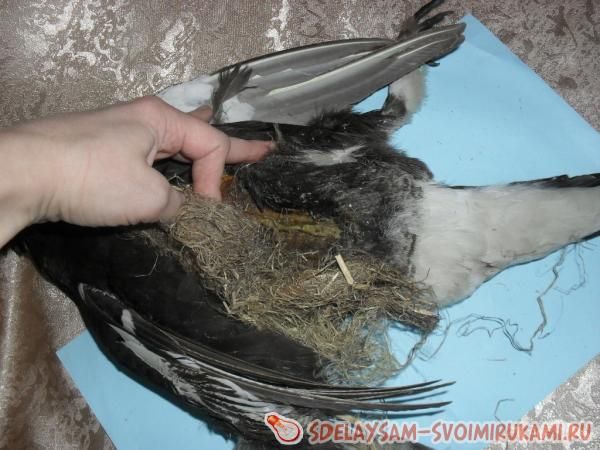
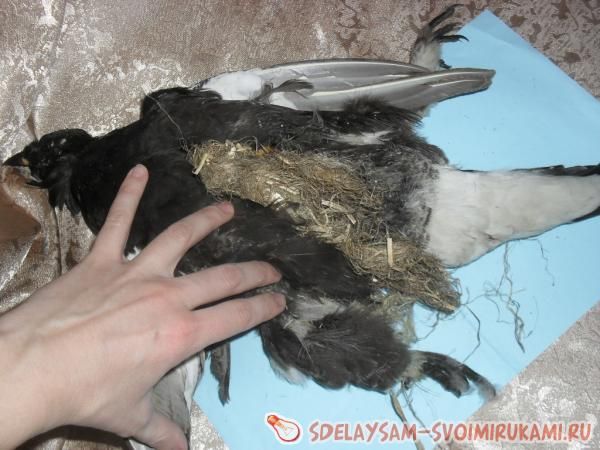
Next, you need to make a frame for the bird, that is, an artificial skeleton. It goes without saying that its dimensions should correspond to the size of the bird. To do this, take a ruler and take measurements of the length of the bird’s wings, legs, and you also need to measure the circumference of the chest and head. Well, then the wire is taken and the frame elements are made. Finally, cotton wool or padding polyester is wrapped around the wire.
Step four. We stuff the stuffed animal and sew it up
In order for the bird to have a filled shape, its body must be stuffed with some kind of filler, it can be cotton wool, rags, foam rubber, and so on. After this, the bird can be sewn up with a thread and a needle. You need to insert a wire into the legs; it is also used to fix the desired position of the wings.
Also at this stage you need to remember to make the bird’s eyes. For this purpose, various balls, beads, and so on are used. The eyes are inserted after stretching the skin onto the frame; you need to take tweezers and pull the code at the installation site. The color of the eye is not important, it will be colored after installation.
To make it convenient to fix the parts to be sewn, you can use decorative pins.
![]()
Step five. The final stage of creating a stuffed animal
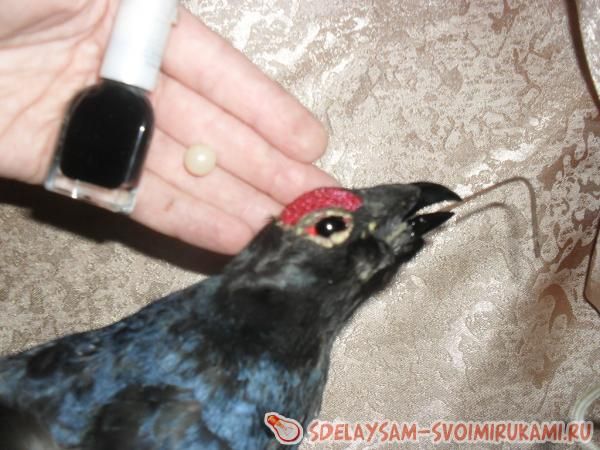
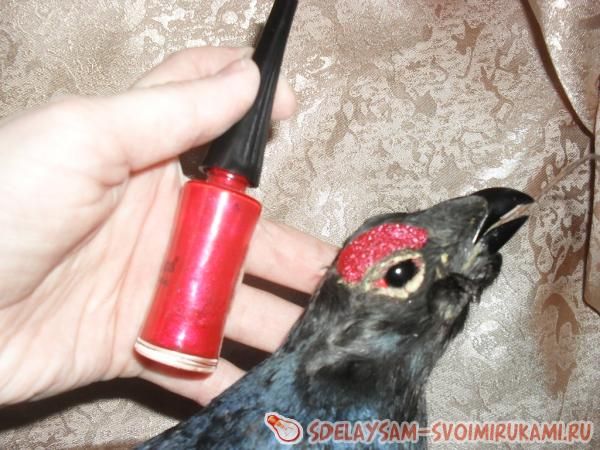
Now the stuffed animal is almost ready, all that remains is to install it and do a little work with glue, paint and varnish. If the stuffed animal has feathers sticking out and you can’t just smooth them out, the feather can be carefully coated with glue and glued on. If the bird has any bright elements, for example, combs, etc., they will lose color later, to restore it, use nail polish of a suitable color.
As for the bird's beak, it needs to be cleaned with the finest sandpaper and then varnished, so it will look much more attractive. In order to paint an eye, you first need to paint the entire eye with varnish, and then make a pupil by placing a drop of paint or varnish in the right place. The author made the stuffed animal's eye completely black.
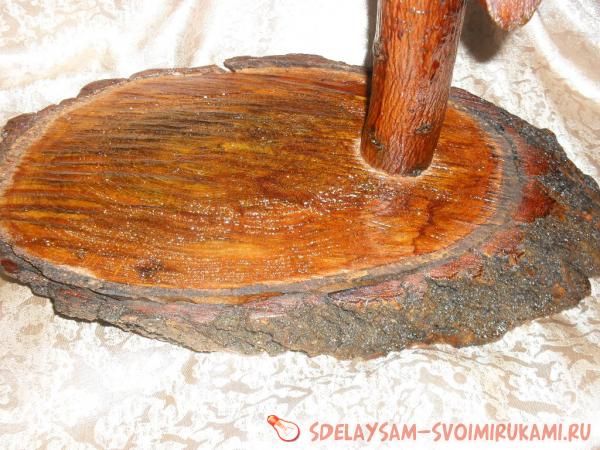
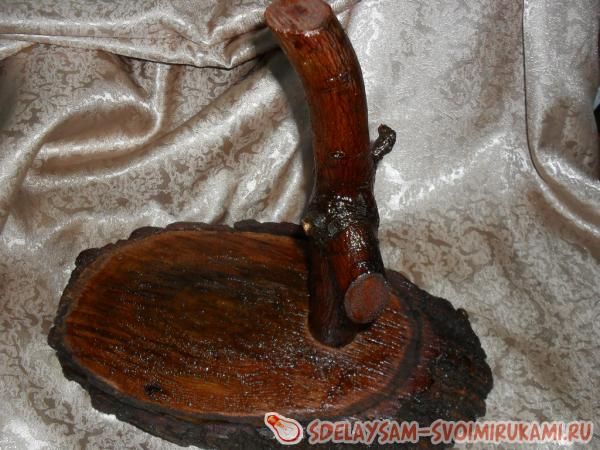
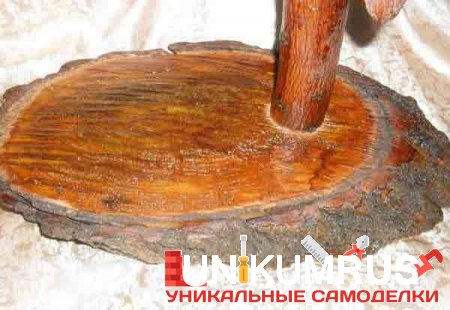
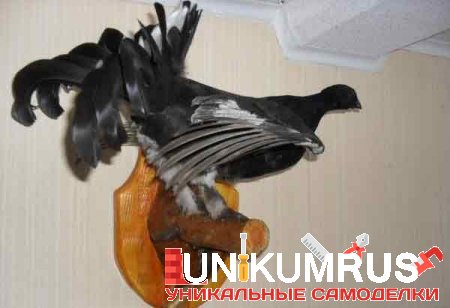
Well, in conclusion, the bird needs to be recorded. You can take a stump or some beautiful root, treat it with sandpaper, stain, and then open it with varnish. A bird planted on it will look very realistic and beautiful. The author used a wooden cut, to which he screwed a wooden knot.
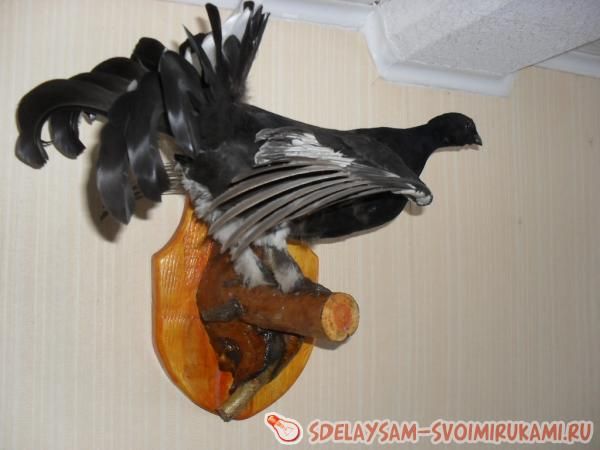
stuffed bird
Features of making stuffed various birds. Stuffed geese, ducks, and fish. Removing the skin, manufacturing sequence.
Make a stuffed bird , for example, quail or snipe, is more difficult than squirrels or ground squirrels, since the skin of birds is significantly inferior in strength to the skins of animals: feathers are held on it many times weaker than hair. Feathers stained with blood or greasy are much more difficult to wash and then return to their original natural appearance. Therefore, to remove bird skins, it is advisable to have a sharp lancet instead of a knife; you also need tweezers, scissors, wire cutters (“side cutters”), a forceps, an awl with a thin and long (10-15 cm) steel end, starch flour, cotton wool, and paper napkins.
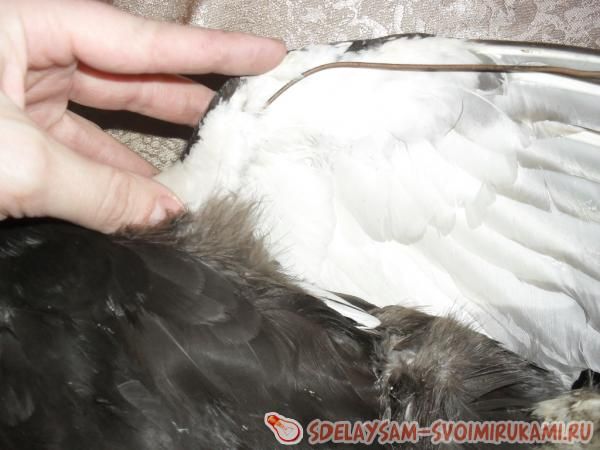
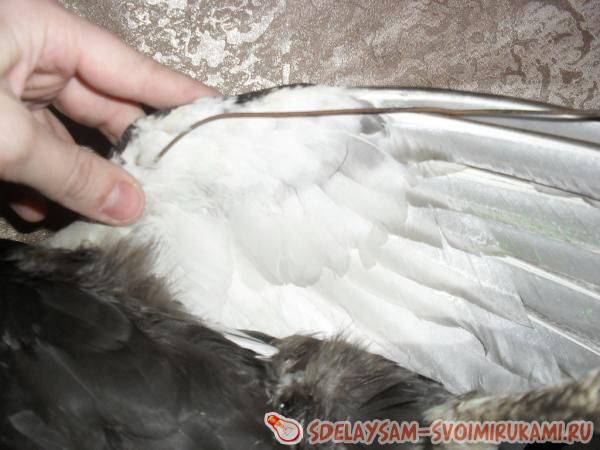
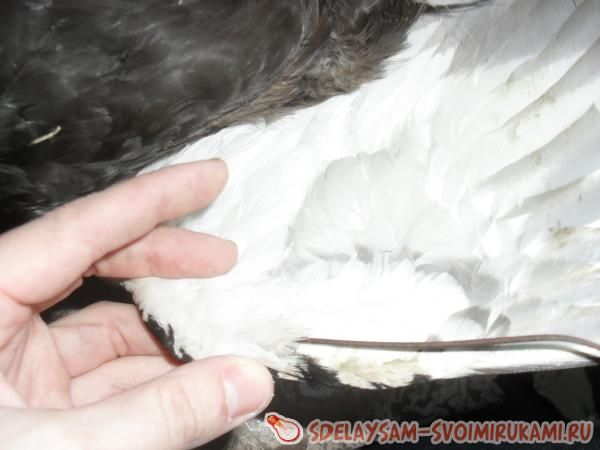
The skin is removed from the bird after rigor mortis. A cotton swab is placed in the beak. The remaining excrement is squeezed out of the anus and wiped with cotton wool. On the abdomen, the feathers are spread along the midline and the skin is cut from the middle of the keel to the anus. This is done carefully so as not to cut through the layer of abdominal muscle and open the abdominal cavity. The skin is separated from the carcass carefully, not pulling, but moving it with your fingers. Exposed muscles are covered with scraps of paper napkins or powdered with starch. After the skin is separated on the chest and abdomen, the knee of one leg is brought out through the incision and cut (Fig. 52, a). Do the same with the other leg. The thighs remain on the carcass. The leg muscles are dissected, the tendons are cut with scissors and the skin is wrapped around the leg. Then the skin is separated from the sides to the back. The end of the scissors is inserted under the caudal vertebrae and cut. This must be done very carefully so as not to cut through the skin on the back and not to cut the base of the tail feathers (otherwise they will fall out). Thus, the tail feathers remain with the skin.
On the side of the back, above the caudal vertebrae, there is a paired coccygeal gland, which is cut out and the area is powdered with starch. Next, the skin is removed from the back to the base of the wings. The forearm is exposed and the elbow joint is cut. The skin is removed from the neck and head with a stocking, moving it forward with your fingers, but without stretching, and cutting with a lancet the junction with the muscles - in the ear canals and around the eyes. The skin is removed from the head to the base of the beak.
In geese, ducks, swans, herons and woodpeckers, the head does not fit through a narrow section of the neck, so you have to cut the neck from the top to the back of the head. The exposed skull is cut off from the carcass, the eyes, tongue, muscles are removed, and the brain is removed through the cut out occipital bone.
From the forearm bones of small birds, without cutting, you can wrap the skin in a stocking and cut out the muscles and tendons.
In birds the size of a partridge and larger, the skin of the forearm is cut along the inside of the wing between the radius and ulna bones. In this case, the flight feathers of the wing remain attached to the bones and maintain their natural position.
The skin on the tarsus of most birds is not wrapped. The exceptions are the golden eagle, eagle owl, rough-legged buzzard and some other birds whose legs are feathered down to the toes. Taxidermists wrap the skin on the tarsus of these birds and remove muscles and tendons from the bones. However, practice has shown that if you inject a few cubic millimeters of a saturated solution of copper sulfate under the skin of the tarsus with a syringe, this turns out to be quite enough to preserve the skin with the muscles of the tarsus and there is no need for its preparation. Instead of cutting fingers and removing tendons! from the metatarsus of a crane, heron and other wading birds, you can get by by injecting copper sulfate under the skin.
The skin removed from the bird is cleaned of any excess meat and fat. The fatty skin from the flesh side is blotted repeatedly paper napkins, wipe with cotton wool and sprinkle with starch. Dirty and bloody feathers are washed with warm water and soap and dried by sprinkling and wiping them with starch. Greasy feathers are pre-washed with gasoline or acetone.
After processing, the skin is etched with a solution of sodium arsenic or copper sulfate. When using the latter, they try to lubricate only the flesh so that the vitriol does not get on the feathers, otherwise they will change their color. The skull is also etched - tow or plaster is applied to the places of the removed muscles, lumps of tow are inserted into the eye sockets and the skin is rolled over the skull, stretching it and smoothing the feathers.
The frame is made of wire of suitable thickness. For snipe, magpie and similar birds, soft wire with a diameter of 1.2-1.5 mm is suitable, for pheasant and black grouse - 2.0-2.5 mm, for wood grouse and goose - 3.0-3.5 mm.
The main central rod should be equal to the length of the body, neck and head, with a margin of 10-15 cm at both ends. The transverse rods for the legs and wings should be equal to twice the length of the limb with a margin of 10 cm at each end. The ends of the rods are sharpened. On the central rod (in accordance with the size of the carcass) 2 rings are curled against the shoulder and hip joints (Fig. 52, b). Transverse rods are inserted through these rings to the middle and each end is screwed one and a half turns to the central rod (Fig. 52, c). On this frame (in accordance with the configuration and size of the bird) the carcass, forearms, hips and neck are wound from tow, lengthening it by the size of the skull (Fig. 52, c). To prevent the tow from spreading and changing shape, it is wrapped well with threads. Then the front end of the central rod is inserted into the cranium and its sharp end is used to pierce the frontal bone along with the skin, the end is brought out and pulled up so that a small excess of tow on the neck fits tightly into the cranium. Next, the skin is pulled over the neck and chest, after inserting the wire into the wings. The wire for the legs is wrapped on the back towards the head, pushing the sharp ends through the shanks and heels of the legs (Fig. 52, e). The shank is first pierced with a thin awl. The wire is pulled up to the connection of the end of the tibia with the knee of the artificial femur and the bone with tow, equal in thickness to the removed calf muscle, is wound to the rod with a thin wire. The skin is then pulled over the artificial leg, rotating it into its natural position. Do the same with the second leg. After this, the skin is sewn up, the bird is placed on a board or knot, the wings are folded and given a natural pose, the eyes are inserted and the feathers are carefully arranged.
The eyes are inserted under the upper eyelids and brought under the lower ones so that they take a central position, are not bulging or deeply recessed, and look in the same direction. To prevent the feathers from puffing up and the wings from sagging, they are bandaged or wrapped with paper bandages while the stuffed animal is drying.
To make a stuffed fish, the skin is cut from the underside of the body from the tail to the base of the head. The skin of fish, especially large ones, is quite strong, but the scales on it are weak and fall off easily. Therefore, when removing the skin from a fish, it is not wrapped in a stocking or folded in half (neither longitudinally nor transversely). It is also important to maintain constant moisture in the skin with water so that the scales do not dry out on the board or oilcloth on which the fish is prepared.
Cuts of meat and fat are scraped off from the skin, spread out on a smooth surface, in the direction from the tail and back to the sides. The gills, eyes and fleshy base of the tongue are removed from the head. The skull is opened from inside the oral cavity and the brain is removed. The same is done with the muscles on the cheeks. The entire head and skin are treated with sodium arsenic or copper sulfate.
An artificial carcass is cut out of foam or wood according to the size of the fish. You can fashion a carcass from plasticine or clay, cover it with multi-layers of paper and, after drying and cutting the paper along the entire length of the ventral side, remove it from the plasticine or clay blank. The paper carcass is sewn together and additionally covered with paper.
The easiest way to make a stand for fish 25-30 cm long is from aluminum wire with a diameter of 3 mm and a length of 75 cm. A circle with a diameter of 10 cm is bent from such wire so that the remaining one end is twice as long as the other. At the intersection, they are twisted in half over a segment of 5 cm and the ends are moved in opposite directions at a slight angle to the plane of the circle formed by the circle (Fig. 52, e). The long end is pierced through (lengthwise) the foam or paper carcass and the ends are bent, strengthening the base of the head and tail.
The skin is pulled over the prepared carcass and the incision is sewn up along the entire length. The head is given its appropriate position, the gill covers are pressed tightly and liquid plaster, alabaster or some other quickly hardening solution is poured into the slightly open mouth. Then they insert the eyes, straighten the fins and tail, pinning or sewing them to the cardboard, and put the stuffed animal to dry.
After a few days, the stuffed fish is coated with colorless varnish. When the skin is treated with copper sulfate, the scales acquire an excessively blue color, so they have to be tinted.
Along with stuffed animals, birds and fish, you can make various souvenirs by selecting funny figures from driftwood and twigs, or cutting bowls from burl.
Birch bark barrels - tuesa - are in great demand among hunters. To make several tues, they look for a slender birch tree 15-20 cm thick with 1.5-2 mm birch bark in a dense forest. At a height of 1 m, it is cut down and felled so that the butt rests on the stump. The crown is cut off, and in places without knots, several birch bark cylinders are cut into a ring - “knots” 20-30 cm high (Fig. 53, a). Between them, birch bark and bast are stripped down to wood. Then, by cutting (0.5-meter wire, flattened to 2 mm thickness and 6-7 mm width, the birch bark along with the bast is separated from the wood. Having trimmed the bark around the trunk, the uppermost cylinder is rolled up by hand or by girding it with a rope with a loop and threaded through it with a stick (lever), remove through the top.
For a small tues, you need a 21 cm high chip and a strip of birch bark (paneling) 18 cm wide. On it, at a distance of 5 cm from the edge, cut 3 equilateral triangles with sides of 3 cm at a distance of 3 cm from each other and 1.5 cm from the edge.
On the opposite side, at a distance from the circumference of the slab, cut 2 similar triangles, with their vertices directed towards the first three and shifted 3 cm to the side.
Strips are cut from the base of these triangles so that 3 symmetrical spikes are obtained (Fig. 53, b). They are steamed in boiling water and, slightly squeezed, inserted into the corresponding triangles. This is how they make a casing for the tues, into which the chipping is inserted. The lower wide part of it is aligned with the skins, and the upper part is steamed and wrapped onto the skins.
The bottom and lid are cut out of the board (Fig. 53, a, b, c).
Literature: Yu.A.Gerasimov. Gamekeeper's Handbook
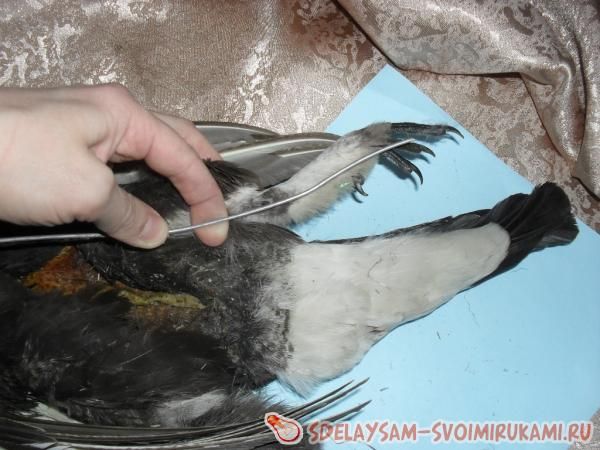
But not every trophy can turn into a work of art. It is best if you get the desired bird in the spring or late autumn. True, in the latter case you will have to tinker more, cleaning the skin from fat, and the plumage will not be so bright. It is also important how to get the trophy - by causing minimal damage. To do this, you need to shoot with a reduced or highly dispersed charge.
The trophy has been won. Don't grab it randomly. Gently lift it by the beak, thoroughly treat the bleeding areas with starch flour, insert a cotton swab into the wound and carefully, without breaking the feathers, place the bird in a bag and place it horizontally in a bag with a hard flat bottom.
It is best to start making a stuffed animal at home immediately after the hunt. If this is not possible, put the bird in the refrigerator and after a day or two, but not later, begin removing the skin. Longer storage causes the skin to deteriorate (especially for ducks), and the feathers become dull and begin to come out.
To remove the skin you need: a razor (blade), a scalpel or a sharp knife, scissors, sticks or wire for swabs, clothespins, paper clips, cotton wool, newsprint, starch flour, salt, water, solutions of arsenic and formaldehyde (though there are many make do with salt).
Now “stretch” the bird, achieve mobility of the legs, wings and neck. Place its head away from you and turn it slightly to the left, spread the feather on the chest part and make a light cut with a razor along the keel from the level of the wing to its end. Pull the skin from the abdominal part over the keel and make a cut again.
Now, with your fingers, begin to separate the skin from the carcass, first on the chest, gradually “digging” to the dorsal part, and then further down the stomach. As the skin is separated from the abdominal diaphragm, the incision should be continued to the anus. Here it is important to leave a kind of “reserve” of skin so as not to “reach” the beginning of the tail. This is one of the most delicate areas to work with, since if done ineptly, the tail can come off from the entire skin.
Having made a “dig” to the dorsal part at the level of the abdomen, you will see the articular part of the bird’s legs – the knees. Take the bird's leg from the outside with one hand, and with the other pull the skin off the knee. Make sure there is a gap in the bend by lowering the skin as low as possible. Then use scissors to cut through the joint. Do the same work with the second leg.
Next begins perhaps the most difficult stage of the work. Continue alternately separating the skin from the carcass on both sides in the abdominal area, gradually “digging” towards the back and tail. Do this carefully: this is where skin tears most often occur. Make sure your fingers connect in this part and, with careful movements, expand the “bridgehead” towards the tail. Insert the scissors into the resulting opening and, making sure that the skin does not fall into the scissors, separate the tail from the abdominal part. Immediately insert the tampon into the resulting hole in the carcass, otherwise the abdominal fluid and intestines will immediately come out.
To protect the skin from contamination with blood, use clothespins, paper clips and starch flour. To prevent the feather from interfering with your work, turn the edges of the skin inside out and pin them with paper clips. If the skin begins to dry out, moisten it with a weak solution of salt water.
Having overcome the most difficult section, continue to remove the skin further, moving towards the wings and head. This operation can also be performed in weight. Then hold the bird by the abdominal part with one hand and peel off the skin with the other. If the latter is removed tightly and “pulls along” the bundles of muscle fibers, then make careful transverse cuts at the level of the carcass with a scalpel or razor. When the joint parts of the wing appear, continue to remove the skin from the collarbone, ensuring that there is sufficient space between the wing and the neck. Separate first one and then the second wing at the shoulder part from the carcass.
Further, however, the operation may reach a dead end. The fact is that the head of many birds, in particular woodpeckers and some ducks, due to the abundance of feathers and the size of the skull, does not fit into the neck cut of the skin. This is what you need to do here. Make a longitudinal cut along the skin and carefully remove the skin to the base of the skull. Having cut off the neck part, open the skull from the back of the head, remove the brain and, after saline or formaldehyde treatment, insert a pre-prepared frame.
The safety and durability of the stuffed animal will largely depend on how you process the removed skin. If you decide to interrupt the lesson, carefully process the skin, remove muscle fibers from it, clean the skull, wings, tail and preserve it.
If the feather of a bird, especially a white one, is stained with blood, the skin can be washed in warm, up to 50°, water using detergents– washing powders with bioadditives and bleaches. Wash in plenty of water, changing it several times.
The skin should be dried in a spacious container with a large amount of starch flour, which prevents the feather from “felling.”
When you begin to continue working, unpreserve the skin by moistening it with warm water from the inside.
It doesn’t matter where to start processing the skin, but the most convenient way is from the head part. Remove the brain matter and eyeballs. Sprinkle all cavities generously with fine salt, insert cotton wool into the eye sockets and under the beak. Then strengthen the fork frame in the skull with the wound neck part and turn out the skin. Remove the muscles from the collarbones of the wings, and in large birds from the radius bones, and sprinkle everything with plenty of salt. Do the same with the bird's legs. Clean the tail part and also sprinkle generously with salt.
Having finished processing the skin, proceed to installing the frame. It can be made from aluminum or steel bendable wire. It is better not to use copper: it can be too soft, and when it oxidizes, it turns the bird’s legs blue or green. It is very important to choose a stiff wire for the leg frame. If you choose the wrong wire, you risk the fact that the scarecrow will constantly sag and fall, which will negate all the work you have done. Therefore, for large birds, such as a goose or capercaillie, a rigid steel wire is used that can hold the entire mass of the bird. Approximately the same wire is used for the wing, if you are planning to make a “bird in flight”.
Now cut off a piece of wire from the skein along the length of the bird with a small margin, that is, approximately to the middle of the tail. Make a fork along the length of the skull by winding the wire and sharpening it. Then wind cotton wool around the wire along the length and size of the neck and bandage it with threads. Strengthen the fork in the skull (you can use plasticine for this) and turn the skin inside out. Then cut off the wire for the wings. Also sharpen it and pass it through the articular part of the radius bones until it comes out at the beginning of the large flight feathers. It is better if the wire runs along the inside of the wing. Pull out the clavicle and tie it with threads to the insertion wire. Cut two more pieces of wire with a margin. Having sharpened them, begin to thread the paws “from the heel” through the leg.
There are two ways to thread the wire: through the bone and under the skin. The first method is more reliable, but labor-intensive. The second is simpler, but can lead to tearing of the skin on the leg. So take your pick. Having threaded the wire through the metatarsus until it comes out in the area of the joint, attach the bone to it, wind the cotton around the volume of the leg muscle, bandage it and stretch the leg lengthwise. Having completed the operation with the second leg, bend the wire to the size of the interleg space and attach it to the main frame.
Finally, take the last piece of wire, bend it in half and create a “fork”. Using the pointed ends, pass it through the rigidity of the tail and also attach it to the frame.
After treating the skin with salt again, you can begin stuffing the stuffed animal. For this purpose, it is best to use cotton wool, but tow and foam rubber can also be used; only straw and rags are not suitable. Straw quickly turns into dust, and rags do not allow the stuffed animal to be given the desired shape.
To properly stuff a stuffed animal, you need to know and have a good idea of the size and shape of the bird, otherwise it’s easy to turn a handsome wild goose into a domestic, belly-bellied gander. Remember that wild birds, as a rule, have highly developed and prominent pectoral muscles and practically no “belly”. Therefore, special attention is paid to padding the chest area.
First make a lining for the frame of the back and neck. The layer of cotton wool should be even, not very thick and, most importantly, not lumpy. A more important moment is stuffing the chest. Try to lay the padding material evenly and tightly. Gradually reduce the amount of cotton wool towards the stomach. Having stuffed the stuffed animal, sew it together. For this it is better to use a thick double thread. Start from the chest area, using your fingers to pull the seam together. While sewing, constantly add cotton wool, compacting the chest part. In small birds it is better to do this with tweezers. It’s okay if the skin doesn’t come together a little along the seam. At correct installation pen this defect can be easily hidden.
When you are done with sewing, proceed to the last and very important stage: giving a natural pose to the stuffed animal and mounting it on a support. This is where you will need in-depth knowledge about birds. Remember that each species has its own habits and natural poses. Try to choose the most effective pose to show the bird in all its glory.
When the pose is chosen, you need to mount the stuffed animal on a support or stand. To do this, drill holes in a knot or plank and sit the bird down, spreading its toes. After this, the painstaking work of laying out the feather, hiding any defects that have appeared, and removing “extra” formations begins. This is done with tweezers, a soft brush and scissors.
Having laid down the feather, the bird is most often bandaged for further drying. The carcass is carefully wrapped with a strip of dry gauze or cloth, making sure that the feather styling is not disturbed. A cardboard stretcher is placed on the unfolded wing or tail, which, with the help of stitching, holds the feather in the desired position. The stuffed animal dries on its own, and this period can last up to a month.
No matter how well it is done, the stuffed animal will not become “alive” if you do not insert the eyes. There are several forms of eyes: cast glass, already painted and fastened with wire, and eyes made from various plexiglass by “extrusion”. Finally, taxidermists create eyes from various materials, paint them, and varnish them.
So choose your own eyes of the appropriate color, size and shape. You can insert them immediately after completing work on the stuffed animal. But it’s better to let it dry a little, and then use nail clippers and tweezers to spread the eyelids and insert the eye. If the eyelids are drooping, they are raised or trimmed slightly. You can attach the eye to plasticine, which you place in the eye cavity, or to glue, which is less convenient.
After a couple of days, remove the bandage and see if the feathers and wings are neatly arranged. Eliminate defects, if any, and bandage the bird again for a week or two.
After final drying, the legs, eyebrows (in grouse) and beak will turn pale. This means that the natural color has to be restored. This should be done using grated lead of colored pencils and paint for coloring, applying them very thinly to the surface of the legs and beak. The eyebrows of grouse can be tinted well with lipstick of a suitable color.
This article can give you some basic knowledge on how to make stuffed birds. There is also an article like The work is not difficult, but it is quite painstaking and definitely not for the squeamish. Using the example described, you can make stuffed animals from almost any bird; this does not require any special knowledge or materials.
Materials and tools for creating a stuffed animal:
Wire;
- brush (copper sulfate will be applied to it);
- tow (or other stuffing material, such as cotton wool or padding polyester);
- glue (moment);
- quick-drying varnish (you can use nail polish);
- balls or beads to create eyes;
- knife;
- decorative pins;
- threads with needles.
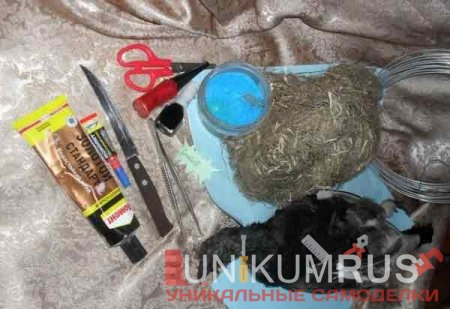
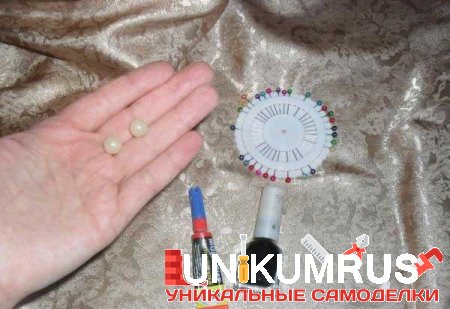 The process of making a stuffed animal:
Step one. Freeing the bird from the carcass
This is the most difficult, painstaking and unpleasant process. All the meat must be removed from the bird and this must be done as carefully as possible, as the skin can be damaged. The most difficult part will be the head, and you also need to pay close attention to the coccygeal part, you need to try not to cut the coccygeal gland. The skin also needs to be removed from the legs of the bird; it can be rolled up into a stocking, this is not scary. The work must be carried out with a very sharp knife using small, careful movements; a scalpel is perfect for these purposes. When the code with feathers is removed from the head, the eye slits need to be covered with a piece of plasticine.
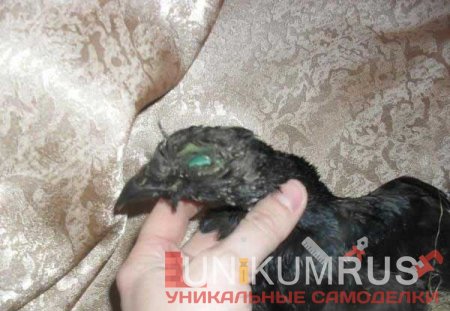 You will also need a skull for the stuffed animal; it will need to be thoroughly cleaned both outside and inside. The skull should be washed and cleaned under running water; the brain should be removed by scraping. Finally, the skull is thrown into water and boiled for no more than three minutes.
As a result, after all the work to make the stuffed animal, what should remain is the skull and the removed skin.
Step two. We poison the skin of the bird
If the stuffed animal is not treated with chemicals, it will quickly disappear; it will simply be eaten by bacteria. For these purposes, a solution of copper sulfate is used. To create it, you need to take one teaspoon of vitriol and dilute it with 200-250 grams of water. Next, the author takes a brush and paints the skin from the inside; unpainted fragments must not be skipped. Once the poison is absorbed, the bacteria will no longer be able to feed on the skin. When working, you should try not to paint the wings, otherwise the appearance of the stuffed animal may deteriorate.
As for the skull, it must be placed entirely in a solution of copper sulfate. Now you need to wait at least 6 hours until the vitriol is completely absorbed into the skin.

Step three. Making a frame for a stuffed animal
Next, you need to make a frame for the bird, that is, an artificial skeleton. It goes without saying that its dimensions should correspond to the size of the bird. To do this, take a ruler and take measurements of the length of the bird’s wings, legs, and you also need to measure the circumference of the chest and head. Well, then the wire is taken and the frame elements are made. Finally, cotton wool or padding polyester is wrapped around the wire.
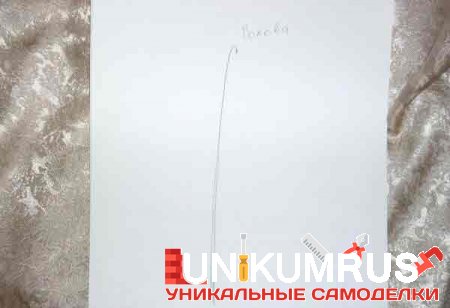
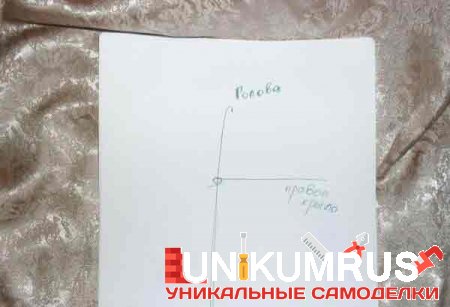
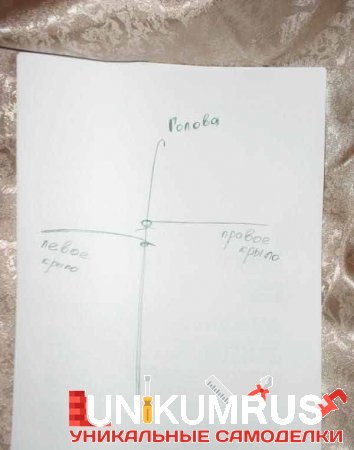
Step four. We stuff the stuffed animal and sew it up
In order for the bird to have a filled shape, its body must be stuffed with some kind of filler, it can be cotton wool, rags, foam rubber, and so on. After this, the bird can be sewn up with a thread and a needle. You need to insert a wire into the legs; it is also used to fix the desired position of the wings.
Also at this stage you need to remember to make the bird’s eyes. For this purpose, various balls, beads, and so on are used. The eyes are inserted after pulling the skin onto the frame; you need to take tweezers and pull the skin at the installation site. The color of the eye is not important, it will be colored after installation.
To make it convenient to fix the parts to be sewn, you can use decorative pins.
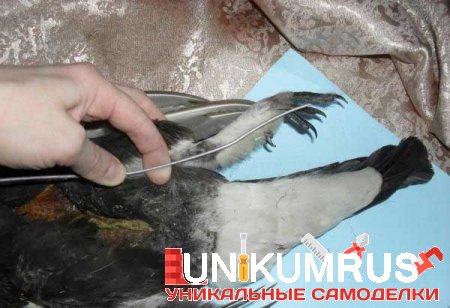
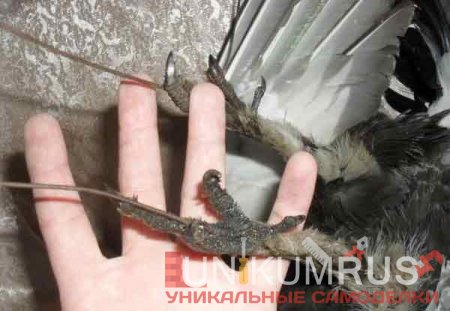
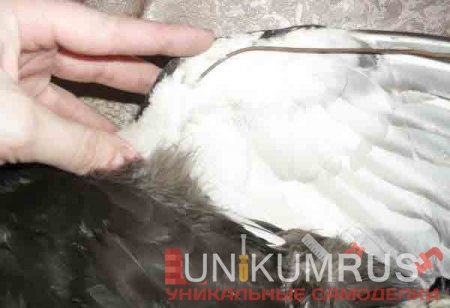
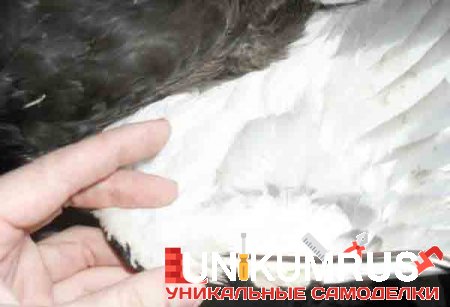
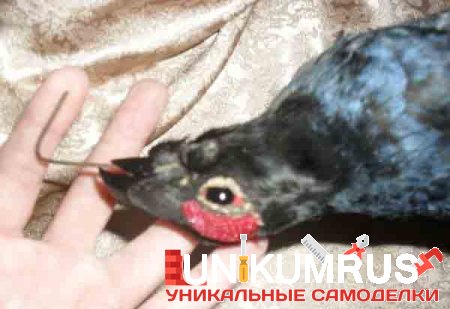
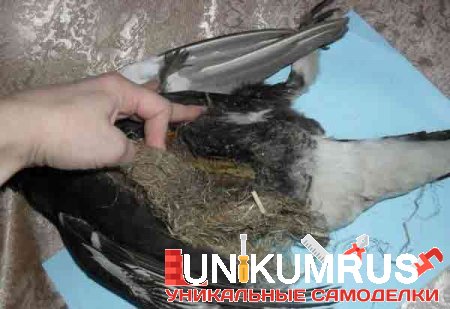
Step five. The final stage of creating a stuffed animal
Now the stuffed animal is almost ready, all that remains is to install it and do a little work with glue, paint and varnish. If the stuffed animal has feathers sticking out and you can’t just smooth them out, the feather can be carefully coated with glue and glued on. If the bird has any bright elements, for example, combs, etc., they will lose color later, to restore it, use nail polish of a suitable color.
As for the bird's beak, it needs to be cleaned with the finest sandpaper and then varnished, so it will look much more attractive. In order to paint an eye, you first need to paint the entire eye with varnish, and then make a pupil by placing a drop of paint or varnish in the right place. The author made the stuffed animal's eye completely black.
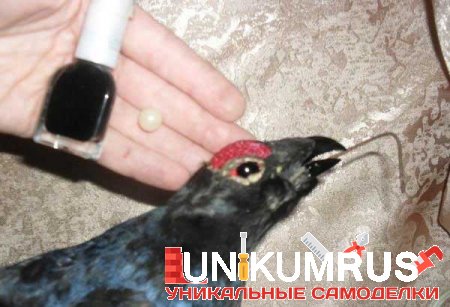

Well, in conclusion, the bird needs to be recorded. You can take a stump or some beautiful root, treat it with sandpaper, stain, and then open it with varnish. A bird planted on it will look very realistic and beautiful. The author used a wooden cut, to which he screwed a wooden knot.