An oven mitt can be both a decorative element in the kitchen and a completely practical thing. It will also be an excellent gift for a friend or relative. Moreover, patchwork sewing of potholders (this is the technique we will talk about) will not require large financial expenditures, because all sorts of leftover fabric and even the smallest scraps lying around idle can be used.
In addition, today it is patchwork (the international name for patchwork) that is the so-called “trend setter” in the manufacture of such things as potholders, blankets, bedspreads, pillows, home bags, etc.
Beginning needlewomen may have a question: how is patchwork different from quilting? Quilting is a broader concept than patchwork (quilting - stitching, quilting). He included several types of needlework techniques, including patchwork, appliqué, embroidery, and traditional quilting stitches and stitches. And patchwork most often only means working with scraps.
And now more about the process of making potholders.
Square potholder in patchwork style
Patchwork is ideal for creating square potholders. At the beginning of work, you need to decide what colors of fabric you will use. Ideally, they should not only fit well with each other, but also be in harmony with the overall image of the kitchen. As they say, the details make the whole look. If, for example, the predominant colors in the kitchen are beige, gray, white, caramel, you can make a potholder in pastel colors. But a brighter option is also acceptable, however, in the ensemble it should be accompanied by some other bright decorative item (painting, vase, curtains, flowerpots, etc.)

If you have already worked in the patchwork technique, you will probably use leftovers from already used fabrics. If this is your debut in patchwork, don’t be lazy to do a revision in your closet. Often there is something lying there that you will no longer wear or use, but it will come in handy for such creative experiments. Pay attention to sales in fabric stores: small surpluses are often sold at a discount.
Materials for a pair of potholders:
- 2 pieces of linen fabric without a pattern - squares 24*24 cm each;
- 24 strips of linen fabric in several colors (24*2.5 cm);
- 2 pieces of wool blanket or cotton batting (also 24*24 cm);
- Border - 250 cm (the color should match the main fabric).

By the way, you can make the border yourself. To do this, cut strips of plain fabric 6 cm wide and then sew them together along the short side. Once you get the length we need, press the seams with a hot iron, then fold the border in half and iron again.
And now additional materials that will be useful when making patchwork potholders: iron, scissors, pins, sewing thread, sewing machine(ideally, you can sew by hand).
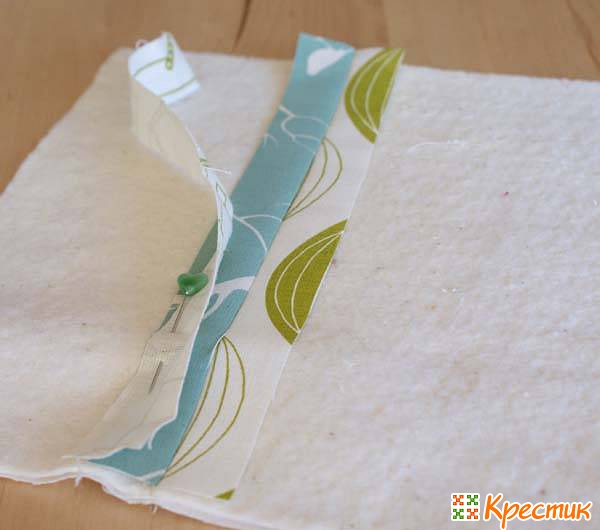
Sew on the stripes
Under the cotton batting you need to place a simple linen fabric, i.e. 2 squares with a side of 24 cm overlap each other. We put multi-colored stripes on top; they have to be sewn directly to the batting.

We take two strips and with their right sides facing each other, fold them in the center of the square batting. Sew on one side. We bend the top strip and iron the seam. In this case, the stripes should “look at you” with their faces.
Now we take another strip and place it right side down on the already sewn, just ironed, last strip. We sew the strips along the edge again, then bend the last strip and smooth the seam again. Using exactly the same principle, we sew the next strips until the piece of batting is completely covered. We do the same with the other potholder. If desired, each strip can be sewn with a finishing stitch. Upon completion, the square piece must be trimmed on all sides.
Sew on the border
We put the border on the wrong side of the potholder, which we just sewed from scraps. At the same time, make sure that the raw edge of the border is connected to the raw edge of the potholder.

Starting at one corner, sew the border to one side of the square first. Before each new corner, you need to bend the border at an angle of 45 degrees. In this way we sew the border around the entire perimeter of the potholder.

Final work
Returning to the corner from which we started sewing, we bend the border to the front side. This must be done before you sew the last piece of the border to the tack, i.e. slightly short of the corner. Cut off the excess border, leaving about 10 cm for the loop.
The border needs to be pressed onto the front side of the patchwork square. For convenience, pin the border safety pins so that it does not move. Make a loop from the remaining tip of the border and carefully hide the cut inside the border.

Now all that remains is to sew the border to the front side of the potholder.

In practice, such patchwork pot holders are very easy to sew, you only need to try it once. And then you can quickly decorate any kitchen interior.
Heart shaped potholder

To make a heart-shaped potholder, we will need the following materials: padding polyester/batting, bias tape, cotton fabric of one or more colors.
First we make patterns. Part A is 21 cm in the middle, part B is 18 cm. A is the main part, it is cut out with a fold, B is the upper parts where the arm is directly inserted. If these dimensions seem large to you, then you can reduce them: say, part A - up to 18 cm, part B - up to 15 cm.

We cut out two parts according to pattern A from cotton fabric, 1 part A from batting/sintepon for lining. Place 3 hearts together (padded polyester in the middle) and align the edges. At the same stage, we cut out 4 parts according to pattern B (two side panels with lining).

We divide the 4 parts into pairs, finishing the inner edge with bias tape or lace.

We place the resulting sidewalls on a large heart, trim them and sew around the perimeter with bias tape. You can use a zigzag stitch, you can use a regular machine stitch, or you can do it by hand, it’s not that difficult. We start sheathing from the middle of the top and finish there. We turn the edges of the binding inwards. This way all the parts will be connected and processed in one step.

The potholder is ready!
Pot holder in quilting technique

To make a potholder using the quilting technique, you will need:
- small scraps of fabric in different colors
- gasket (sintepon or thermal gasket with a layer of foil)
- paper, ruler, pencil
- needle, thread, pins, scissors.
The process of patchwork sewing potholders in this technique begins with the preparation of templates.
On paper, draw and cut out 19 hexagons. Their size is equal to the size of those hexagons that you see on your future potholder. For example, a hexagon measuring 5 cm with a side of 2.5 cm. You also need to cut out one hexagon of a larger size (about 1 cm on each side).

Use the large hexagon as a pattern, and use it to cut out 19 hexagons from the fabrics.

Place a small template on the wrong side of the cut piece. It's better to secure it with a pin.

Fold the edges of the fabric over the template and sew with basting stitches. Proceed the same way with the rest of the parts.

Then the two parts need to be folded with their front sides facing each other. Sew over the edge using regular stitches.

From the front side you will get something like this:

Continue sewing the pieces together. You will see that the result will be a kind of “flower”.

Then you need to iron everything thoroughly, pull out the basting and remove all the templates from the paper.

Now we cut out two squares from the fabric for the front and back sides of the potholder, and cut the same square from the spacer.
Assembling the potholder proceeds as follows: we fold all the layers of the potholder in sequence: the back, the gasket, the front side, the “flower”. Pin all layers together for security.

Now the potholder needs to be quilted. This means the stitch must go through all the layers, stitching the “flower” at the same time. The easiest way, of course, to carry out this process is with a sewing machine. You can also quilt the potholder by hand, making small forward stitches using contrasting threads. Hand stitching, of course, will take more time, but it will not lose the item. Cute, original, bright. But if this is a very long option for you, then the line can only be made along the “flower”. However, if each hexagon is quilted, the volume and pattern will be better emphasized.


Now you need to edge the potholder. The strip of fabric must be sewn with the same seam “forward to the needle”.

As soon as you reach the corner, you need to carefully wrap the strip and continue making the stitch on the other side of the potholder itself. The edging should begin from the place where the loop will subsequently be located.

You can also edge the potholder using a sewing machine, if you know how to do it.
The final part of the work. After completing the edging, point the strip of fabric upward. Continuing to stitch, we form a loop. Wrap the strip onto the wrong side of the potholder and sew it on.
Well, the potholder using the quilting technique is ready!

Yes, beginners may be intimidated by the lengthy instructions and the seemingly lengthy process. But in fact, everything is done quite quickly, and once you get the hang of it, patchwork will no longer be a labor-intensive process for you. Rather, on the contrary, you will only be looking everywhere for scraps for future work. You'll start with a potholder, then sew a blanket for your daughter's favorite doll, and then an adult patchwork blanket will come out from under your hands.
Categories,Surely everyone has stale bedding: a blanket, blanket or, for example, a bedspread, but you don’t know what to do with it and where to use it? Or maybe you have a favorite similar item that keeps you warm on rainy days or cold days, and you would like to somehow improve it and complement it with some beautiful and amazing details or embroidery?
We will talk about how to beautifully and quickly process the edges of the product, and also share how to transform the bedspread more colorfully.
Finishing the edge with a corner
This method of corner hemming is universal: it is simple, concise, and most importantly, beautiful. This way you can hem any rectangular or square items (curtains, napkins, tablecloths, bedspreads, etc.).
- The first thing we do is align all the edges so that each cut is even;
- We bend 1.5 centimeters on all four sides (to make things easier, you can use a fabric chalk);
- We place the wrong side on top, and the front side on the bottom, because we will fold all the seams inside out;
- For convenience, so that everything is fixed evenly, we iron the folds;
- Next we select the thickness of the decorative edge. Since we took a bedspread as an example, we bend the edge inside out at a distance of about 5-6 cm (if you are sewing a napkin, you can take 2-3 cm, if a curtain - 10 centimeters).
- We turn the blanket over with the front side out, take a ruler and use a special tailor’s chalk to mark our 5-6 cm on all four sides, in other words, we make even marks;
- Having folded the fabric inward according to these measurements, iron it again;
- We unbend the folds (except for the first 1.5 cm, they remain folded), see our ironed lines, and turn the fabric over to the other side. Now we see a corner bent back, we take it and put it on another corner and get an acute angle;
- Now we need to bring out a flat corner in order to sew it up. To do this, you need to align two lines (5 cm + 5 cm) with each other evenly and pin them with a pin or needle so that the lines fit exactly into each other (the edges should also overlap each other exactly);
- We take a ruler-protractor and set aside 45 degrees at the junction where the fold ends (i.e. 10 cm from the beginning of the edge), cut off the triangular end. We get a right angle;
- Remove the pin and turn the fabric over onto its face. It turns out to be a kind of cut off corner, and we do this with all four corners;
- We turn each corner to face inward and mark 1.5 cm from the cut corner; we will sew along this line;
- When the corners have already been cut off on all four sides, we simply need to lay a stitch along the intended lines (so that nothing comes unraveled in the process, make bartacks). It turns out to be a kind of “bath” made of fabric.
- Before bending everything to the front side, we lay out the seam of the sewn corner in different directions and iron it, that is, the seam should not fall on one side, it should “fall apart” on different sides;
- If the seam is too large and bothers you, then you can pre-cut it by 0.5 cm. After the work done, the corners turn out sharp;
- We iron our corners evenly on top so that nothing sticks out anywhere;
- We cut pins along the perimeter of the fabric and lay a straight line of 1-2 mm, thus sewing on our edges.
- That's it! At the end we simply iron our finished product again.
Processing the edge (border) using a hook
The border looks chic, and knitting it is not difficult even for beginner knitters; to begin with, you can master a simple border consisting of one row.
- First, we knit the preparatory row with single crochet stitches;
- We tie the last loop in the last column with a different color, the same color as you will knit the border;
- At the beginning of the row we knit three air loops;
- In the first of three loops we knit a half double crochet; to do this, insert the hook into the first loop and pull out the thread. There are three loops on the hook, we knit them all together. This is how our first element turned out;
- We turn the knitting over, skip the next two loops on the fabric and knit a connecting loop into the third loop;
- We repeat everything from the beginning, only this time everything will be on the front side.
At the end, tie the connecting loop one last time to the last column, to the last loop. Close the knitting, and that's it.
Corner cutting, in a sense, is a real art that you need to learn to master in order to create beautiful and high-quality products. This activity may well develop into a hobby, and now you yourself come up with individual, simple embroidery.
TOTAL
Today we will teach you how to edge a blanket with your own hands. In our article you will clearly see how to do this easily and correctly. In the example, we will be edging a quilt using patchwork. In fact, you can finish the edges of any blanket this way. Very often, the edges of a blanket become frayed during use; they can also be refreshed. And your favorite blanket will still serve you.
We really hope that this master class will be useful to you. To get started, you need to trim the edges of the new blanket and align its corners. If it is an old blanket, trim off the frayed edges and straighten them.
How to edge a blanket
From the fabric you have chosen for the edging, cut strips 10 cm wide. The length of the sewn strips should be equal to the length of the perimeter of the blanket.

Fold the ribbon in half (wrong side inside) and iron.

It will be convenient for you if you wrap the tape on a piece of cardboard.

Never start work from a corner. Leave a small “tail” of their tape at the beginning of work.
Use sewing pins to pin the ribbon to the front of the quilt. Step back about 1 cm from the edge. Sew until you reach the corner.

When you reach a corner, stop sewing 0.5 cm from the corner. The needle must be in the fabric. Raise the presser foot and turn the work 45 degrees. See photo.

We sew to the edge.


We bend the edging so that a 90 degree angle is formed.

The excess fabric forms a 45 degree angle.

Align the sides of the edging with the edges of the blanket

Sew the tape to the next corner.

The angle should look like this.

We continue to sew. When you have sewn all the corners and matched the joint, the ends of the tape need to be tucked inside. If the tape is too long, the ends must be cut off.

Sew the ribbon to the end.
Unscrew the sewn ribbon.
The angle should look like this.

We wrap the ribbon and sew it with a blind seam by hand.

Processing the corner from the inside out.

That's all the wisdom!
We hope you find this patchwork tutorial helpful.
Author Sandy wishes you inspiration!
Border: An equal part of the quilt.
The border is an important element of the quilt and from it appearance and the accuracy of execution depends on the overall impression of the entire work. A correctly chosen border will emphasize a good color scheme and highlight the patchwork pattern. Most often, we decide what the border will be after we have assembled the main patchwork part. But if we are talking about an artistic quilt or panel, work on which begins with a sketch, then already at the initial stage you should imagine into what “frame” you will “insert” your work.

According to the sewing methods, the border can be overlapping, with corner squares and with beveled corners. Sewing Instructions - (I used materials from the book Patchwork Techniques).
It's easiest to sew an overlapping border, but with beveled corners it looks more impressive. By the way, at quilt exhibitions, preference is given to quilts with borders with beveled corners.
In any case, when sewing a border you need to remember a few simple rules.
Firstly, we make all measurements not along the sides of the patchwork fabric, but in the middle. This is necessary so that the edges of the quilt do not puff up and the middle does not bulge, because... Due to the large number of seams, the edges of the patchwork may have different dimensions than we expected.
Secondly, the border should always be cut either longitudinally or transversely to avoid stretching the edges of the product.
Thirdly, if the length of the fabric is not enough for the border, then you can add it, but in this case the pieces of fabric are sewn at an angle of 45 degrees so that the seam is less noticeable.
Fourthly, the border is only a “frame” for your quilt, an addition to it, it should not take away attention.
If you choose a patterned border, then take into account the patterns that are used in the main patchwork fabric. The border pattern should complement and repeat them, but not conflict with them in any way. For example, if the pattern consists of squares and triangles, then a border with circles and waves will not “pull together” the canvas and will fall out of the general idea of the quilt.

To make the border pattern match the canvas, you can take the pattern of the patchwork block you are using and simplify or modify it.

You can simply make the border composite, i.e. sew it from several strips. In such cases, these stripes should be of different widths so that there is a visual narrowing in the center of the canvas, so that the border “collects” the canvas and does not fall apart.

If you want to try your hand at a more modern quilt, there are also a few options for altering the traditional border.
Use asymmetry, take several stripes different colors and width.

Divide the border into separate sections using sewn-in strips, squares, etc.

Sew the border not to all sides.

“Play” with color, try new, bold combinations.

They look very beautiful and I really like artistic quilts, where the patchwork seems to go beyond the boundaries.

The quilt border is not the last part of it, so don’t take it lightly. It can either improve the impression of your quilt or completely ruin it.
You can see various examples of borders for patchwork fabrics.
When working on the article, I used: the book by E.V. Alekseeva “10 lessons of patchwork and quilting”, the book “Patchwork Techniques”, the magazines “Cinderella Patchwork” and “Wonderful Moments” for different years.
With sincere wishes of inspiration and success,
Elena Folomieva
If you follow fashion, and especially fashion trends in the field of interior design, you have already noticed that gradually old trends are becoming relevant again.
The patchwork technique, which involves creating products from many textile scraps, is one example of handicraft that has become popular again. And one of the reasons for such interest in patchwork is the ease of sewing almost any product for the home. These can be items of clothing, tablecloths and curtains, bags, toys, warm blankets for children and adults and much more.
Since the patchwork technique has a long history, you will find many ways to sew such textiles. Moreover, having gained experience, you will be able to realize your interesting ideas, come up with new forms and ways of connecting elements.
But in order to learn this skill, you need to understand the simplest techniques and learn as much as possible about the features of patchwork sewing.
We suggest you learn how to sew a patchwork quilt correctly, and start with a master class on a patchwork quilt for beginners: it is very simple to do, although sewing takes a lot of time, but in return you will receive a charming and comfortable textile element for the home.
Patchwork quilt, photo
How to make a patchwork quilt
The traditional DIY quilt process for beginners involves three main steps:
- searching for suitable materials. To create a harmonious design, you will need fabric in at least two colors. You can take patterned textiles, but in this case it is better to stick to a single theme (for example, decorate a blanket in a floral style or choose fabric with a geometric print);
- sketch of a sewing pattern. It is important to decide what the blanket will look like in order to cut the component elements correctly;
- connecting fragments using threads.
 Patchwork quilts, photo
 At the stage of choosing materials, you need to look for fabrics that you have at home, but have not been used for their intended purpose for a long time.
If you are making a blanket for an adult, purchasing new textiles can be quite expensive. It is not at all necessary to use a long, solid fabric: you will still have to cut it, so you can use a huge variety of small scraps of bright or pastel colors as a source material.
Attention! If you find scraps different shapes– no problem: it will be easy to combine them together to create a stylish blanket for the home.
Now let's start with the diagram. If you are sewing a patchwork blanket for the first time, it is better to use ready-made templates. You shouldn’t choose an overly complex technique: a product made from identical squares will look no worse than a blanket with many elegant patterns.
You need to start sewing small: sew several scraps together to create a separate block. After creating a certain number of blocks, start attaching them to each other.
Do not forget that the top of the blanket must be sewn onto the lining. It is possible to stitch the product either by hand or on a sewing machine - with a straight stitch or using a special foot.
Advice: If desired, the elements of the patchwork quilt can not be sewn, but connected with knitted threads using special hooks.
The time spent on creating such a blanket directly depends on the required dimensions and parameters of the constituent elements. Therefore, you should not make the fragments too small: if you want to create a more interesting design, take several fabric options in harmonious shades.
Master class for beginners
Even those who have never done professional sewing before can make a cute and comfortable quilt by hand. Let's find out how to make a children's patchwork quilt using a master class.
As the main material, it is better to take a pair of fabrics that are pleasant to the touch in compatible shades. You will also need an elongated sheet of padding polyester, which will be used to stuff the blanket, and a lining (for example, calico).
 DIY patchwork quilts, photo
 According to the master class on a patchwork quilt for beginners, you should start making a baby blanket by cutting about 50 textile squares 21 by 21 cm. If you plan to use fabrics of several shades or patterns, lay out all the blanks on a flat plane to properly design the future blanket.
After making sure that the design matches your idea and all the fragments have straight sides, you can start stitching.
First, sew the first strip of the blanket: to do this, sew the squares from the very bottom row together. Next, proceed to the second and subsequent stripes. Only when all the strips are sewn together can they be connected to each other.
Each time after sewing on a sewing machine, do not forget to smooth the formed part of the blanket with an iron. Then the workpiece will have correct form and will not distort the overall appearance of the product.
After the upper patchwork part is ready, cut out the lining and filling, focusing on the general parameters of the product.
Take a look at the side of the blanket: it is peeling at this point, so the edges need to be sealed securely. To do this, use tape with a width that can cover all edges of the product. The binding is sewn face down to the lining, after which the tape is straightened and folded to fold the free edge inward. Finish this stage with a stitch on a sewing machine.
The blanket is ready! This is ideal for a child as it is soft, cozy and bright. If desired, the blankets can be supplemented with suitable color scheme bedding set
 Patchwork - blanket, photo
 For those who are ready to create a more complex product, we suggest that you familiarize yourself with another master class. It involves a combination of rectangular and square fragments. It is advisable to use a mock-up mat to correctly calculate the parameters of each element.
Cut a couple of long and a couple of short rectangles from the fabric. Take another fabric and prepare a small square. Rectangles are stitched around it to form a large square piece.
Now you need to cut out four ribbons, which will be an additional “edging” for the square. Try to calculate their parameters correctly. If desired, such a blanket can be supplemented with a large number of small squares on the outer border.
As in the previous case, lay out all elements on a plane to control the evenness of the product.
After sewing the components together, all that remains is to fill the blanket with padding polyester, add lining and decorate the edges.
Did you like the technique? Then watch another example of sewing in the video master class of a patchwork quilt for beginners:
Varieties of patchwork
You can make a baby patchwork quilt with your own hands for beginners using a pattern in different ways.
Let's take a look at the most interesting options for such work:


Techniques for stitching elements
Patchwork is famous for its unusual design, so it is extremely important to plan in advance how all the components will be placed relative to each other.
We have already noted that ready-made schemes are available to you, but new techniques implemented according to your own ideas are also appropriate.
The simplest options for sewing a patchwork quilt for beginners:


Any technique will be easier to implement if you cut out the component elements based on the beginner quilt pattern. You can use one of the following examples:

 DIY children's patchwork quilts, photo


 DIY patchwork quilt - diagrams, photos
Patchwork edging
Any quilt, whether hand- or machine-sewn, made from squares, triangles, polygons or free-form shapes, needs an edge finish called piping. After connecting the backing, insulation and patchwork top of the product, their quilting remains to close the cut to give the blanket a finished look. To do this, prepare the edging (edging) and sew it.
How to finish the edge of a quilt? For edging we will need:
- Fabric for piping.
- Scissors or cutter.
- Cutting mat.
The color of the edging can be any - contrasting, matching the blanket or any other. You can buy fabric for edging when the entire blanket has already been sewn: it is often difficult to decide on the color while the product is in the preparation stage.
The photo below shows a beautiful patchwork quilt with finished edging:

How to edge a patchwork quilt? Let's consider step by step instructions by edging:
- Calculate the blanket's perimeter by measuring its sides and adding up the lengths of the sides.
- The edging should be longer than the perimeter - add 20-25 cm to the resulting amount.
- The width of the edging is chosen at will, on average it is 6-8 cm, taking into account the hems at the seams. Cut the fabric into strips using a cutter or scissors and join them into a single strip at a 45-degree angle to avoid excess thickness of the fabric. Steam with an iron. Fold the edging in half with the right side outward, iron along the entire length - the edging is ready (you should get a long strip of fabric folded in half, 3-4 cm wide.
- We apply the strip to the back of the blanket, edge to edge, fold to the center.
- You can pin the edging with pins for convenience. At the beginning of work, leave a tail at least 10 cm long unsewn. When you reach the corner, bend the edging upward to form a 45-degree angle. Bend the edging down so that the fold of the edging is even with the edge of the product. Secure with a pin.
- Continue sewing the edging to the next corner, stopping about 20cm short of the beginning.
- We connect the edging into a single piece: fold it, mark the junction of the edging strip with soap or a pencil. Fasten it with pins and stitch, cut off the excess. Fold the piping in half lengthwise again and machine sew this section. Thus, we sewed the piping on the wrong side.
- Turn the blanket right side up and, folding the edge, pin the border to the front side directly to the sewing line of the border, covering it slightly. You can start from the corner. Sew - it is better to use a decorative stitch, because... it will hide the flaws of uneven stitching for beginners. Fasten the stitching twice in the corners.
Attention: do not start sewing the piping from the corner, it is better from the middle.
Almost any small baby blanket can be folded and used as a discharge envelope. Rectangular, square - it doesn’t matter: in the maternity hospital, the nurse will deftly roll up a bundle from any blanket.
Important: such a blanket will warm the baby not only with warmth, but also with your care and love.
 DIY patchwork quilt for a baby, photo
 Despite its simplicity, the patchwork technique is considered a true art in the field of home design.
The success of patchwork is associated with the ability to create amazing products for the home with rich colors, unusual shapes and patterned designs.
Show your imagination and please your loved ones with a new blanket that will not only be “pleasing to the eye,” but will also keep you warm in cold times. With photos and videos of a quilt master class for beginners, you can quickly decide on the technique for such needlework.
Video
Watch another tutorial for beginners with another DIY sewing idea in the video tutorial about a patchwork quilt: