Profiled sheet is a modern, inexpensive, beautiful, high-quality and easy-to-use material. You can make wonderful gates from it yourself. How? Read on!


| Brand | Overall sheet width, mm | Useful sheet width, mm | Profile height, mm | Metal thickness, mm |
|---|---|---|---|---|
| S-8 | 1200 | 1150 | 8 | 0,4-0,8 |
| S-10 | 1155 | 1130 | 10 | 0,4-0,7 |
| S-15 | 1200 | 1150 | 15 | 0,4-0,8 |
| S-18 | 1150 | 1100 | 18 | 0,4-0,8 |
| S-20 | 1150 | 1100 | 20 | 0,4-0,8 |
| S-21 | 1051 | 1000 | 21 | 0,4-0,8 |
| S-44 | 1047 | 1000 | 44 | 0,5-0,8 |
| MP-18 | 1150 | 1100 | 18 | 0,4-0,8 |
| MP-20 | 1150 | 1100 | 18 | 0,4-0,8 |
| MP-35 | 1076 | 1035 | 35 | 0,5-1 |
| N-60 | 902 | 845 | 60 | 0,5-1 |
| N-75 | 800 | 750 | 75 | 0,7-1,2 |
| N-114 | 646 | 600 | 114 | 0,7-1,2 |
| NS-35 | 1100 | 1035 | 35 | 0,5-1 |
| NS-44 | 1050 | 1000 | 20 | 0,4-0,8 |
Studying the gate design
We will make the simplest gate of two leaves. Having mastered the technology, you will be able to build more: sliding, lifting, etc.
The gate leaves can swing inwards and outwards. At this point, focus on the features of the site and your preferences. The most popular option is external plowing.
The structure consists of support posts, frame and casing. Pipes and profiles are usually used to assemble supports and frames. The diameter of the pipes and the dimensions of the profiles are selected individually, taking into account the dimensions and weight of the future gate. The main load will fall on the external elements of the frame. For the manufacture of internal parts, you can use a smaller profile. The cladding is made using profiled sheets.
Selecting the size of the sashes

Before starting work, it is important to determine the optimal dimensions of the swing doors. At this point, be guided by the dimensions of the vehicle that will pass through the gate being built.
So, for the passage of most passenger cars, a gate with a width of 4 m is sufficient. For a truck, the opening will have to be expanded to an average of 6 m. Based on this, we calculate the width of each door. Select the height at your discretion. Most often, gates with a height of 2-2.5 m are erected.
Helpful advice! Make the dimensions of the gate with some margin, because it is possible that in the future you will buy a new vehicle that will have more impressive dimensions compared to the existing car.
To make the work easier and faster, we draw up a drawing of the future gate indicating the dimensions of all structural elements.

Making the foundation
First step. We mark the places for installing vertical supports. There will be 3 such posts in total: one for attaching the gate and a pair for mounting the sashes.
Second step. We dig holes with a diameter of about 20-25 cm (depending on the size of the selected racks, more on this later) for installing supports. We calculate the depth of the pits so that it is approximately 30-35% of the height of the above-ground part of the supports. We take into account that the height of the gate leaf is usually 50 cm less than the height of the supports.
Thanks to this reserve, the required 20-30 cm gap between the ground and the lower edge of the sashes will be provided, and the rest of the reserve, at the request of the owner, can be used for installing various decorative elements at the top of the structure.
Third step. We fill the bottom of each depression with a 10-15 cm layer of crushed stone. Carefully compact the pillow.
Fourth step. Getting ready to pour the supports. We take part of M400 cement, a couple of parts of sand and 4 parts of fine crushed stone. Mix the dry ingredients, gradually adding water to them until the mixture has a viscous consistency.
Fifth step. We insert support posts into the holes. They can be made from different materials, namely:
- timber with a section of 15x15 cm;
- round log with a diameter of 20 cm;
- channel beam with walls at least 1.5 cm thick;
- profile pipe with a cross section of 8x10 cm with walls no thinner than 7 mm.


We position the supports strictly vertically and fill them with solution to the top of the holes. In the case of using wooden racks, we pre-treat their buried parts and wrap them with roofing felt or tar them.
To make the metal supports more stable, we can first weld 3-4 horizontal strips of steel reinforcement, metal angle or pipes to their lower ends.
Let the concrete set. He needs at least 2-3 days for this. According to GOST, concrete gains strength on average within a month.
While the concrete dries, let's start making the frame.


Making a frame
It is advisable to make the frame from the same material as the supports. Most often, the racks and frame are made of metal products. We assemble the frame from profiled pipe.
To assemble the frame, we find a horizontal platform that can freely accommodate at least one sash.
The process is extremely simple: we need a rectangular frame from a pipe (profile) pre-cut into pieces of the required size. The angles must be strictly straight. We verify this using a square.


Having welded the frame, we strengthen it in the corners using steel angles. To give the frame additional rigidity, we divide it in height into 3 approximately equal parts and weld parallel horizontal jumpers along the marks. We also strengthen the junction points of the lintels with the frame using steel corners. We weld the gate hinges at the same points.

Helpful advice! There is another popular option for strengthening the frame. To do this, in the center of the frame towards its vertical sides there is a horizontal jumper, dividing the frame into 2 identical rectangles. After this, the corners of each of these rectangles are connected by diagonal jumpers. Choose any of the two hardening methods discussed, they are both good.
The frame for the gate is assembled in a similar way. If you want to make a gate directly in the gate leaf, assemble the frame in a slightly different order. To do this, weld transverse and longitudinal metal jumpers to the rectangular frame of the selected sash, thereby forming the frame of the gate. The average dimensions of the gate are 80x180 cm. If possible, stick to these values. We shift the places where the hinges are attached to the sash to the upper and lower edges of the frame.


Prices for popular models of welding machines
Welders
We adjust the sashes to the racks
First step. We install the gate leaves on stands, which can be made of timber, brick or other suitable material.
Second step. Align the sash along all planes.
Third step. Our frame already has hinge elements. We mark the places for installing the second part of the connecting element on the supports. We weld the hinges to the posts according to the marks.
Fourth step. We hang the sash. We remove the stands installed at the beginning of work.


We mount the frame of the second rack in the same way. To make the structure even more rigid, we can weld the two outer gate supports with the posts of our fence.
To increase the stability of the gate to wind loads, we can weld a horizontal strip of metal profile along the upper ends of the support posts. This is only relevant for situations where only passenger vehicles will pass through the gate.
We weld one part of the hinge to the stand, the second to the frame, and make cutouts in the corrugated sheet before fastening.


Finally, all we have to do is paint the parts of the frame that will remain visible after attaching the profiled sheets. We select the paint color so that it harmonizes well with the color of the corrugated sheet and the fence.


We fasten the corrugated sheet


The width of the profiled sheet is usually 110 cm. About 10 cm will be spent on the floors. Thus, to cover a two-meter wide door you need exactly 2 sheets of material. If desired, the gate can be sheathed on both sides.


We fasten the sheets using hex head screws and nuts or special rivets. It is better that the color of the fasteners and the base material be the same.
If necessary, pre-paint the fastening elements. We place bolts or rivets in the inner wave of the sheet (the one that fits tightly to the frame). We fix it in each wave of the profiled sheet. For greater convenience, we can pre-make holes in the frame to accommodate fasteners.
The gate is sheathed similarly to the doors. You just need to pre-cut the sheets to the size of the gate.


Useful notes
The fence is ready. To ensure that the work is completed to the highest possible quality, and the finished result pleases you, read a few useful notes and take them into account during the manufacturing process of the structure.
- The gates are installed in a single plane with the fence.
- Wickets and gates must be equipped with reliable locks and comfortable handles.
- Fences and gates should be harmonious in color both with each other and with the surrounding landscape.
The knowledge gained will help you make high-quality, reliable and beautiful gates from profiled sheets with your own hands. Follow the instructions and everything will definitely work out.

Prices for popular types of corrugated sheets
Corrugated sheet
Good luck!
Video - Do-it-yourself gates from corrugated sheets
Houses and cottages need gates to allow a car to enter even if it is not present. From time to time it is necessary to bring something into the yard: building materials, large household appliances and even manure; bringing all this through the gate is not entirely convenient.
With the current variety of goods and services, gates can be purchased, but not everyone can afford it. It will be more interesting to build the structure yourself.


Materials for production
Gates can be made from profiled flooring (metal profile), profile pipe, metal, wood.
To choose a material, you need to compare its advantages and disadvantages. Previously, such structures were made of sheet metal, but it is heavy, it must be painted and professional welders must be hired for installation. This increases the cost of such a product.

Only a professional welder can make a structure from a profile pipe, and if you want to hide the yard from prying eyes, you will have to cover the gaps between the pipes with something, using boards or other components.


Combined gates made of metal and wood or a wood polymer composite look good; structures with forged inserts look even more beautiful, but their cost increases.
Now there are modern materials: profiled flooring (metal profiles) and corrugated sheets, which are lightweight, relatively inexpensive, easy to use and durable (the manufacturer gives a 20-year guarantee). It has a variety of shades. Flooring differs from sheet metal in that it is more protected from corrosion, has greater noise reduction and is more durable.


When working with decking or sheeting, you do not need to buy additional tools or equipment. Making a gate yourself from profiled flooring is not difficult; such gates can also be decorated with various decors. Having chosen the material, you need to decide what design your future gate will have.
What types are there?
Structures are divided according to the opening method: swing, sliding, sliding, forged, lifting. They also come in different manufacturing methods and shapes, for example, you can find welded and arched gates. Gates can be built-in or free-standing.


Peculiarities
Swing gates are simple to manufacture and easy to maintain; even an inexperienced welder can make them from profiled decking, since there are only a small number of simple seams in the structure. This reduces the risk of breakage and increases the service life of the gate.
To do this, the products must be left with plenty of space to open and take into account possible wind loads. In winter, you will need to clear a large area of snow (unless, of course, there is a lot of snow in your climate zone). Unusual gate models are characterized by a variety of style and decor, but It’s easier to install automation, which can be purchased at a low price.
Sliding (cantilever) gates save space for opening, convenient for dense buildings. They have a complex structure, but there is no need to clear space for their opening. A counterweight and space along the fence to install the rails are required. The manufacture and maintenance of such structures is quite complicated; additional materials are required, which increase the overall cost.

Sliding gates similar to sliding doors, the only difference is the number of doors. Sliding ones have two boards, therefore the installation location should be on both sides of them. Therefore, the amount of material increases, but there is less space on one side of the fence.
Forged gates, undoubtedly, are stronger, have a beautiful appearance and add luxury and individuality to housing. But the price of such products is less affordable. You can buy and assemble ready-made parts by welding them yourself, but you need to be proficient with a welding machine: know how to prepare metal and be able to clean seams.
If you do not want the adjacent area to be visible, then you can fill the voids with profiled flooring or boards (don’t forget to treat them).


Lift gates, which are used at the entrance to the garage, are more expensive and more difficult to manufacture. But how nice it is to open the gate in bad weather without getting out of the car.


Arched gate can be made from the materials listed earlier (wood, metal, forging, brick, stone, profiled flooring), and their combinations. They also come in different configurations and opening methods, with the exception of lifting ones.


Advantages and disadvantages
The advantages of the products include:
- ease of manufacture;
- ease of maintenance and operation;
- ease of installation;
- the ability to make structures at any time of the year, including winter;
- low weight of the product, reducing pressure on the support;
- high technical performance;
- no need for painting;
- resistance to fading;
- resistance to frost, snow and other weather conditions;
- variety of shapes and colors;
- affordable price.
Due to these qualities, the gates retain their excellent appearance for a long time.


The products also have disadvantages. A thin sheet can be easily cut, deformed, scratched, which can lead to corrosion processes. There is no insulation, there is a large wind load.
Colors
They produce profiled flooring in various configurations, colors and shades: from white to brown. The choice of the desired tone depends only on your taste and the characteristics of the surrounding objects.
Design and style
The fence can be very diverse in color and shape; among the options you can find a design suitable for any site and buildings. This allows you to create various compositions using forged patterns and finishes, combinations with wood, brick, stone, and even mesh. The choice depends only on the imagination and desires of the owner.

How to do it yourself?
It is believed that the creation of swing gates can be carried out by a person who does not have professional skills. The installation location and type of gate must be planned, taking into account various features and nuances.
Dimensions depend on:
- car size (when measuring the width, do not forget about the mirrors + 1 meter);
- parameters and number of pillars;
- width of openings, frames and other structural elements.
Most often, the width of the gap in the goal exceeds 4.5 m, and in the wicket - 1.2 m. In height they are most often equal to the size of the sheet and depend on the height of the car. Do not forget to take into account the distance from below, it depends on the climatic zone of the given area (amount of solid deposits in winter), so that the gate opens freely, and ranges from 0.15 to 0.3 m. On top you can decorate the structure with decor.

It will be easier to calculate the correct amount of raw materials and evaluate the rigidity of parts if you prepare a schematic drawing and plan the work. The exact amount of material needed will depend on the size, which will prevent unnecessary costs.
Swing gates come with one or two leaves; here you need to make the correct calculation. The advantage of single-leaf structures is that they save raw materials, but when opened they take up more space, which is not always convenient, they have a large windage and warp. Therefore, the structure must be strongly strengthened.


For double-leaf models these problems are eliminated, but due to the increase in parts, such models are more expensive. One part of the gate can be made larger, and the smaller half can be used for a gate. Therefore, single-leaf options can be made with a small opening.
To build a structure correctly, you need to carefully study the diagram of its structure. Important things to consider:
- the width of the entire opening;
- the size of each door;
- number of racks;
- the size of the racks and the depth of their burial;
- product design and dimensions of all its elements;
- location and dimensions of the gate;
- location of the loops;
- configuration of locks and their installation location;
- location and details of reinforcement.

Gain options:
- welding corners to strengthen doors no more than one and a half meters;
- the frame is tacked at intervals of 0.2-0.3 m;
- in doors over one and a half meters, various lintels are installed.
Materials
Now, having a schematic drawing, you can move on to calculating the required raw materials. Should be considered:
- wall corrugated sheeting (it is wider);
- self-tapping screws (preferably roofing);
- metal pipes of different diameters for support pillars;


- blanks for the frame and its reinforcement;
- metal sheet, if you need to make scarves for reinforcement;
- loops;
- locks;
- shutters, clamps (you can do it yourself);
- metal paint (applied even to rust) of the desired color;
- tassels;
- decorative details;
- meter, level, plumb line, grinder for cutting pipes, drill, machine for manual arc welding, protective mask for welding, screwdriver, consumables, scissors for cutting metal, gloves.


Preparing the pillars
There should be a place for them that is equal in depth - 1/3 of the height of the rack. It is easier and more economical to do this with a garden drill; it should be twice the diameter of the posts. A mixture of crushed stone and sand with a depth of 0.15-0.3 m is poured into the hole.


The pillars, if necessary (depending on the material of manufacture) treated against corrosion damage, are installed strictly vertically using a plumb line and concreted. We close the top of the supports (in any possible way) to prevent precipitation from entering. Pillars covered with any facing material will look beautiful, right down to the tree.
Preparing the frame
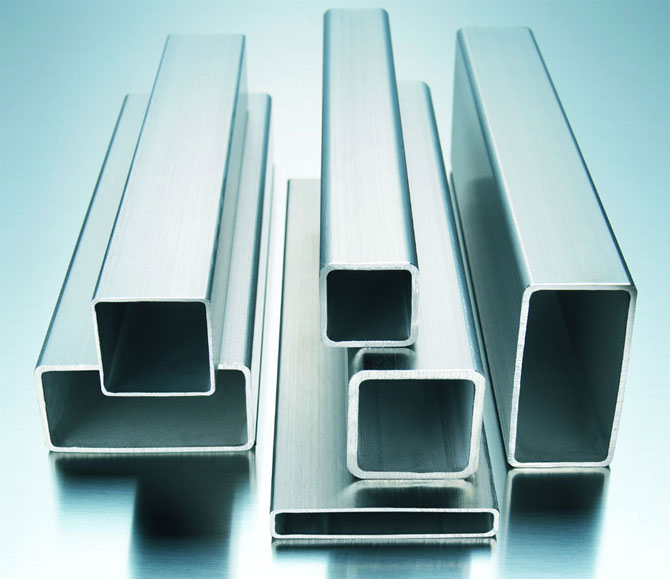
The frame is also made from a material available to you. Certainly, it is preferable to use a metal pipe with a cross-section of at least 60x40, but it is possible to use wooden material (don’t forget to process it), it all depends on your capabilities, imagination and preferences.
Manufacturing requires a fairly flat surface on which to lay the sash. We begin welding the parts, strengthening them with steel corners or crossbars for greater stability. We fasten the wooden frame with screws or bolts.


Manufacturing of sashes
We take measurements again to eliminate errors, and if necessary, we strengthen the workpieces in the way necessary for you. If the gate is inside, you need to make additional space for it. We thoroughly clean everything to avoid corrosion processes, fit the parts together, and only after accurate measurements cook them without gaps.
We very efficiently clean the places where welding occurred, degrease them, cover everything with a primer, and paint the welded seams. Instead of a primer, you can use paint applied directly to the rust. After drying the surface, we paint everything again.
The hinges are initially welded to the support post, then to the frame, retreating from the end of the frame by 0.2 m. The location of the hinges determines exactly how the doors open. If you attach them directly to the frame, the door opens to one side. And if you attach them closely to the support, they will open both outward and inward. Then, To prevent structures from dangling and damaging the fence, limiters are installed. For heavy ones, three loops are welded on each side, otherwise two are enough.

To attach profiled flooring to doors, it is safer to use roofing screws of the same color.
If the roof of your house is covered with metal decking, then a gate of the same color will look good. Sheets can be attached through one wave both to the frame itself and to the reinforcements. If one sheet per door is not enough, then the sheets must be attached to each other, overlapping one wave at a time. The doors can be closed, if desired, with a deck on both sides - from the street and from the yard.
Fastening and making fittings
Good quality store-bought latches and handles are expensive to install, and cheap alternatives usually don't last long. They can be made from the remaining pieces of fittings and pipes by welding; they will definitely work in different weather conditions.


We place the lock on the top with screws on the inside of the door, and fasten the two lower ones to the posts. We drill small holes in the ground and concrete pieces of pipes into them (the internal hole should be wider than that of the rod). If necessary, we also attach locks to the gate, but we also install a lock (it will be more convenient to install a mortise structure).
Gates and wickets are a necessary addition to their corrugated sheet fence. The gate provides access to the site for cars and special equipment, and the gate is intended for those who came on foot. Unlike a fence, the design of gates and gates turns out to be more complex, so a separate drawing is developed for them and a special calculation of materials is made.
We would like to offer you several ready-made drawings of gates and gates made of corrugated sheets, which you can adapt to your conditions. The height of the fence and gate must correspond to the height of the fence.
Main types of gates for country and country houses
- hinged - are two hinged doors that open inward or outward. They are simple and cheap to install, however, they can damage the car when entering, especially if there is strong wind. Also, a significant space needs to be cleared for them.
- sliding or sliding gates with a guide rail - the door moves on a roller mechanism along the fence line. The complex design and special expensive fittings make such gates not the most affordable. But they provide a higher level of comfort: an automated drive makes it possible to open them without leaving the car.
Drawings of swing gates and wickets
When drawing up a drawing, it is important to determine the width of the gate and wicket opening, the height, as well as the frame model. Do not forget that when designing a gate, you need to correctly distribute the load along the leaf, because it is attached to the side hinges and their weight rests entirely on the support posts. For this reason, gate posts are often made of thicker profile pipes or laid out of brick.
The metal thickness of the profile pipe must be at least 3-4 mm. Accordingly, the foundation under the gate supports must be quite reliable. Weak supports will lead to sagging of the sashes and deformation of the structure from wind loads and the gravity of the sashes. For the frame, you need to use a lighter profile pipe to prevent overload on the sashes, but a frame that is too thin will not withstand wind loads.
Pay attention to the choice of gate width. The optimal width is 4 meters; it allows both cars and trucks to easily enter even from a narrow street. Remember, the wider the sash, the greater the load it creates on the supports (in accordance with the law of leverage).
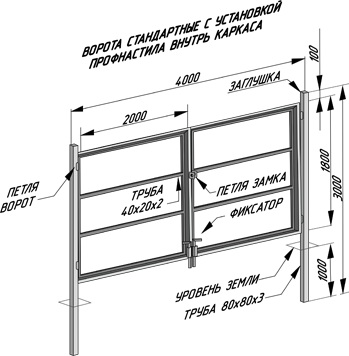
Schemes of gates and wickets made of corrugated sheets with a parallel frame
1. Before us is a “classic” and well-balanced drawing of a gate with a wicket. The height of 2 meters corresponds to the traditional height of a fence made of corrugated sheets. 60x60 posts should cope with a 40x20 pipe frame. The frame itself is not overloaded, is easy to calculate, and does not require a lot of materials. It has only one drawback - the lack of diagonal rigidity. It is compensated by the presence of two horizontal strips of a profile pipe, which form three sections 60-70 cm wide on the sash.

Another characteristic feature is the presence of a top crossbar. It provides a more balanced load distribution and prevents the pillars from moving towards each other; however, in order to successfully enter the site for tall vehicles, it must be removable.
2. Another version of the drawing. This time without the crossbar. Please note that the support posts have a larger diameter due to the absence of a crossbar.
3. Swing gates with a built-in wicket. This scheme is perfect for those who have limited space to enter/enter the territory. A width of 4 meters accommodates both a gate and a wicket. However, it is worth understanding that the presence of a gate increases the weight of the gate, which means the cross-section of the side post must be at least 10x10 cm and it is better to place the gate closer to the post (according to the law of leverage, it will put less load on the gate support).

Schemes of gates and wickets with diagonals
The presence of diagonal frame elements increases the rigidity of the structure and makes it resistant to various types of deformations, however, it should be remembered that additional lines are an additional load and it is important to choose the right pattern. So, instead of two horizontal slats, it is better to use one. Options for the location of diagonal strips are shown in the drawings below. The cross-section of support posts for a fence with diagonals must be at least 80x80.
1. Diagonals from the extreme corners to the middle or vice versa. Such schemes look quite nice. One looks like a snowflake, the other forms a diamond-shaped pattern.


Length of the hypotenuse: where A And b- sides of a right triangle.
2. Diagonals from one corner of the sash to the other. The scheme allows you to minimize the load on the sash and at the same time impart the necessary rigidity, however, welding such a diagonal is not very convenient.

3. Small diagonals at the corners of the sashes. It looks quite beautiful and creates a minimum load, but such doors have a high windage capacity, which means they can suffer from wind loads.

In the following video you will receive valuable tips on how to prevent support posts from bevelling under the weight of the sashes:
Drawings of sliding gates made of corrugated sheets
The most optimal option for a sliding fence, which you can build on your own, is a design with a guide rail. It is enough to simply select kits of fittings and automation systems. The gate includes a retractable leaf with a bottom rail that moves on a special roller system. In order for the structure to be balanced when closed, an additional triangular console is welded to the side of the frame.

As you can see, the gate frame consists of a frame and a console, which are made of a thicker profile pipe (60x40). It is also better to make the internal elements of the console from this pipe. Inside the gate frame, the frame design can be made in different versions (with rectangles or triangles. The main thing is that the pipe is a lighter pipe (for example, 40x20). Also, do not make the grille too thick. The installation procedure for a sliding fence is presented in the following video:
We hope that the following drawings will help you make your own gates and wickets from corrugated sheets that will be comfortable, reliable and durable.
Fences made of corrugated sheets are a practical and reliable structure that you can build with your own hands. To do this, you need to study the principle of constructing such a fence and stock up on the necessary tools and materials.
swing gates made of corrugated sheets with a wicket of non-standard configuration
DIY fence installation from corrugated sheets
Before you begin installing a fence made of corrugated sheets with your own hands, you should draw up a construction plan that will outline all the stages of constructing the fence.
Stages of fence construction:
- preparatory work (territory marking and necessary measurements);
- preparation of the trench and installation of the foundation;
- erection of a fence structure (laying posts, logs);
- installation of gates and fencing gates;
- covering the fence structure with corrugated sheets.
To obtain a better result, before starting installation work, it is recommended to make a constructive calculation of the future fence.

diagram of the structure of a gate made of corrugated sheets with brick pillars
How to properly organize gates made of corrugated sheets, photo
One of the important and rather complex stages of installing a fence made of corrugated sheets with your own hands is the organization of gates and wickets. This process requires a detailed approach and strict adherence to all requirements.
The organization of gates for the fence is as follows:
- In the process of designing a fence, you need to decide on the location and width of the gate;
- Decide in which direction the gate leaves will open (inward or outward);
- Determine the location for the gate. It is very convenient when gates made of corrugated sheets include a gate in its area (the so-called built-in structure).

drawing of a gate made of corrugated sheets with a wicket inside the section (horizontal guides are clearly visible)
The advantages of this design option (fence with a gate) are significant space savings. This option is applicable when the entry area is limited. As a rule, the width of such gates is 4 m.

design diagram of swing gates made of corrugated sheets with a wicket next to it
If the space of the entrance (entrance) area allows, the gate can be installed next to the gate. In this case, the width of the gate with a wicket can be 5 m.
Do-it-yourself installation instructions for gates made of corrugated sheets with a wicket
The option under consideration is a swing gate made of corrugated sheets with a wicket, which will be placed in one of the leaves.
Construction stages, photos and videos
We install support pillars on which the gate leaves will be attached. Based on the fact that these pillars will bear a large load, they must be secured as much as possible. To do this, the support posts must be tied to the main structure of the fence, which will eliminate unwanted distortions of the load-bearing supports.

Detailed sectional diagram of a gate made of corrugated sheets
Let's start assembling the frame and calculating the parameters of the sashes. In this case, we divide the total width of the opening into two equal parts. It is important to remember that the metal has its own thickness and this must be taken into account when taking dimensions.
When organizing the frame, you can use a profile pipe - it is practical to assemble, has low weight and a reasonable price.
Important. All horizontal guides in the two door sections must be placed at the same level. This will facilitate symmetrical fastening of the corrugated sheets to the frame.

diagram of the construction of a gate made of corrugated sheets with a wicket (the drawing shows the locations of the joists and hinges)
In one of the sections of the fence we make an opening for a gate. To do this, we make the necessary indentation to the side from the frame of the fence sash, from the side where it is attached to the support posts, and weld a vertical guide. In the future, this vertical guide will hold the gate structure.

detailed diagram of the structure of a gate for a fence made of corrugated sheets
Let's move on to making the gate. First, we assemble a rectangular frame of the given dimensions. It is very important to maintain accuracy here, down to millimeters. Therefore, it is better not to rush and once again double-check the parameters of the opening of the future gate. The guides on the door frame should be set at the same distance as the guides on the gate leaves.

layout of loops for a fence made of corrugated sheets with a wicket
We begin installing hinged hinges on the wicket and gate sections. To do this, we put the doorway in its place (in one of the sections) and install the hinges. To avoid distortions of the gate, the above action must be carried out on a flat plane.
Installation of hinges on support posts and on the frame of sections is carried out somewhat differently. First, we make markings on the pillars according to the height of the sashes. It must be remembered that the gate leaves should not touch the ground. Then from each mark we retreat 25 cm along the pillar towards each other and fasten the fitting (half the loop). Next, we make markings on each sash frame, taking into account the deduction of the inner half of the hinge.
You can simplify the installation of hinges and reduce the load on them by using a special mounting strip, which should be welded to the hinge. But you just need to do this in advance.

gates with a wicket are covered with corrugated sheets
We sheathe the gate leaves and wicket with corrugated sheets. This process is also recommended to be carried out on a flat plane. Using a grinder, we cut out an opening for the gate in the profiled sheet and fasten it with self-tapping screws to the metal frame of one of the gate sections. Next, we attach the corrugated sheets to the other leaf and install the gate with a wicket.
Price for installation and materials
The cost of manufacturing a gate from corrugated sheets with a wicket, as well as the price of the material, will depend on a number of indicators. For example: on the complexity of the design, on the type of corrugated sheeting (color, configuration), on the fittings (hinges, locks, rivets).

Options for profiled sheets in cross-section for a fence with a gate
To make a preliminary calculation of the cost of installing a gate made of corrugated sheets with a wicket, a small estimate will help you determine.

price for material and accessories for a fence made of corrugated sheets with a gate
Note that installing a gate made of corrugated sheets with a wicket yourself significantly saves money. After all, with this option, money will only be needed to purchase materials and tools (if they are not available).
Gates made from profiled pipes are affordable and easy to construct, which is why they are popular among homeowners. Moreover, they are easy to make yourself.
Profile pipe, as the main material for creating gates, is in demand, popular and often used due to the following advantages:
- low cost;
- high strength and low weight;
- ease of installation - the profile is pliable, it is easy to cut out parts, weld workpieces, connect with self-tapping screws.
But along with the advantages, there are also disadvantages:
- Weak resistance to corrosion. High environmental humidity and liquid penetrating into the structure gradually lead to the formation of rust.
- Applying primer and paint to the surface of pipes is inconvenient, which significantly delays installation time.
- With careless handling and installation errors, the frame is often deformed.
How to make a gate yourself
Before you start making gates, it is important to decide on the choice of material, make a drawing and the necessary calculations, prepare tools and materials, and only then proceed with installation, following the step-by-step instructions.

Preparatory work
For correct calculations, drafting, drawings and estimates for materials and installation work for the production and installation of gates, you should carefully consider all the nuances:
- Select a design and determine the need to install automation. The gate can be made one-piece, with several leaves, or sliding.
- Consider the sheathing and color tone of the frame.
- Take the necessary measurements. Not only the owner’s personal car, but also vehicles of various municipal, medical, and fire services must freely enter the yard. In addition, you need to take into account the area required for the gate to swing open.
- Develop a detailed drawing indicating the size and location of the gate, additional hinges, reinforcement elements, and connection of automatic devices.
- According to the completed sketch, the pipe footage and the required amount of lining are determined, and the material is purchased.