An additional 1C module and installation of exchange with Bitrix are necessary to expand the functionality of the program. This solution is used to automate business processes of manufacturing enterprises, trading platforms and online stores running on the Bitrix platform. Modules in 1C are metadata containing program code that describes procedures, variables, functions, and main sections of the program.
Add-ons should be configured in accordance with the developer's instructions. 1C presents a large number of modules responsible for describing algorithms, processing events and data entered by the user, various functions, connection parameters, initializing sessions, and applications. They can be installed on both the server and client side.
The following types of modules are distinguished:
facilities manager.
for applications;
for external connection;
session parameters;
Each of them has a different functional purpose.
Form modules are responsible for processing input data, creating machine-readable forms, and setting print parameters.
Installing modules in 1C
To configure the module in 1C: Enterprise 7.7 and 8, follow 11 steps:
1. Download components to your computer in accordance with the software version.
2. Open “Configurator” in 1C.
3. Create an archive database.
4. Open the configuration.
5. From the Configuration menu, select the merge mode.
6. Select the XXX.cf file.
7. Install and include Bitrix in the association.
8. Compare and merge.
10. Specify the 1C boot parameters in the “Service” menu.
Setby specialists have extensive experience in setting up software solutions for enterprise automation and will help you choose software that meets the needs of your business. If you are unable to register the module, our programmers will help you resolve any issue in setting up configurations.
The post inspired me to write a more detailed note about exchanging Bitrix with 1C. At first glance, it seems that this is a very complicated process, but with many years of experience you understand that it is not just difficult: it is also completely g (cough, cough). I will try to describe this process in words. Welcome to hell description of exchange with 1C.
The initiator of any exchange is 1C, the site does not load anything into 1C, the site only receives requests and returns the result. By default, 1C accesses the script /bitrix/admin/1c_exchange.php. This path is indicated in the exchange settings in 1C itself. Out of the box, this file includes the file /bitrix/modules/sale/admin/1c_exchange.php. If you open the file, you will see the connection of several components depending on $_GET["type"]. In general, two of them are of interest:
bitrix:sale.export.1c- export of orders.
bitrix:catalog.import.1c-catalog import.
Export of orders to 1C
After receiving the session ID goes initialization exchange, URL: /bitrix/admin/1c_exchange.php?type=sale&mode=init&sessid=ID_Session. At this stage, the site gives the exchange settings from the site.
For getting a list of orders URL /bitrix/admin/1c_exchange.php?type=sale&mode=query&sessid=Session_ID is requested. Orders with the fields EXTERNAL_ORDER = "N", UPDATED_1C = "N" and updated after the last successful upload in 1C are uploaded (this is checked by time from the property "last_export_time_committed_/bitrix/admin/1c_excha" of the sale module).
The EXTERNAL_ORDER flag indicates that the order was created in 1C and its uploading to 1C is not required.
The UPDATED_1C flag after successful import from 1C on the site is set to “Y” and such orders do not participate in further exports until they are updated on the site. During order updates on the website, UPDATED_1C is set to "N".
After processing orders 1C for completion of the exchange requests the URL /bitrix/admin/1c_exchange.php?type=sale&mode=success&sessid=Session_ID. In this case, the time of requesting the list of orders is recorded in the property "last_export_time_committed_/bitrix/admin/1c_excha" of the sale module (NOT the current time, since from the moment the orders were requested until they were processed, orders could have been added and they will be included in the next upload from the site).
Modification
The file /bitrix/admin/1c_exchange.php, the bitrix:sale.export.1c component and the CSaleExport class are involved in exporting orders. There are no events here, so to modify this process you need to replace the component with your own, create a class that inherits from CSaleExport and replace the calls in the component with it. In the latest versions of Bitrix, this class has become relatively readable; in the old ones there was just a sheet of php and “xml”.
Since version 15.5, additional checking has been added and if you simply call /bitrix/admin/1c_exchange.php?type=sale&mode=query , you will get the error "failure Error checking the request source. Update the exchange module." If you don’t want to mess around with sessid, you can disable checking the request source by running:
// old school: COption::SetOptionString("sale", "secure_1c_exchange", "N"); // d7 style: \Bitrix\Main\Config\Option::set("sale", "secure_1c_exchange", "N");
Import of goods from 1C
Next comes initialization of exchange, URL /bitrix/admin/1c_exchange.php?type=catalog&mode=init&sessid=ID_Session. At this stage, the exchange data array $_SESSION["BX_CML2_IMPORT"] is initialized in the session and the site provides exchange parameters: the ability to use zip, file size limit, etc. Also at this stage the folder for upload files is cleared. Most likely, this will be the /upload/1c_catalog/ folder. For debugging, you can enable saving of old exchange files, then during a new exchange, the old data will be moved to separate folders: 1c_catalog0, 1c_catalog1, etc. To save data, you need to declare a constant in dbconn.php:
// Don't forget to remove this line after debugging to avoid server overflow define("BX_CATALOG_IMPORT_1C_PRESERVE", true);
After this 1C starts data preparation and then sends them with a POST request to the site in parts, URL: /bitrix/admin/1c_exchange.php?type=catalog&mode=file&filename=FILE_NAME.zip&sessid=Session_ID. The request continues until the files are completely transferred.
1C transmits xml files with product and offer data, as well as pictures, to the website. If the site allows the use of zip, then 1C transfers all files in one archive. Then the next step starts with unpacking it.
Can participate in unloading xml files:
- import.xml - products, sections, price types, warehouses, product properties and units of measurement;
- offers.xml - trade offers of goods and their properties;
- prices.xml - prices of trade offers (in new versions);
- rests.xml - rests of trade offers (in new versions);
- references.xml - user references (highload infoblocks, in new versions).
Pictures are uploaded to the import_files folder.
Then begin import steps, URL: /bitrix/admin/1c_exchange.php?type=catalog&mode=import&filename=UPLOAD_FILE_NAME.xml , where UPLOAD_FILE_NAME - import.xml, offers.xml, etc. File processing ends when the site returns the word "success". The CIBlockXMLFile (/bitrix/modules/iblock/classes/mysql/cml2.php) and CIBlockCMLImport (/bitrix/modules/iblock/classes/general/cml2.php) classes are responsible for processing the upload file.
File processing consists of several steps (information will be added):
- Temporary table indexing;
- Import metadata;
- Import sections;
- Deactivate partitions and recalculate left and right boundaries for partitions;
- Import elements;
- Deactivating elements;
- success.
Clear temporary table (table b_xml_tree);
CIBlockXMLFile::DropTemporaryTables() method. Normal drop of the b_xml_tree table.
Creating a temporary table;
CIBlockXMLFile::CreateTemporaryTables() method. Here the b_xml_tree table is created. By the way, you can set the storage engine of this table, as well as all those created by Bitrix, by defining the MYSQL_TABLE_TYPE constant.
Reading a file into a temporary table;
CIBlockXMLFile::ReadXMLToDatabase() method.
Some steps can be performed in several requests, in portions of several seconds (this time is configured by the “Interval of one step in seconds” parameters in the 1C integration settings in the Bitrix admin panel).
Modification
At step 10, i.e. upon completion of processing of the upload file (NB: one file, for example, products or offers), the OnSuccessCatalogImport1C event of the catalog module is called. The handler arguments are the parameters of the exchange component and the path to the upload file.
You can also use regular events to change the exchange process, for example, OnBeforeIBlockElementUpdate or OnBeforeProductAdd. In the handler, to determine that the event was triggered during an exchange with 1C, I use the following crutch condition:
If (isset($_GET["type"], $_GET["mode"]) && $_GET["type"] === "catalog" && $_GET["mode"] === "import") ( // ... )
Well, if nothing can be solved by events, you can always completely change the exchange process by copying and changing the /bitrix/admin/1c_exchange.php file, the bitrix:catalog.import.1c component and the CIBlockCMLImport class.
Disabling request source checking
As in the case of unloading goods, when importing goods there is a check of the source of the request. You can disable it with the following code:
// old school: COption::SetOptionString("catalog", "DEFAULT_SKIP_SOURCE_CHECK", "Y"); // d7 style: \Bitrix\Main\Config\Option::set("catalog", "DEFAULT_SKIP_SOURCE_CHECK", "Y");
The article will be updated as new information and inspiration becomes available.
Unpack the module distribution package and run setup.exe.
Launch 1C: Salary and HR Management (1C-ZUP) in Configurator mode. Please note that installation of the module is only possible for configuration versions no lower than 2.5.9.2. Follow the detailed step-by-step instructions included in the installation kit.
As a result, the menu Service(in the full interface) the corresponding items should appear.

If the configuration version is lower than the required one, or if any problems arise during installation, consult with 1C specialists.
Integration setup
Setting up exchange with the corporate portal
Open 1C: Salary and personnel management. On the menu Service - Data exchange with the corporate portal select item Set up data exchange with the corporate portal.
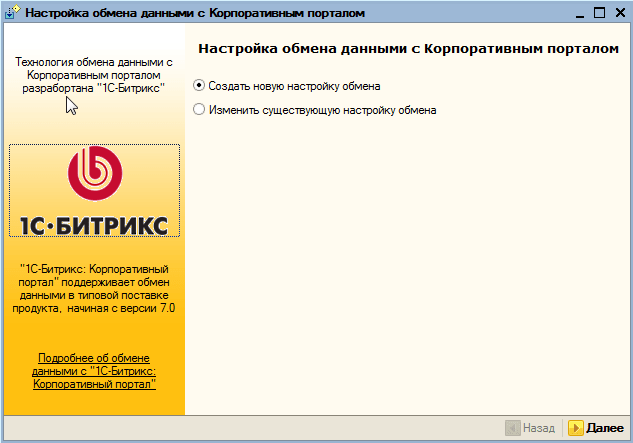
Select Create a new exchange setting. The interface for the initial setup of exchange with the corporate portal will open.

- Select Uploading to the site, so that the data is sent directly to the corporate portal, without creating intermediate upload files.
- Use Uploading to the catalog only in case of any problems: lack of Internet connection, transmission errors, etc. In this case, in the administrative part of "1C-Bitrix: Corporate Portal" you will need to import the data generated in this way.
- In the Site Address field, enter the full URL at which the corporate portal is accessible, including http:// and the port number, if it differs from 80, as well as the path to the PHP script that receives data and processes it. By default this is /bitrix/admin/1c_intranet.php.
- In the User and Password fields, enter the authorization information for an account on the corporate portal that has the rights to receive data from 1C. To set up such an account in the administrative part of the portal, go to the section Settings - Users - Import users and select the option Import from 1C: Salary and personnel management.
- If access via HTTP to the corporate portal from 1C is possible only through a proxy server, check the option Use a proxy server and specify its parameters.
Click the Test button to ensure that the connection to the corporate portal is established successfully.
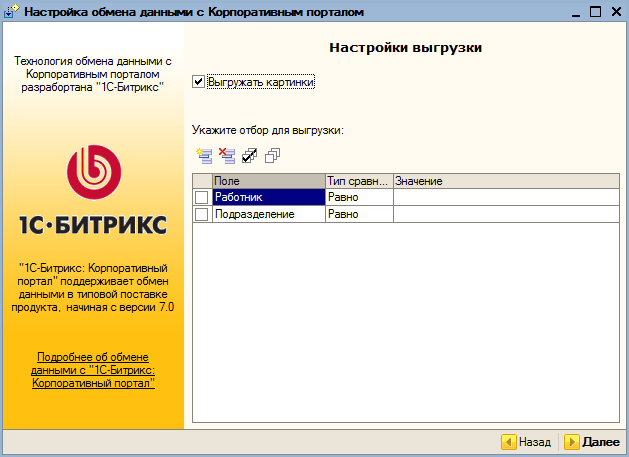
In the next step, you can detail the data that will be transferred to the corporate portal. If you want all standard data to be downloaded in full, leave the default settings.
Otherwise, in the field Specify selection for unloading mark and (or) add objects and selection criteria necessary to solve the problem.
The Upload pictures option means that photographs of employees will be uploaded to the corporate portal if they were specified in 1C.
Be careful! It is at this step that the maximum number of mistakes are made by inexperienced users, as a result of which the exchange does not work or does not work correctly.

Specify the data exchange mode. We recommend using the option Upload only changed data, since in this case, at each next exchange session, only new and updated information from the moment of the previous exchange session will be uploaded. This speeds up the exchange and reduces the load on 1C and corporate.
All changes to objects are registered in the appropriate Data exchange node, which must be indicated in the field of the same name.
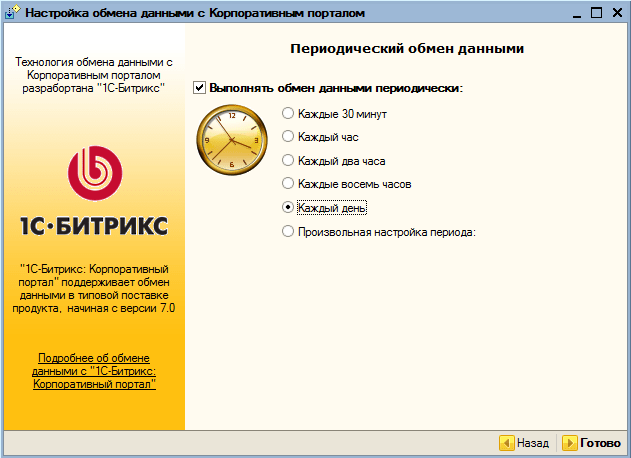
You can completely automate the exchange process if you specify Exchange data periodically. and specify the required exchange schedule, which can be configured in great detail.
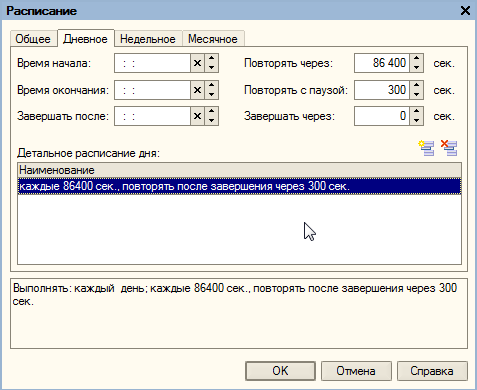
Thus, 1C will independently establish a connection to the site and transfer data at the specified intervals.
Click the button Ready, exchange setup is complete.

Our settings were saved in a separate profile. You can create many different profiles with different settings. This allows you to implement exchanges with maximum flexibility and solve the most complex integration problems.
The exchange can be performed manually, using the Execute exchange button, or wait until the procedure starts automatically.
All statistics on the exchange results can be viewed in the Data Exchange Monitor, where all successful and unsuccessful attempts will be visualized, including a lot of reference information.
It’s probably been 2 months now that I’ve been making integrations for new clients with 1C-Bitrix and 1C Enterprise on the new version of exchange modules. I would like to note right away that the new version of the exchange is awesome, heaven and earth compared to what was before. But there are small sharp pebbles, you need to walk over them, scraping your heels, before plunging into this sea of pleasure.
My main problem with the new integration module was that I was too lazy to switch to it - during the existence of the old exchange module, we seriously developed it for our clients, added functionality on the 1C side, moved everything to external processing, and added it to the Bitrix side their module and rested on their laurels. When a new client came, I would simply find a similar case, and we would refine some inevitably existing features, being sure that everything would go as it should.
When Bitrixoids released a new module, I looked closely at it for some time, but did not want to implement it - I was afraid.
And then in the summer something terrible happened - at some point my smart employees finished all their projects and sat idle for 3 days. Of course, I found something for them - they updated our modules in the market, but the fear of a repetition of this apocalypse remained. At that moment, I came up with the promotion “integration as a gift” for purchasing a license for Bitrix Business from me or for concluding a technical support agreement with me for a year. I published the promotion in the affiliate promotions section on the Bitrix website, and it took off - I can still hear the echo.
The funny thing was that during the promotion period only 2 clients took advantage of it, but then for a long time clients came to me and said that they saw the promotion and, although they did not have time to take advantage of it, they decided to contact me anyway. As a result, in July and August, about 10 integrations fell on our shoulders. Most of the cases were typical and boring, but there were also some interesting, complex problems.
I was faced with a difficult choice - to integrate new complex clients in my old way or to implement a new exchange module for them. By the way, the new exchange module covers 80% of those tasks that we previously provided to clients as non-standard. I looked at it and at our processing and thought that developing my module on the 1c side, trying to keep up with Bitrixoids, would not be profitable. In addition, I entered into a mutually beneficial partnership with a company that provides 1C Enterprise as an “application rental” and I wanted to simplify our interaction and configure 1C clients as much as possible.
The same factor forced me to understand the 1C UT configuration code more deeply, and, as usual, I rethought everything at a new level. (By the way, I now have a completely separate person on my team who deals exclusively with the initial settings of 1C UT for various features of accounting and document flow).
So I started implementing a new exchange module, installing 1C Enterprise 8.3.5, 1C UT 11.1.6 for clients, downloading the latest version of the Bitrix add-on to 1C UT, and taking the new one at the time of the start of Bitrix work. By the way, the Bitrix version was one of the stones. I'll start with him.
1) Correspondence of exchange versions on the 1C Bitrix side and on the 1C Enterprise side
I don’t remember the specific dates when this happened, but during the transition period of the release of new exchange modules on the Bitrix side and on the 1C Enterprise side, some clients and I had a situation where Bitrix was updated to the latest version, but the 1C side was not updated, and due to a change in the exchange protocol, this exchange did not go through. I remember my panic, I even rushed to copy the old exchange module on the Bitrix side into my namespace and use it, but Bitrixoids, fortunately, provided a solution for this case. On the Bitrix side you need to enter the following commands:
Settings -> Tools -> PHP command line
COption::SetOptionString("catalog", "DEFAULT_SKIP_SOURCE_CHECK", "Y" ;
COption::SetOptionString("sale", "secure_1c_exchange", "N" ;
And support for the old version of the protocol will be enabled.
2) Export to 1C a large volume of goods
On one of the projects, I needed to download about 40,000 item items with pictures from the website into 1C. The “Import Assistant” processing took a terribly long time to complete this operation - more than a day, which was unacceptable for me, and I rewrote some places in it - I took queries to the database out of the loop. I wrote a separate post about this. Bitrixoids promised to optimize processing in updates.
3) Reverse import and group tree
On the project of the same client, when we began to do integration in the opposite direction, we had a very specific situation.
Initially, the catalog structure was created on the site - not on the Bitrix site, but on another old customer site on OpenCart. Uploaded the catalog to Bitrix. (using, by the way, our import module from yml and the export module to yml from opencart, which I wrote on the basis of one of the free ones and now give to those who buy my import module from yml to Bitrix and want to pick up goods from the store on OpenCart )
We uploaded the catalog to 1C - everything worked out just fine - the product groups were assigned a code that corresponded to the external code of the XML_ID sections on the Bitrix side. We agreed with the customer that we would then fill the catalog and edit its structure on the 1C side. We performed a reverse import of the catalog to make sure that everything was ok, set up the exchange of prices and balances, and tested it. Then the customer said that the directory structure on the website and in 1C would be different. In the new exchange module, you can customize the group tree - and this task is no longer a problem at all. However, an interesting fact emerged - this is more of a feature than a bug, but it really confused me at first. When I set up a group tree on the 1C side, I thought that after the exchange they - the groups that had already been imported to the site before setting up the tree - would take it and rebuild themselves in accordance with this tree. However, new groups with new XML_IDs began to be created. And this had to be taken into account.
4) Minor troubles on the 1C side
Three clients had 1C UT implemented from scratch (+ integrated with Bitrix, of course). The cases were identical and were actually done in parallel. I did it for one client, tested it and got my assistant to do everything exactly the same on 2 other projects. I’m starting to test - standard reports do not work on 2 other projects. An error occurs
Indexed fields must be present in the selection list
<>Segments.Nomenclature
I begin to boil internally and go over in my mind all the swear words I know. I remain silent out loud and check. Everything seems to be the same. The difference turned out to be in the platform versions. Where everything worked ok, the version was 8.3.5.1068, and where the error occurred, the platform version was 8.3.5.1119, the configuration was the same 1C UT 11.1.6.26 The problem was solved by turning on the compatibility mode with version 8.3.4 A at When installing the add-on, I usually turned it off completely - but apparently I should have installed 8.3.4 Although on lower versions of the platform - in particular on 8.3.5.1068 everything was ok with the compatibility mode disabled, and I already thought that I would eat someone.
5) Compliance of delivery services and counterparties - cargo carriers
We solved this problem well and conveniently using the old module, but the old solution did not fit the new module at all. Using the new module, I solved the problem with minimal modification of the order exchange module, namely the “CreateUpdateOrder” procedure.
I added where the order properties were filled in, perhaps not very optimally
Delivery Method = GetDocumentAttributeValue(XMLDocument.AttributeValues, "Delivery Method");
DeliveryAddress = GetDocumentAttributeValue(XMLDocument.AttributeValues, "DeliveryAddress");
//We get delivery correspondence from our additional settings:
ObjectKey = "Bedrosova";
SettingsKey = "BedrosovSiteExchange";
//UserName = UserName();EndAttempt;
UserName = "SHARE";
StructureSettings = New Structure();
Attempt
Settings Structure = GeneralSettings Storage.Load(ObjectKey,SettingsKey,UserName);
Exception
Report("You do not have permission to read additional exchange settings.");
If SettingStructure = Undefined Then
Report("Failed to read additional exchange settings!");
Otherwise
FoundString = SettingsStructure.MatchingDeliveryMethods.Find(DeliveryMethod, "OnSite");
If NOT FoundString = Undefined Then
Order.DeliveryMethod = FoundString.OnServer;
Order.CarrierPartner = FoundString.Counterparty;
endIf;
endIf;
And I left the additional settings in external processing - just as I described before.
6) Correct transfer of currency in orders
While exchanging orders for one of my clients, I encountered the following problem: The exchange itself went fine, but then the order that came from the site could not change its status - it gave an error
"The Currency field value cannot be empty"
In the standard sales agreements used in the exchange, the currency was specified as RUB.
On the site, it seems, the same currency was indicated in the currency settings.

But in orders that came from the site, the currency was not filled in.
It turned out that it was necessary to specify the currency in the integration settings on the site side:

Unfortunately, it was not possible to test this on multi-currency stores.
7) Selection of items according to product properties
One of the clients had 1C UT 10.3.29.1 installed, and installed the corresponding exchange module on it. When uploading items from 1C to the site, it was necessary to ensure that only those products were uploaded for which a certain custom property was equal to a certain value. At first I thought that selection settings could be used for this purpose.

It turned out not.
This selection is not for the selection of goods, but a general selection of properties. Those. Only those properties that are in this selection will be unloaded (regardless of additional property settings).
But in 1C UT 10.3 in the module of the exchange plan object manager "B_ExchangeSSite" there is a procedure " CustomizeBuilderProducts". In it, I corrected the package of requests related to the selection of goods in order to solve my problem.
9) Pictures of sales offers
An incredibly interesting case - I’ll leave it as a snack - I’ll write next time how I implemented it in a new way on a new module for clothing stores, where records are kept by characteristics - color and size.
The data exchange module is designed to integrate the First Form system with various solutions based on the 1C:Enterprise platform 8.2 and higher.
A flexible universal solution automates end-to-end business processes, when one part of personnel actions (timing control, verification, approval) is carried out and controlled by First Form tools, and the other is performed in the 1C environment (payment posting, accounting, planning).
The module allows you to automatically exchange data between systems, for example, transfer directories, create contracts, and automatically update them when data changes in one of the systems. Any 1C element can be synchronized with First Form. Both integrated systems fully retain their basic functionality.
The solution allows you to significantly optimize work, avoid double entry and duplication of information. At the same time, the transition of a business process across the system boundary is as transparent as possible for the user.
List of counterparties in 1C.

List of counterparties in the “First Form”.

Counterparty in 1C.

Counterparty in the “First Form”.
Examples of solutions
- Transfer of directories, such as Nomenclature or Counterparties from 1C to the “First Form” with subsequent automatic updating of these elements in the “First Form” when changed in 1C;
- Automatic creation of a contract in 1C after approval in the “First Form” with all its parameters;
- Setting a task for the responsible manager upon the fact of shipment of goods recorded in 1C to provide the accounting department with original invoices;
- Transfer of personnel documents such as orders, vacation requests, non-salary payments to 1C after approval in the “First Form”.
Possibilities
- Data migration. Transfer of data (directories, documents, fields, etc.) between systems with subsequent synchronization;
- End-to-end business processes. Transfer of business process management between two systems;
- Integration of personnel information. Transfer of user data (credentials, organizational structure);
- Interface integration. Moving between systems in one click.
Benefits
- The business process can be initiated in any system without additional reconfiguration;
- Allows connection to any (standard and non-standard) 1C configurations;
- Does not require modification of 1C (including removal of standard 1C configurations from support);
- Configurable without programming.
Ensures smooth transfer of information, without interruptions in business processes;
Information
- The module is a separate subsystem of the First Form software product. Licensed separately: the license is purchased once per organization;
- Further configuration and support of the module can be done by the client independently.
When installing the module, the client is provided with free one-time initial setup services. Additionally, consultant services can be provided to customize the data exchange scenario in accordance with business processes;
Technical features
- Data exchange is implemented based on web services;
- The module can be connected to any (not necessarily standard) configuration of 1C:Enterprise 8.2 and higher;
- All configuration of data exchange scenarios is performed entirely from the First Form administrator interface and can be performed by the company’s IT specialist. Using 1C Configurator is not required.